
Device development based on TCP protocol
This document guides you through the process of developing a device that communicates via the TCP protocol. It covers the necessary steps: modifying the configuration file to set up the TCP connection, importing and running the script on the QuecPython module, and debugging the data transmission. Follow the sections below to implement a TCP-based data transparent transmission solution.
Modify configuration file
After obtaining the code from the "Experimental Source Code" section in the Development Resource Summary, you can modify the project configuration file dtu_config.json under the code directory as needed.
Based on TCP private server data transparent transmission, configure as follows:
The default
systemconfig.cloudconfiguration item is defined asTCP, which means TCP transparent mode. The system will automatically read thesocket_private_cloud_configconfiguration item.{ "system_config": { "cloud": "tcp" # Default Configuration for TCP Passthrough Mode } }This experiment adopts TCP transparent transmission mode, and users need to set the TCP server domain name (domain) and port (port) in the
socket_pivate_cloud_configconfiguration item according to the actual situation.{ "socket_private_cloud_config": { "domain": "112.31.84.164", # Server Domain Name/IP Address "port": 8305, # Port Number "timeout": 5, # Timeout Time (unit: seconds) "keep_alive": 5 # Heartbeat Cycle (unit: seconds) } }The
uart_configconfiguration item is a serial port configuration parameter, which defaults to the configuration made based on the current experimental development board and cannot be changed. If users use other development boards, they need to configure according to the actual hardware.
{
    "uart_config": {
        "port": 2,  # Serial port. Choose according to the actual hardware configuration. This setting cannot be changed for the current experiment.
        "baudrate": 115200,  # Bit Rate
        "bytesize": 8,  # Data Bit
        "parity": 0,  # Parity Check
        "stopbits": 1,  # Stop Bit
        "flowctl": 0,  # Flow Control
        "rs485_config": {  # RS485 Configuration
        	"gpio_num": 28,  # 485 Control Footage, Current Experiment Cannot Be Modified
            "direction": 0  # Pin level change control. 1 indicates that the pin level change is: the pin is pulled high before serial data transmission and then pulled low after the data transmission. 0 indicates that the pin level change is: the pin is pulled low before serial data transmission and then pulled high after the data transmission.
        }
    }
}
network_configis used to configure the APN. If the APN is not configured or an incorrect APN is configured, the base station of the operator will automatically correct the situation during the network connection process and send a correct APN to the terminal. Overseas users need to configure this item. At this time, the terminal will choose to accept and use this APN to continue the network connection."network_config": { "apn": "", # Access Point Name, for example "cmnet" or "ctnet" "username": "", # APN username, usually not required "password": "", # APN password "auth_type": 0 # Authentication type: 0 - no authentication, 1 - PAP, 2 - CHAP }
The complete configuration file template is as follows:
{
    "system_config": {
        "cloud": "tcp"
    },
    "mqtt_private_cloud_config": {
        "server": "mq.tongxinmao.com",
        "port": 18830,
        "client_id": "txm_1682300809",
        "user": "",
        "password": "",
        "clean_session": true,
        "qos": 0,
        "keepalive": 60,
        "subscribe": {"down": "/public/TEST/down"},
        "publish": {"up":  "/public/TEST/up"}
    },
    "socket_private_cloud_config": {
        "domain": "112.31.84.164",
        "port": 8305,
        "timeout": 5,
        "keep_alive": 5
    },
    "uart_config": {
        "port": 2,
        "baudrate": 115200,
        "bytesize": 8,
        "parity": 0,
        "stopbits": 1,
        "flowctl": 0,
        "rs485_config": {
        	"gpio_num": 28,
            "direction": 0
        }
    },
    "network_config": {
        "apn": "",
        "username": "",
        "password": "",
        "auth_type": 0
    }
}
Parameter description:
systemconfig. config: Specify the type of private cloud currently in use. Currently supports TCP and MQTT.mqtt_private_cloud_config: MQTT private cloud configuration.socket_private_cloud_config: TCP private cloud configuration.uart_config: Serial port parameter configuration.network_config: APN configuration. It can be configured if necessary.
Script import and run
After downloading and installing the QPYCom tool, use the tool to download the script to the QuecPython module.
💡 Tips
QPYCom Installation and Usage Tutorial: https://developer.quectel.com/doc/quecpython/Application_guide/en/dev-tools/QPYcom/index.html
- After installing QPYcom, we select the serial port and open the Quectel USB REPL Port.
- Go to the download interface, follow the first step in the figure to create your own project.
- Right-click on "usr" and select "One-click Import", then choose the "code" directory under solution-HuaDTU that was cloned via git.
- Click on the fourth step in the figure, switch back from downloading the firmware to downloading the script, and click on the script.
- The sixth step in the figure opens the serial port.
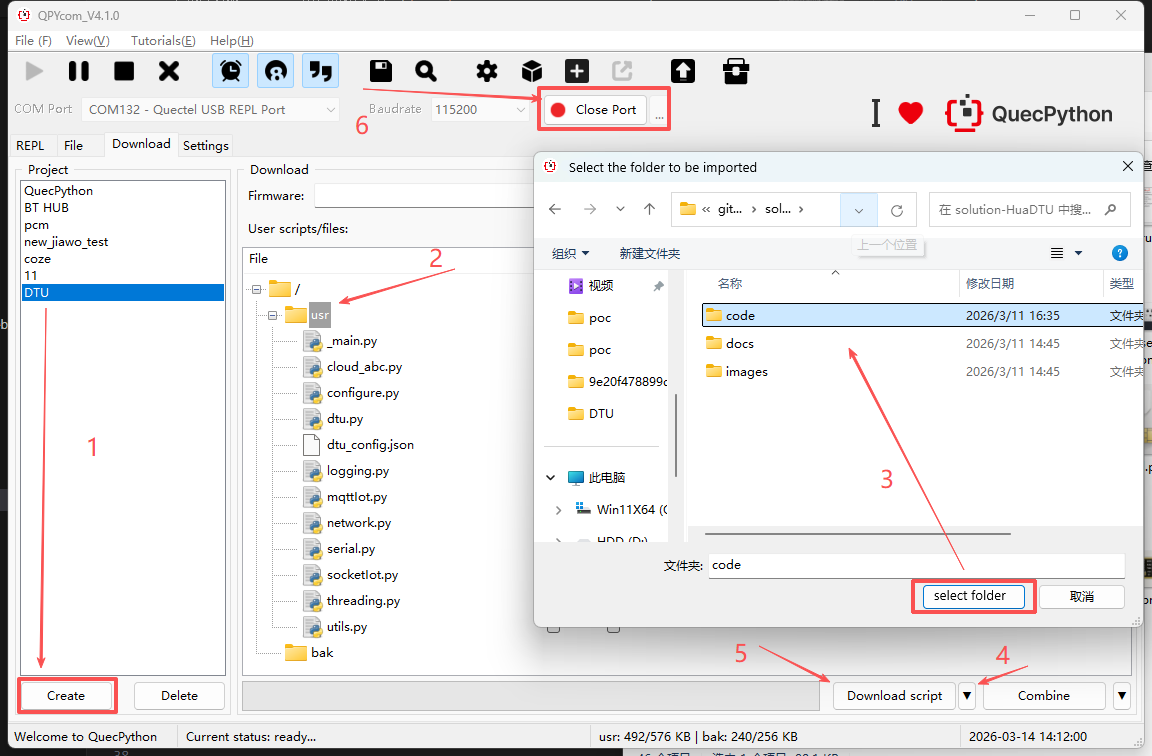
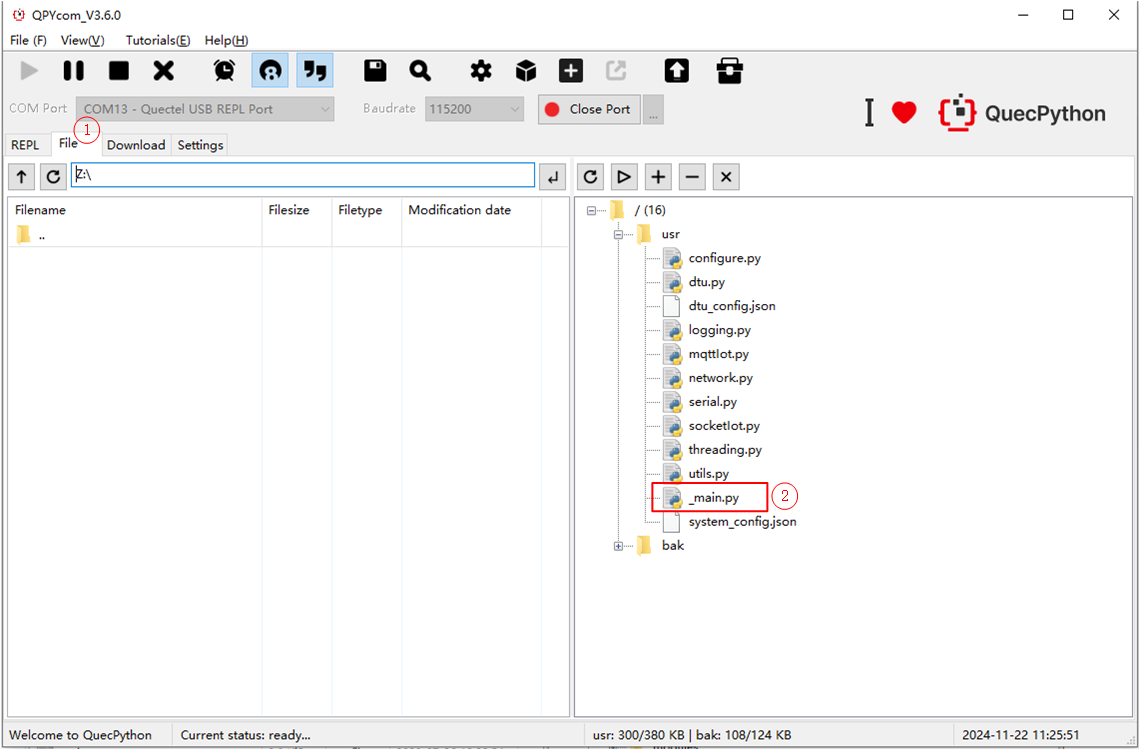
- After the download is complete, switch to the file interface and select _main.py for running.
Debugging
After the program runs, the log output can be seen on the REPL interaction page as shown in the following figure.
In the diagram on the left, we use QCOM to simulate MCU opening the module serial port for transparent transmission (i.e. the COM port corresponding to the USB to TTL module).
The diagram on the right shows the module log output from the REPL interaction port.
Use the serial port tool QCOM to simulate MCU serial port upstream data, transmit it transparently to the TCP echo server through DTU, and then the echo server transmits the same data transparently downstream to QCOM through DTU.
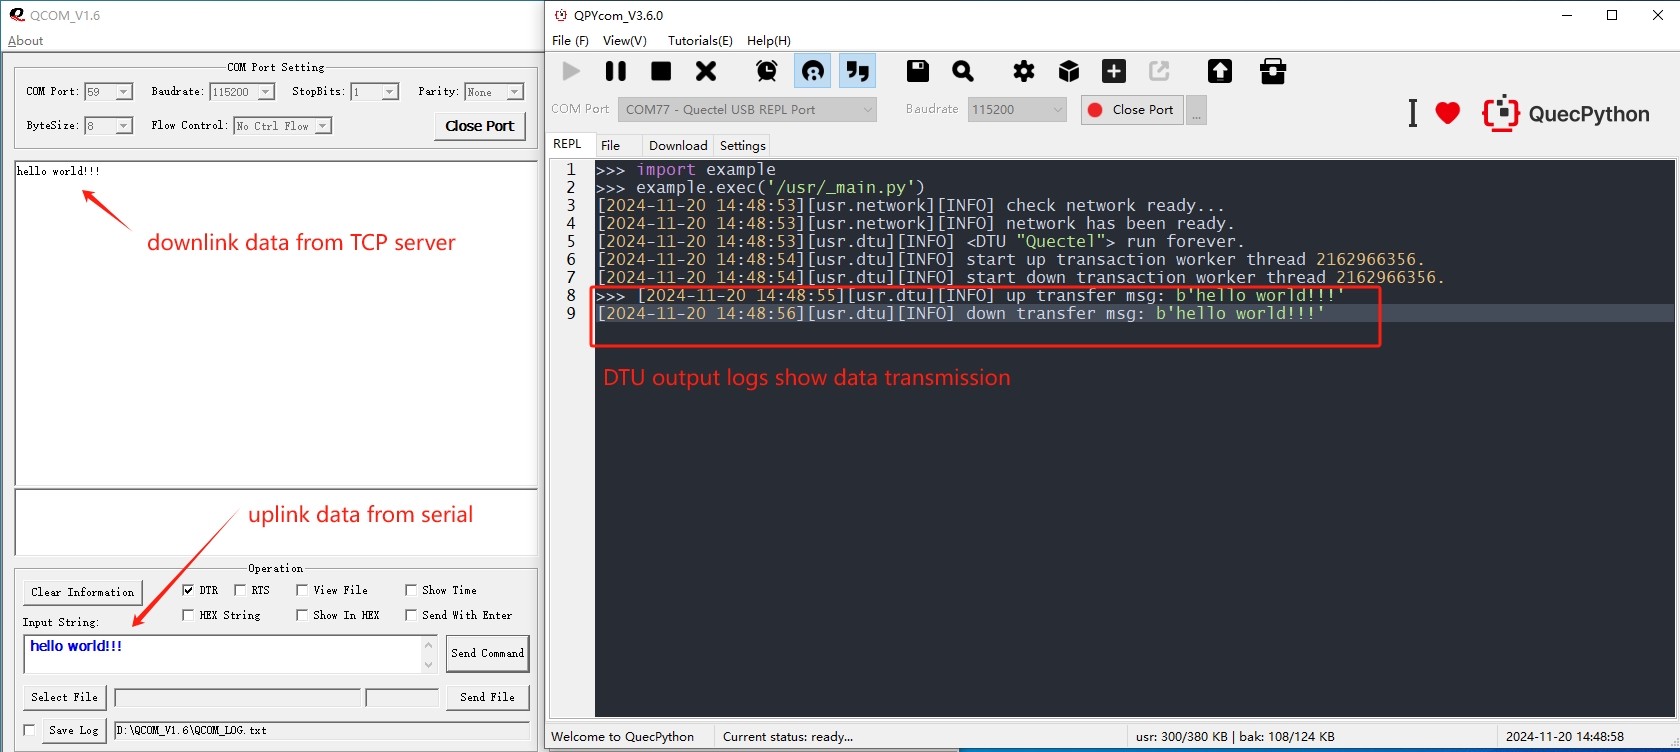
In this case, a TCP echo server is used, so QCOM upstream data will be transmitted through DTU to the TCP server and immediately downstream along the original path upon receipt.