
People Counting Device
This project is a lightweight people counting solution developed based on the Quectel Pi H1 Smart Single-Board Computer, integrating technologies such as object detection, object tracking, and pedestrian re-identification (ReID). It offers the following core features:
- Real-time Human Detection: Real-time identification of human targets in video streams
- Stable Object Tracking: High-precision target tracking using the ByteTrack algorithm
- Intelligent Deduplication Statistics: Personnel identity deduplication based on ReID features
- Multi-source Video Support: Compatible with USB cameras, IP cameras, and local video files
- Multi-dimensional Statistics: Provides real-time count, cumulative deduplicated count, and entry/exit direction statistics
Development Resources Summary
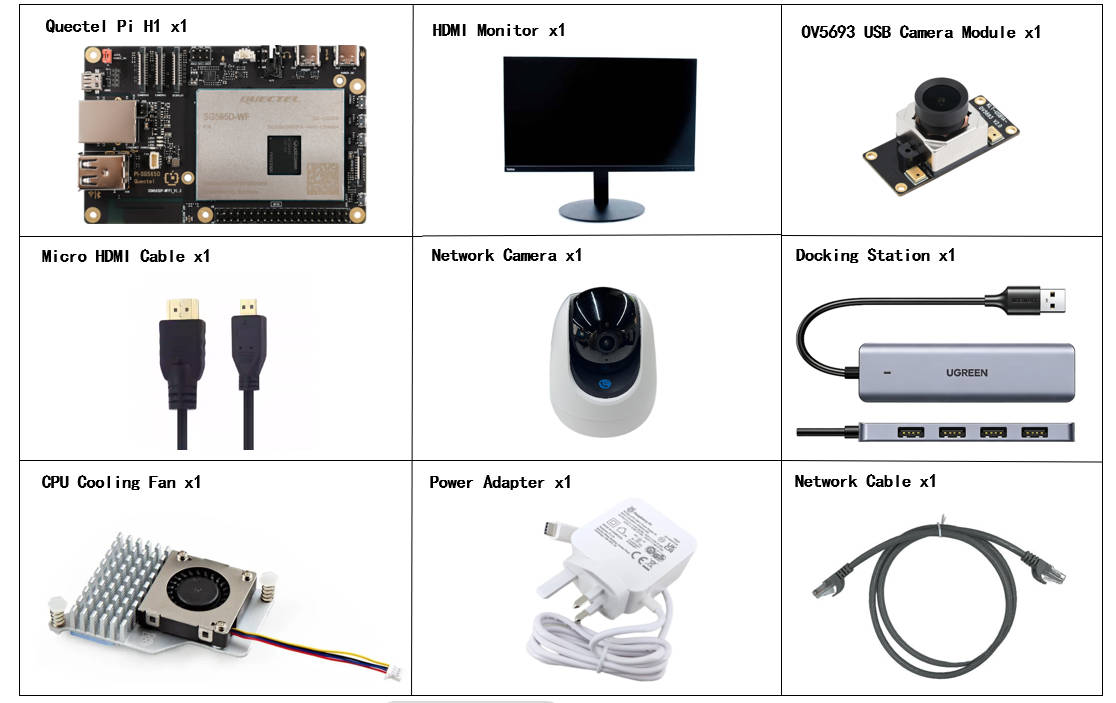
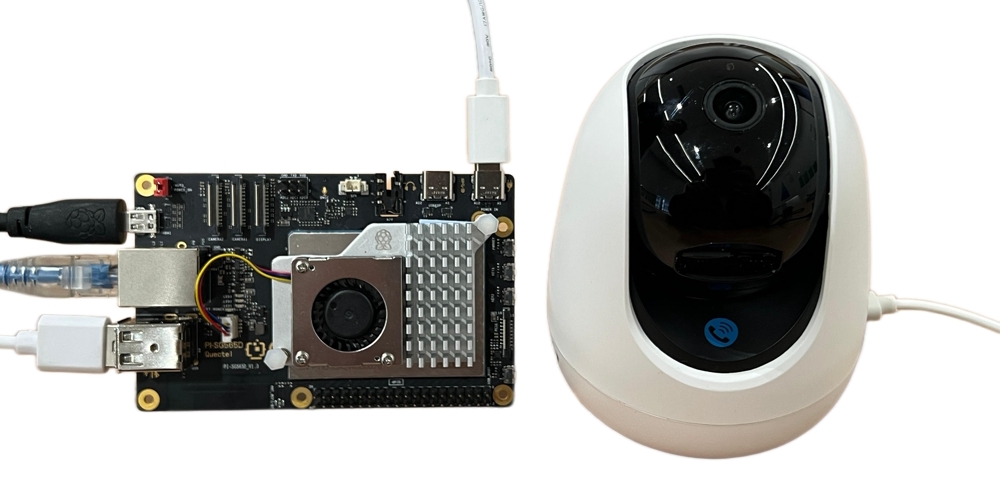
Development Accessories List
Note: The following accessories list is for reference only. The actual development environment can be adjusted according to requirements. For example, when developing via SSH remote connection, the display and USB hub can be omitted.
| Accessory Name | Quantity | Specifications |
|---|---|---|
| Quectel Pi H1 Smart Single-Board Computer | 1 piece | - |
| Power Adapter | 1 piece | 27W USB Type-C Interface Charger 1.2m Cable Length China Standard Power PD Power Suitable for Raspberry Pi 5 |
| Micro HDMI Cable | 1 piece | Micro HDMI 2.0 Standard, 1m Length, HDMI-A (Male) to HDMI-D (Male) |
| Ethernet Cable | 1 piece | Gigabit Ethernet Cable, 1m Length |
| CPU Cooling Fan | 1 piece | Raspberry Pi 5 Official Active Cooler with Thermal Pad |
| USB Hub | 1 piece | UGREEN USB3.0 Hub |
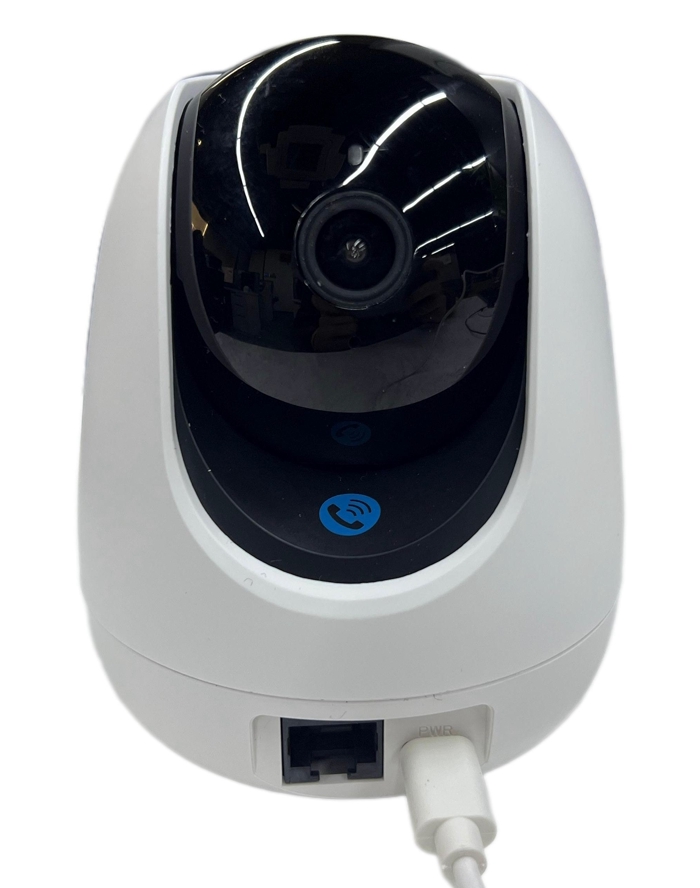
| Network Camera | 1 piece | Tenda Indoor Home Surveillance Camera |
| USB Camera | 1 piece | OV5693 5MP USB Camera Module |
| Display | 1 piece | 24-inch HDMI Monitor |
Accessories Reference Images
Quick Start
Development Preparation
The Quectel Pi H1 Smart Single-Board Computer comes pre-installed with Debian 13 system image. No need to re-flash the system; follow the steps below to start development.
Hardware Connection
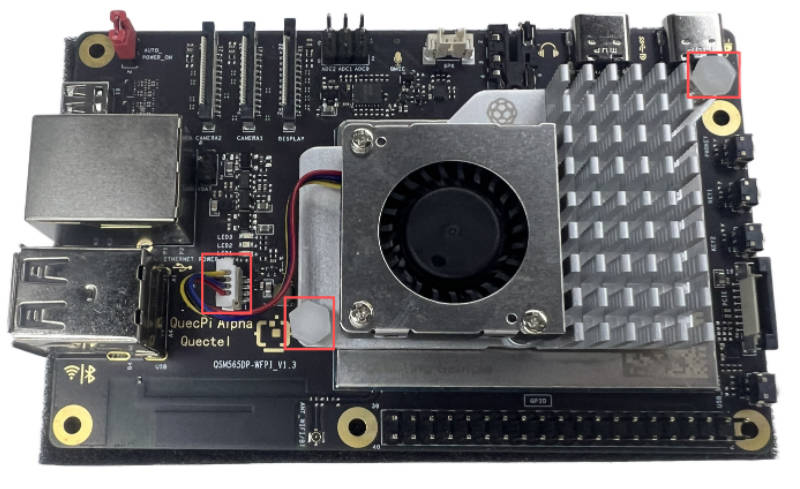
Cooling Fan Installation
- Insert the cooling fan ribbon cable into the FAN slot on the main control board
- Secure both ends of the cooler to the reserved mounting holes on the main control board
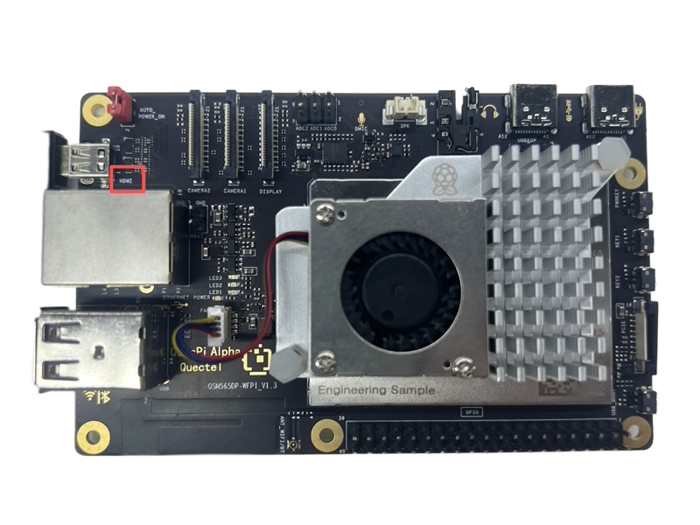
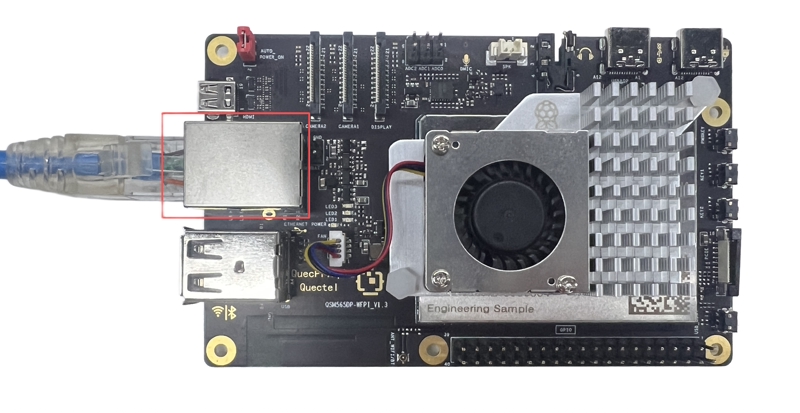
Display Connection
Connect one end of the Micro HDMI cable to the Micro HDMI port on the main control board and the other end to the HDMI port on the monitor.
Input Device Connection
Connect the USB keyboard and mouse to the two USB-A ports on the main control board respectively. If using wireless input devices, insert the receiver into a USB port.

Network Connection
Connect one end of the Ethernet cable to the Gigabit Ethernet port on the main control board and the other end to the LAN port of the router (ensure the router is connected to the internet).
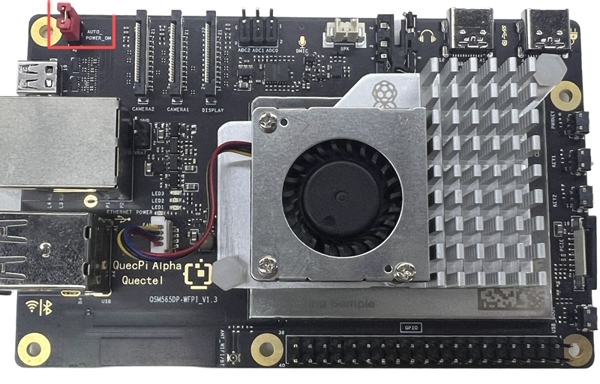
Auto Power-On Setting
Install a jumper cap on the header pins labeled AUTO_POWER_ON in the upper left corner of the main control board to enable auto power-on functionality.
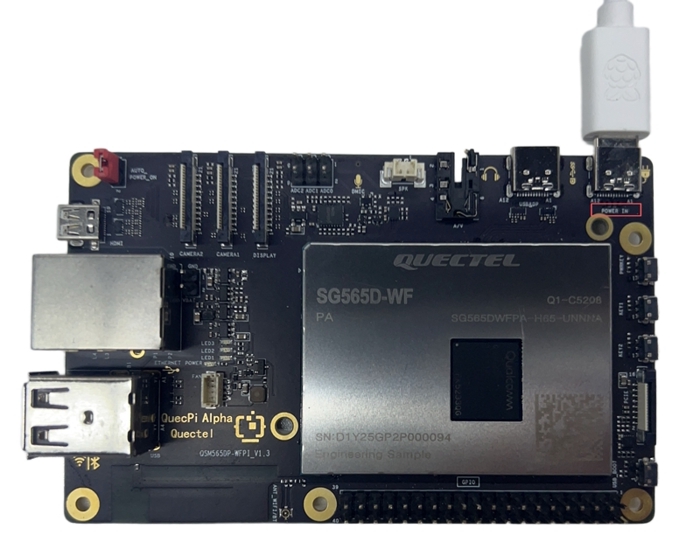
Power Connection
Connect the USB-C end of the power adapter to the POWER IN port on the main control board, and the USB-A end to the power adapter.
Network Camera Connection
Power on the network camera and ensure it is on the same local network as the main control board.
Complete Connection Diagram
Model Preparation
Object Detection Models
The project supports the following YOLOv5n ONNX models (located in src/ directory):
| Model File | Input Size | Features |
|---|---|---|
yolov5n_320.onnx |
320×320 | Fastest speed, slightly lower accuracy (default mode) |
yolov5n_416.onnx |
416×416 | Balanced speed and accuracy |
yolov5n_640.onnx |
640×640 | Highest accuracy, slower speed |
Note: All model files are included in the project and located in the
src/directory, no additional download required.
Person Re-identification Model
- ReID Model:
osnet_x0_25_market1501.onnx(located insrc/directory) - Input Size: 256×128 (width×height)
- Feature Dimension: 512-dimensional normalized feature vector
Note: The ReID model requires fine-tuning from ReID datasets like Market1501, and cannot directly use ImageNet pre-trained models.
Statistics Logic Explanation
Count Types
- Real-time Count (Current Count): Number of active targets detected in the current video frame
- Cumulative Count (Total Count): Historical cumulative deduplicated count based on unique track_id
- Entry/Exit Count (In/Out Count): Personnel entry/exit direction statistics based on virtual detection line
Counting Principles
- Real-time Count: Directly counts the number of active tracked targets in the current frame
- Cumulative Count: Each newly generated track_id corresponds to a unique person identifier, ensuring accuracy of cumulative statistics
- Entry/Exit Count: Determines target movement direction through a virtual detection line (default is the horizontal line at the center of the screen):
- Entry (In): Target moves downward (Y coordinate increases)
- Exit (Out): Target moves upward (Y coordinate decreases)
- Direction is determined based on the historical trajectory of the target's center point
- Each track_id is counted only once when first crossing the virtual line to avoid duplicate counting
Custom Virtual Line
The current version supports customizing the position and direction of the virtual detection line:
- Horizontal Detection Line:
direction='horizontal',line_position=specified Y coordinate - Vertical Detection Line:
direction='vertical',line_position=specified X coordinate
Project Deployment
Network Camera Configuration
When using the network camera for the first time, connect your phone to the same WiFi network, then use the Tenda app to add the camera device and complete the network configuration.
Important Note: Ensure that the Quectel Pi H1 Smart Single-Board Computer and the network camera are on the same local network; otherwise, RTSP video streams cannot be obtained.
Obtain Project Code
- Create a project directory and enter it:
mkdir ~/people-counting-device
cd ~/people-counting-device
- Install Git and clone the project code:
sudo apt update
sudo apt install -y git
git clone https://github.com/Quectel-Pi/demo-people-counting-device.git
- Set directory permissions:
sudo chmod -R 755 ~/people-counting-device
Create Virtual Environment
To avoid dependency conflicts, it is recommended to run the project in a virtual environment:
# Create virtual environment
python3 -m venv ~/people-counting-env
# Activate virtual environment
source ~/people-counting-env/bin/activate
Install Project Dependencies
# Upgrade pip to the latest version
pip install --upgrade pip
# Install required project dependencies
cd demo-people-counting-device
pip install -r requirements.txt
Camera Parameter Configuration
The IP address of the network camera can be obtained from the device information page in the Tenda app.
Open Firefox browser in the main control board system, enter the camera's IP address, and log in using the default credentials:
- Username:
admin - Password:
admin123456
After logging in, change the video encoding type to H.264, turn off the audio stream, and finally save the settings.
Launch Application
Enter the project source code directory and run the corresponding script:
cd demo-people-counting-device/src
# Run IP camera version
python3 ip_camera_main.py
# Or run USB camera version
python3 usb_camera_main.py
# Or run local video test version
python3 local_video_main.py --video ../asset/street.mp4
`--video`: Specify video file path (required)
`--model`: Specify YOLO model path (optional, defaults to `yolov5n_320.onnx`)
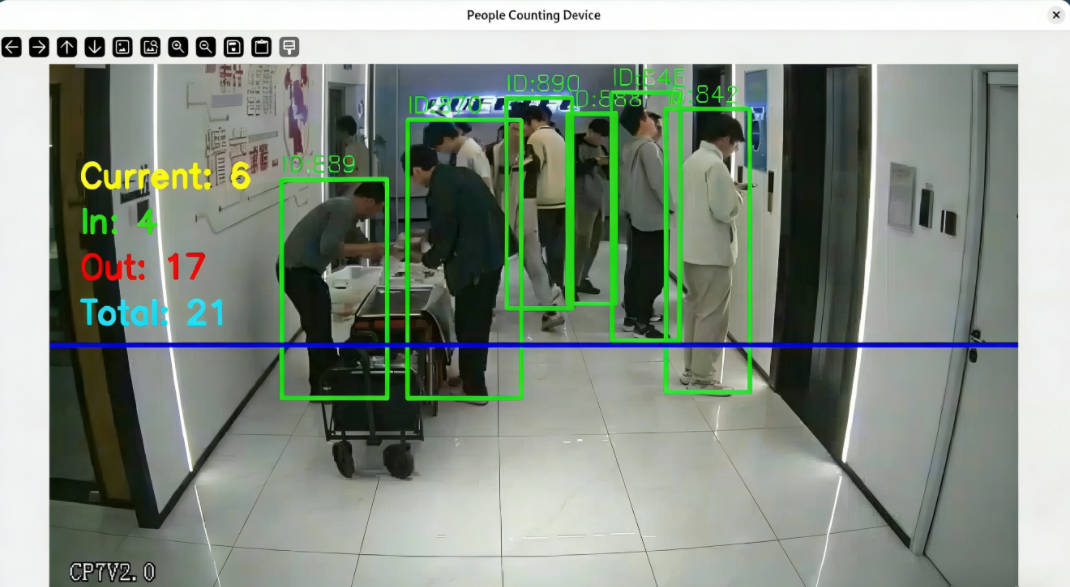
Application Demonstration
Common Troubleshooting
Q1: Camera Cannot Be Opened
Solution:
- Add the current user to the video group:
sudo usermod -aG video $USER - Restart the system to apply group permissions
- Check if the camera is occupied by another process
Q2: Model File Loading Failed
Solution:
- Ensure scripts are run from the
src/directory (all model files are located in this directory) - Do not change the working directory; execute startup commands directly in the
src/directory
Q3: IP Camera Connection Failed
Solution:
- Test network connectivity:
ping <camera IP address> - Confirm that the camera's ONVIF service is enabled
Q4: System Performance Lag
Solution:
- Disable ReID feature (set
use_reid=Falsein the code) - Reduce display window resolution
Technical Support and Contributions
If you encounter any issues during use, please submit technical inquiries on the Quectel Official Forum. Our technical support team will respond promptly.
Project open-source repository: https://github.com/Quectel-Pi/demo-people-counting-device
We welcome you to submit Issues to report problems or Pull Requests to contribute code improvements!