
USB camera
The Quectel Pi H1 single-board computer supports USB cameras. This document uses the Waveshare OV5693 5MP USB camera as example to introduce how to connect and use USB cameras.
Hardware interface
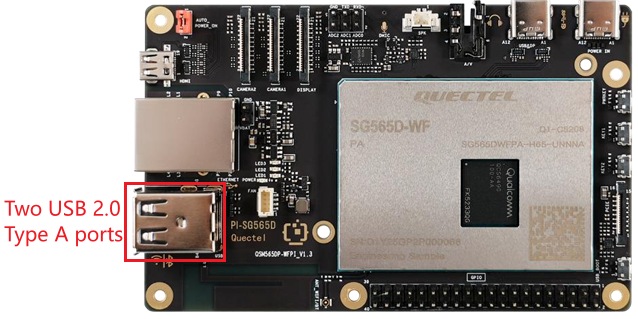
Insert the USB camera cable into the USB Type-A interface of Quectel Pi H1.
Hardware connection location:
View device information
Check USB device recognition
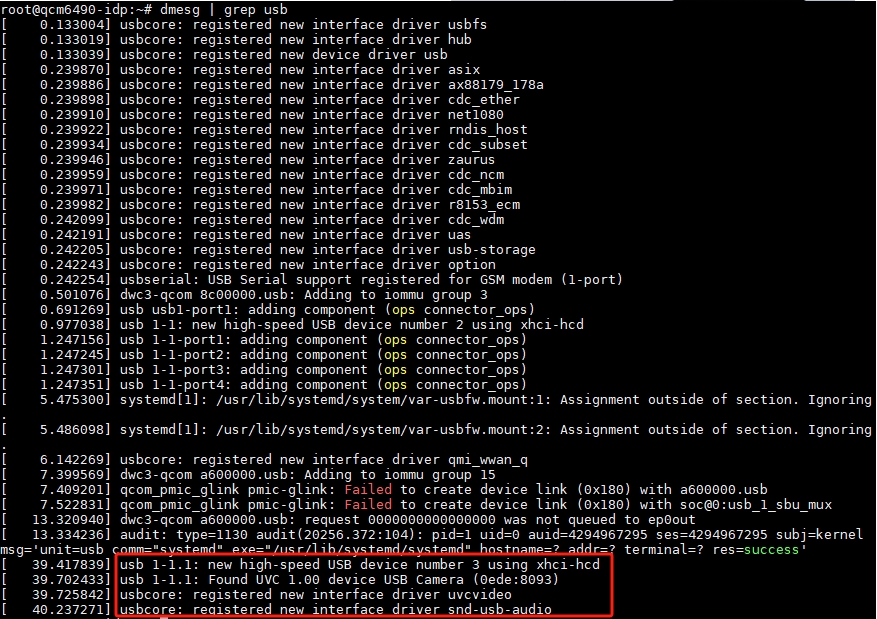
Run the following command in the SSH terminal to check the USB device information recognized by the system:
dmesg | grep usb
Example output:
Check device nodes
Run the following command in the SSH terminal to view the newly added device nodes:
v4l2-ctl --list-devices
Example output:

/dev/video2— Main video node (subsequentgstcommands operate on this)./dev/video3— Metadata node./dev/media3— Hardware topology controller for the entire pipeline.
Check supported formats
Run the following command in the SSH terminal to check the formats supported by the video node:
v4l2-ctl --list-formats-ext --device /dev/video2
Example output:
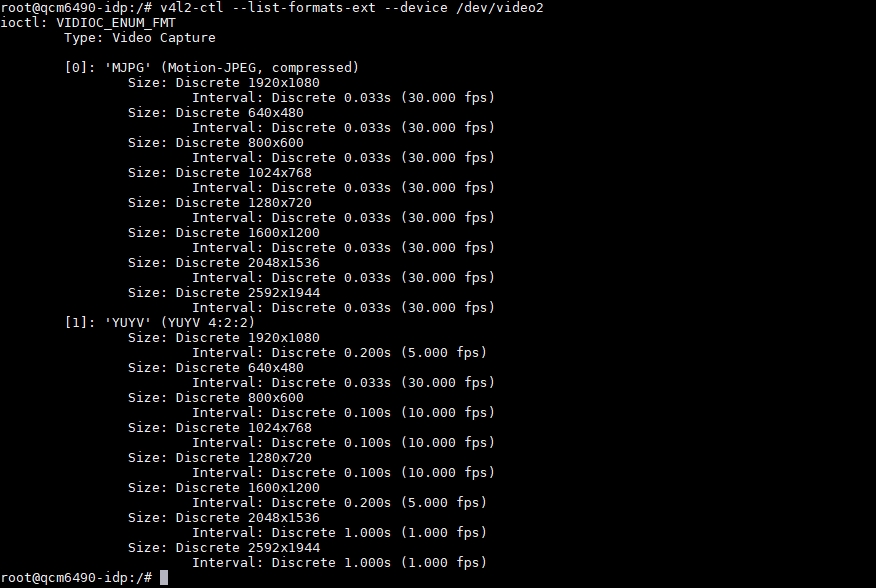
- As shown, the camera supports two output formats: MJPG and YUYV.
Function usage
Prerequisites
Connect an HDMI display
Run the following command in the SSH terminal:
mount -o rw,remount /
export XDG_RUNTIME_DIR=/dev/socket/weston
export WAYLAND_DISPLAY=wayland-1
Real-time preview
Run one of the following commands depending on the supported format:
#The MJPG format, resolution and frame rate should correspond to the formats supported by the video node.
gst-launch-1.0 v4l2src device=/dev/video2 ! image/jpeg,width=1280,height=720,framerate=30/1 ! jpegdec ! videoconvert ! waylandsink fullscreen=true
# The YUV format, resolution and frame rate should correspond to the formats supported by the video node.
gst-launch-1.0 v4l2src device=/dev/video2 ! video/x-raw,format=YUY2,width=1280,height=720,framerate=10/1 ! videoconvert ! waylandsink fullscreen=true
Detailed command description:
gst-launch-1.0 -e: Start the pipeline;-eensures a clean EOS shutdown when pressing "Ctrl" + "C".v4l2src device=/dev/video2: Capture data from the V4L2 device /dev/video2.image/jpeg,width=1280,height=720,framerate=30/1: Request 1280×720 @ 30 fps MJPEG output; if unsupported, the pipeline will report an error.jpegdec: Decode MJPEG frames into raw YUV/RGB pixel data.videoconvert: Convert pixels into formats acceptable by waylandsink (usually NV12 / BGRx).waylandsink fullscreen=true: Display full‑screen output using Wayland (no title bar, full screen).
Video recording and playback
Video recording
- Run the following command in the device terminal:
gst-launch-1.0 -e v4l2src device=/dev/video2 io-mode=2 ! \
  image/jpeg,width=1280,height=720,framerate=30/1 ! \
  jpegdec ! videoconvert ! tee name=t \
  t. ! queue ! v4l2h264enc ! h264parse ! mp4mux ! filesink location=/opt/out.mp4 \
  t. ! queue ! videoconvert ! waylandsink  fullscreen=true sync=false
Detailed command description:
v4l2src device=/dev/video2 io-mode=2:
Capture the video stream from /dev/video2 devices. io mode=2 indicates to use memory mapped (mmap) mode to improve performance.
image/jpeg,width=1280,height=720,framerate=30/1:
Specify captured video stream format as MJPEG, with a resolution of 1280 × 720 and a frame rate of 30fps.
jpegdec:
Decode the video stream in MJPEG format and convert it to the original RGB/YUV format.
videoconvert:
Convert the decoded video format to one suitable for subsequent processing (e.g., convert from YUV to RGBA).
tee name=t:
Split one video stream into two streams, which can be referenced later through t..
t. ! queue:
Extract a stream from the tee element and buffer it through the queue element.
v4l2h264enc:
Encode the video stream into H.264 format.
h264parse:
Analyze the H.264 encoded video stream to meet the requirements of the MP4 file format.
mp4mux:
Encapsulate H.264 video streams into MP4 file format.
filesink location=/opt/out.mp4:
Save the packaged MP4 file to /opt/out.mp4.
t. ! queue:
Extract another stream from the tee element and buffer it through the queue element.
videoconvert:
Convert the video format to a format suitable for display on Wayland monitors.
waylandsink fullscreen=true sync=false:
Output the video stream to the Wayland monitor to display the video in full screen mode and disable sync mode to avoid the Wayland monitor waiting for the data stream, thereby improving display performance.
If the gst pipeline status changes to "PLAYING", it indicates that the camera is running.
Press "Ctrl" + "C" to stop video recording.
Video playback
To play a video file, run the following command in the device terminal:
gst-launch-1.0 -e filesrc location=/opt/out.mp4 ! qtdemux ! queue ! h264parse ! v4l2h264dec capture-io-mode=5 output-io-mode=5 ! videocrop top=0 bottom=40 left=0 right=0 ! videoconvert ! waylandsink fullscreen=true enable-last-sample=false
Detailed command description:
filesrc location=/opt/out.mp4:
Read data from the /opt/out.mp4 file.
qtdemux:
Separate the video and audio streams from the MP4 file.
queue:
Buffer data to avoid data loss during processing.
h264parse:
Analyze the H.264 encoded data in the video stream.
v4l2h264dec capture-io-mode=5 output-io-mode=5:
Use the V4L2 decoder to decode the H.264 video stream, where capture io mode=5 and output io mode=5 are hardware acceleration related parameters.
videocrop top=0 bottom=40 left=0 right=0:
Due to automatic alignment of video streams, additional pixel information is filled in. Resulting in a green edge at the bottom of the video, therefore cropping the bottom by 40 pixels.
videoconvert:
Format conversion elements ensure that the cropped video stream format is suitable for Wayland monitors.
waylandsink fullscreen=true enable-last-sample=false:
Output the decoded video to the Wayland monitor and set it to full screen mode, while disabling the display of the last frame.
Photo capture
- Run the following command in the device terminal:
gst-launch-1.0 -e v4l2src device=/dev/video2 io-mode=2 ! \
  image/jpeg,width=1280,height=720,framerate=30/1 ! \
  tee name=t \
  t. ! queue ! jpegdec ! videoconvert ! waylandsink sync=false \
  t. ! queue ! multifilesink location=/opt/shot-%05d.jpg max-files=5
Detailed command description:
v4l2src device=/dev/video2 io-mode=2:
Collect MJPEG data from a USB camera.
image/jpeg,width=1280,height=720,framerate=30/1:
Require the camera to output a MJPEG stream of 1280×720@30 fps.
tee name=t:
Divide the same stream into multiple branches, and use t. to reference it later.
t. ! queue ! jpegdec ! videoconvert ! waylandsink sync=false:
Preview branch: decode MJPEG → convert it to RGB → send it to Wayland window for real-time display. Sync=false can reduce latency.
t. ! queue ! multifilesink location=shot-%05d.jpg max-files=5:
Photo branch: Each frame is saved intact as JPG, and the file name is automatically numbered % 05d (5 digits). Max files=5 only saves the last 5 images, and old files are automatically deleted.
Press "Ctrl" + "C" to save the last 5 images.
To view photos, enter the following command in the device terminal:
gst-launch-1.0 filesrc location=/opt/shot-00036.jpg ! jpegdec ! imagefreeze ! waylandsink fullscreen=true
Detailed command description:
filesrc location=/opt/shot-00036.jpg:
Read /opt/hot-00036.jpg from the file system.
jpegdec:
Decode JPEG compressed data into raw RGB/YUV pixel frames.
imagefreeze:
Keep only the first frame and repeat it continuously thereafter to achieve a 'still image' effect.
waylandsink fullscreen=true:
Send the image to the Wayland synthesizer for full screen display.
- To exit the view, please press "Ctrl" + "C".