
Quick start
Unboxing preparation
This chapter is based on the Quectel Pi H1 development kit and explains how to quickly get started with the Quectel Pi H1 smart single-board computer.
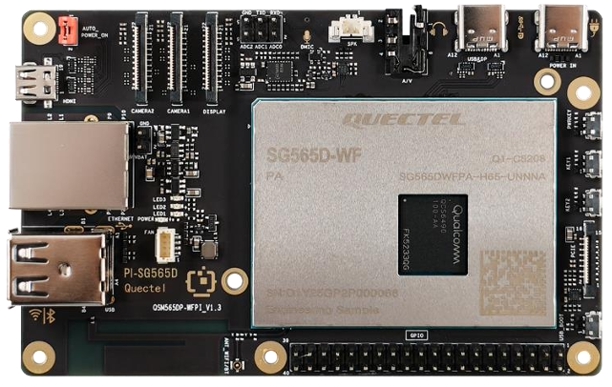
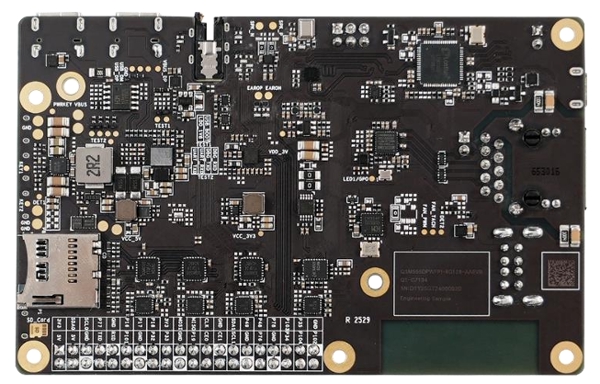
Physical product
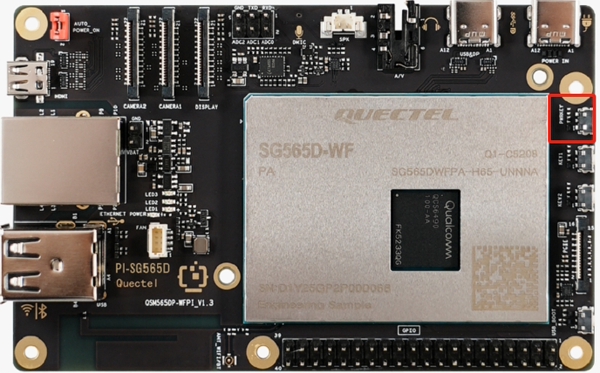
Product top view and bottom view:
Required accessories
The complete Quectel Pi H1 development kit (verified against the "Kit list" to ensure nothing is missing).
A power adapter supporting 5V/5A, 9V/3A, or PD fast charging protocol.
A monitor supporting USB-C DP or Micro HDMI (resolution is recommended to be 1080P or higher).
USB keyboard + mouse (wired or wireless, need to be connected to the USB port of the smart single-board computer).
A router with internet access (for network debugging of the smart single-board computer).
Precautions
Hardware usage guidelines (to avoid damage)
Please use the USB-A power cable (5A) provided in the kit. Do not use power supplies with a current lower than 3A (such as mobile phone chargers), as this may cause insufficient power supply to the smart single-board computer and frequent crashes. If a high-power module (such as a motor) needs to be connected externally, it must be powered separately. Do not draw power from the smart single-board computer's USB port or GPIO port (to avoid overload and damage to the computer).
Always disconnect the smart single-board computer's power supply before plugging or unplugging accessories (such as camera cables or network cables). Hot-plugging may damage the interface chips. The USB & DP interfaces only support DP display and power output; they cannot power the computer.
Operating temperature: -20 to +70 °C. Do not use in high-temperature (e.g., direct sunlight), humid (humidity > 80%), or dusty environments. Before operation, please touch a metal object to discharge static electricity and avoid directly touching the chip pins on the smart single-board computer with your hands.
System and software precautions
Only the official system image is supported. Flashing images from other smart single-board computers (such as Raspberry Pi) is prohibited, which will cause driver incompatibility, boot failure, and other problems.
If you need to customize the system, you must use the Yocto Linux SDK for development, ensuring that the kernel version and driver modules are compatible with Quectel Pi H1.
Do not modify core configuration files (such as config.txt) under the /boot partition. Accidental modification may cause the boot failure of the system (it is recommended to back up the file before modifying it).
When installing software, prioritize using the apt command to download from official sources to avoid installing DEB packages from unknown sources, preventing system infections or crashes.
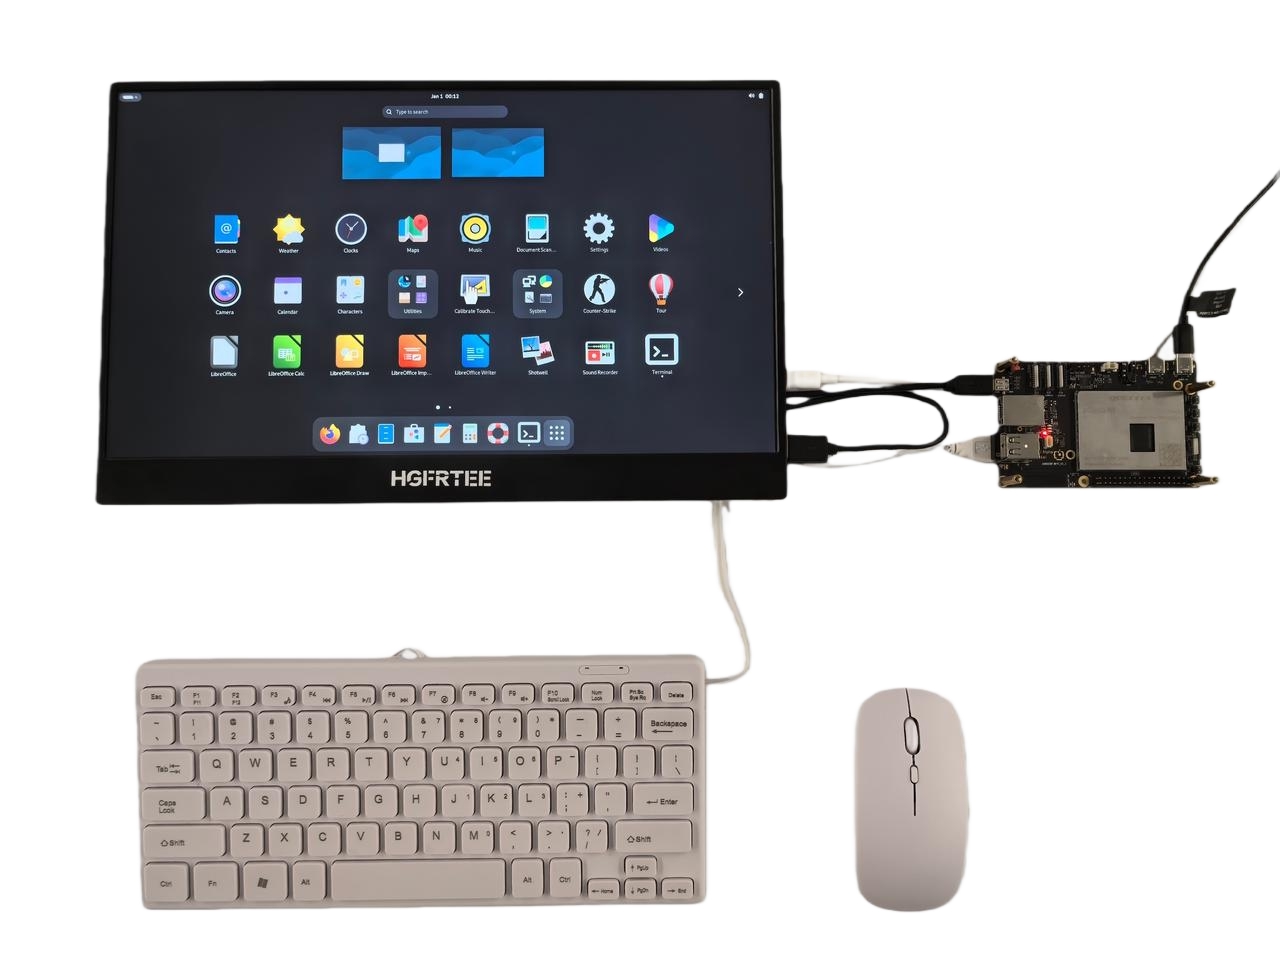
Hardware Connection
⚠️ Warning: Please disconnect all power supplies during the connection process to avoid hardware damage caused by hot-plugging interfaces!
The Quectel Pi H1 smart single-board computer comes pre-installed with the Debian 13 system image from the factory, so there is no need to re-flash the image. Just follow the steps below:
Display connection
Option 1 (high definition): Connect one end of the USB-C DP display cable to the USB&DP interface of Quectel Pi H1, and the other end to the USB-C interface of the monitor;
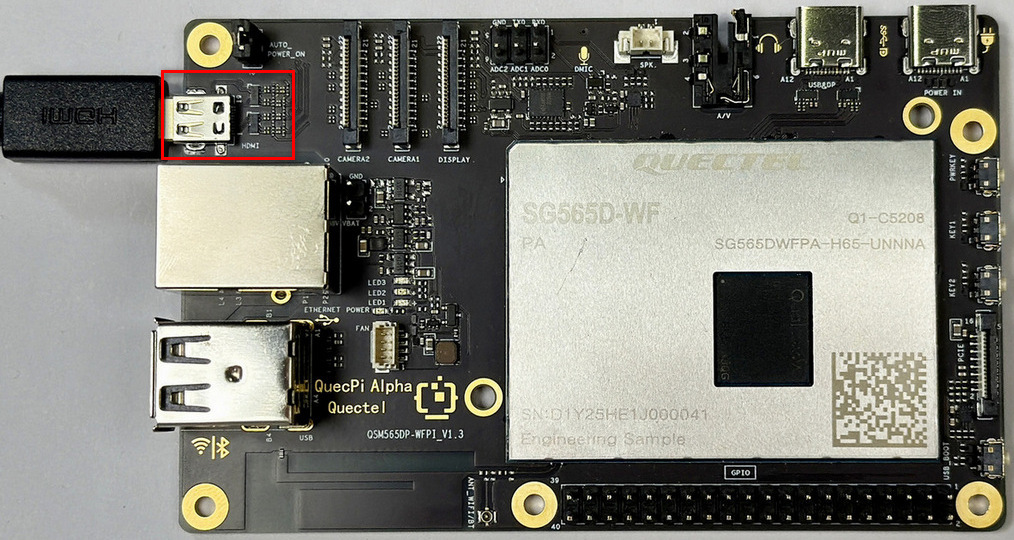
Option 2 (compatibility): Connect one end of the Micro HDMI cable to the Micro HDMI interface of Quectel Pi H1, and the other end to the HDMI interface of the monitor.
Peripheral connection
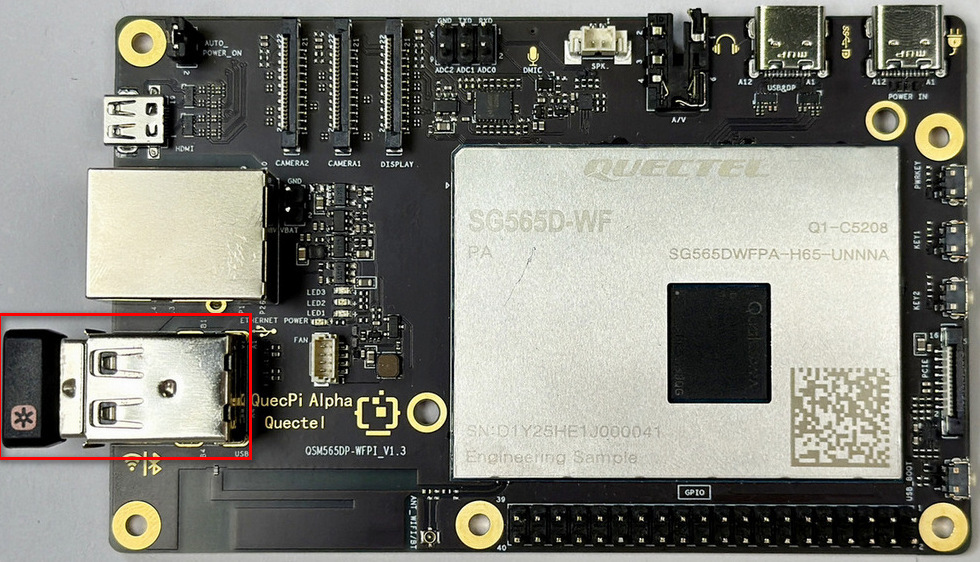
Connect the USB keyboard and mouse to the two USB-A interfaces of Quectel Pi H1; for wireless keyboard and mouse, insert the receiver into the USB port.
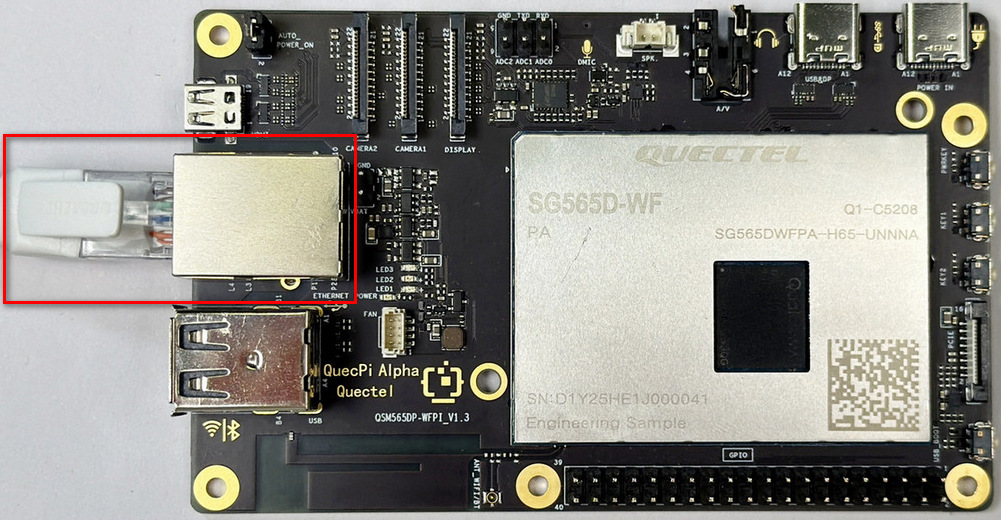
Network connection
Connect the network port of Quectel Pi H1 to the LAN port of the router using a network cable.
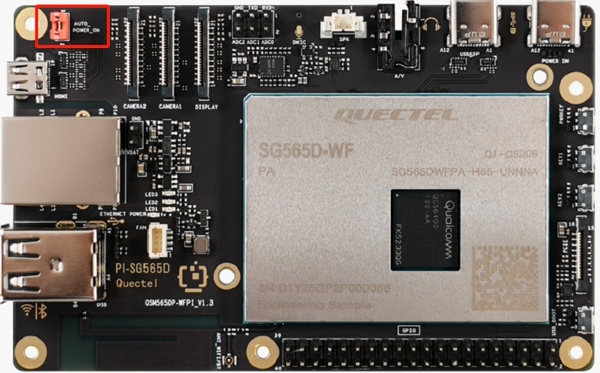
Jumper cap connection
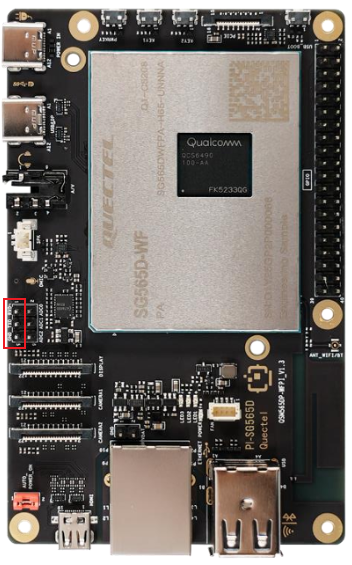
Ensure that the pin header marked with AUTO_POWER_ON in the upper left corner of Quectel Pi H1 is shorted with a jumper cap.
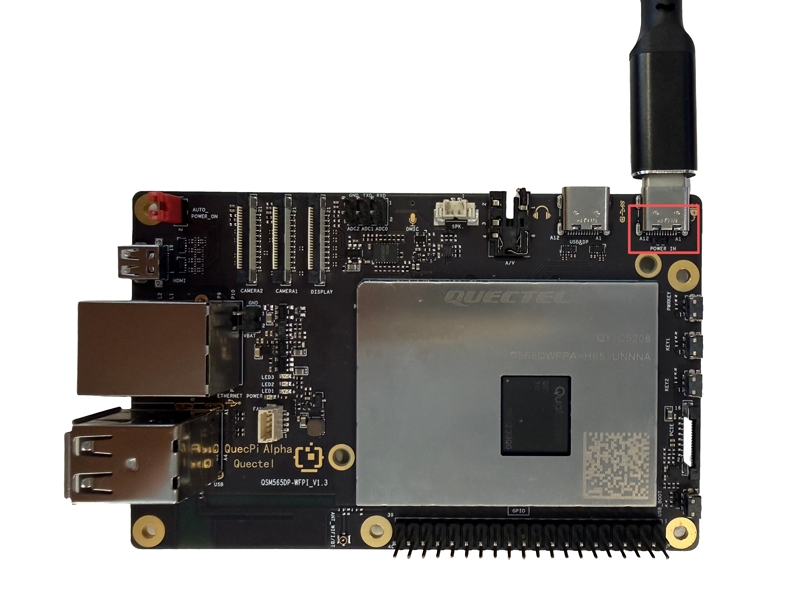
Power supply connection
Finally, connect the USB-A end of the USB-A power cable to the power adapter, and the USB-C end to the power port (usually marked POWER IN) of Quectel Pi H1.
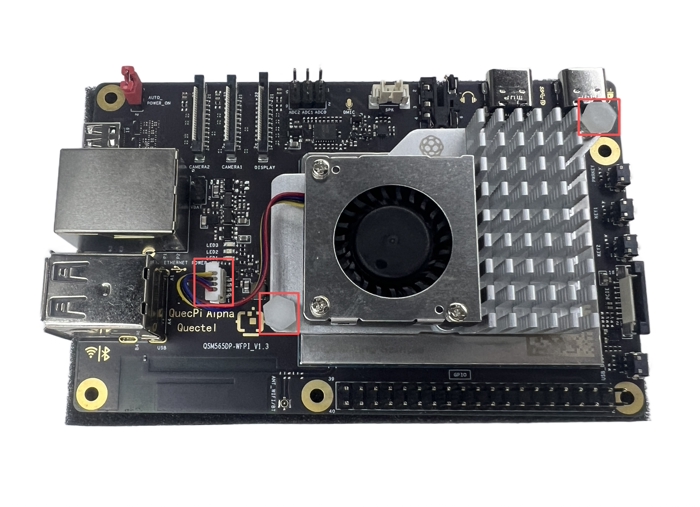
Heatsink installation
First, insert the heatsink cable into the FAN slot of Quectel Pi H1, and then fix the two ends of the heatsink into the reserved sockets of Quectel Pi H1.
(Note: The heatsink is not included in the development kit. It is recommended to use official Raspberry Pi 5 heatsink.)
System startup
Start the system
⚠️ If the pin header marked AUTO_POWER_ON was not shorted with a jumper cap during the hardware connection process, you need to first long-press the PWRKEY button on the right side of tQuectel Pi H1, then turn on the power until the system starts.
- Power on the monitor and confirm that the monitor input source has been switched to the corresponding interface (such as USB-C or HDMI).
- Power on Quectel Pi H1 (plug in the power cable). At this time, the power indicator (usually red) of Quectel Pi H1 will be on steadily, and the system indicator (usually green) will flash, indicating that the system is starting.
- Wait for about 1–2 minutes, and the monitor will display the system login page.
System login
For instructions on setting your login username and password, please refer to System login.
System update
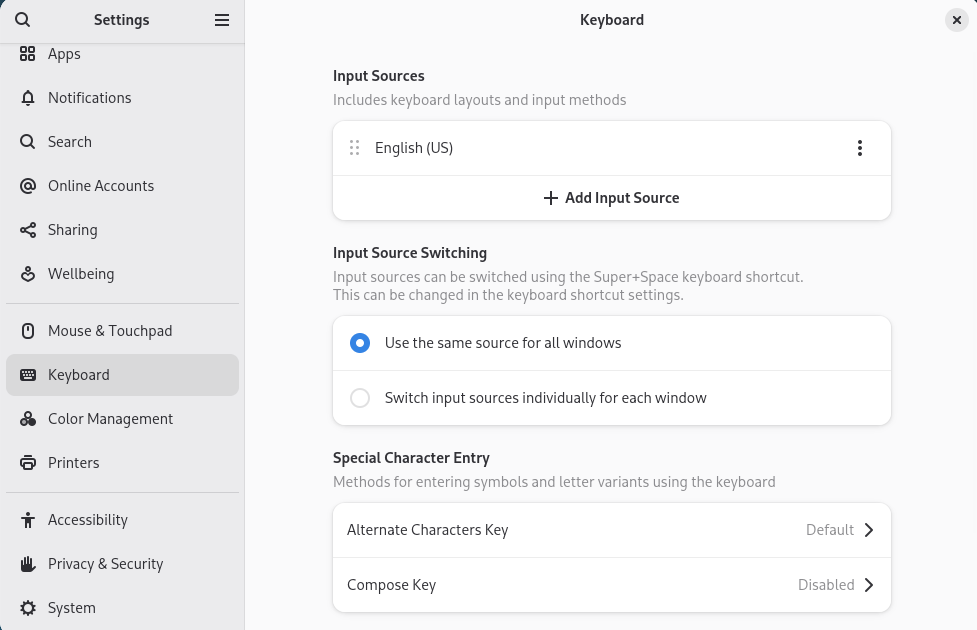
- Open the terminal as shown in the image below, and enter the following command to update the system (ensure you have a network connection).
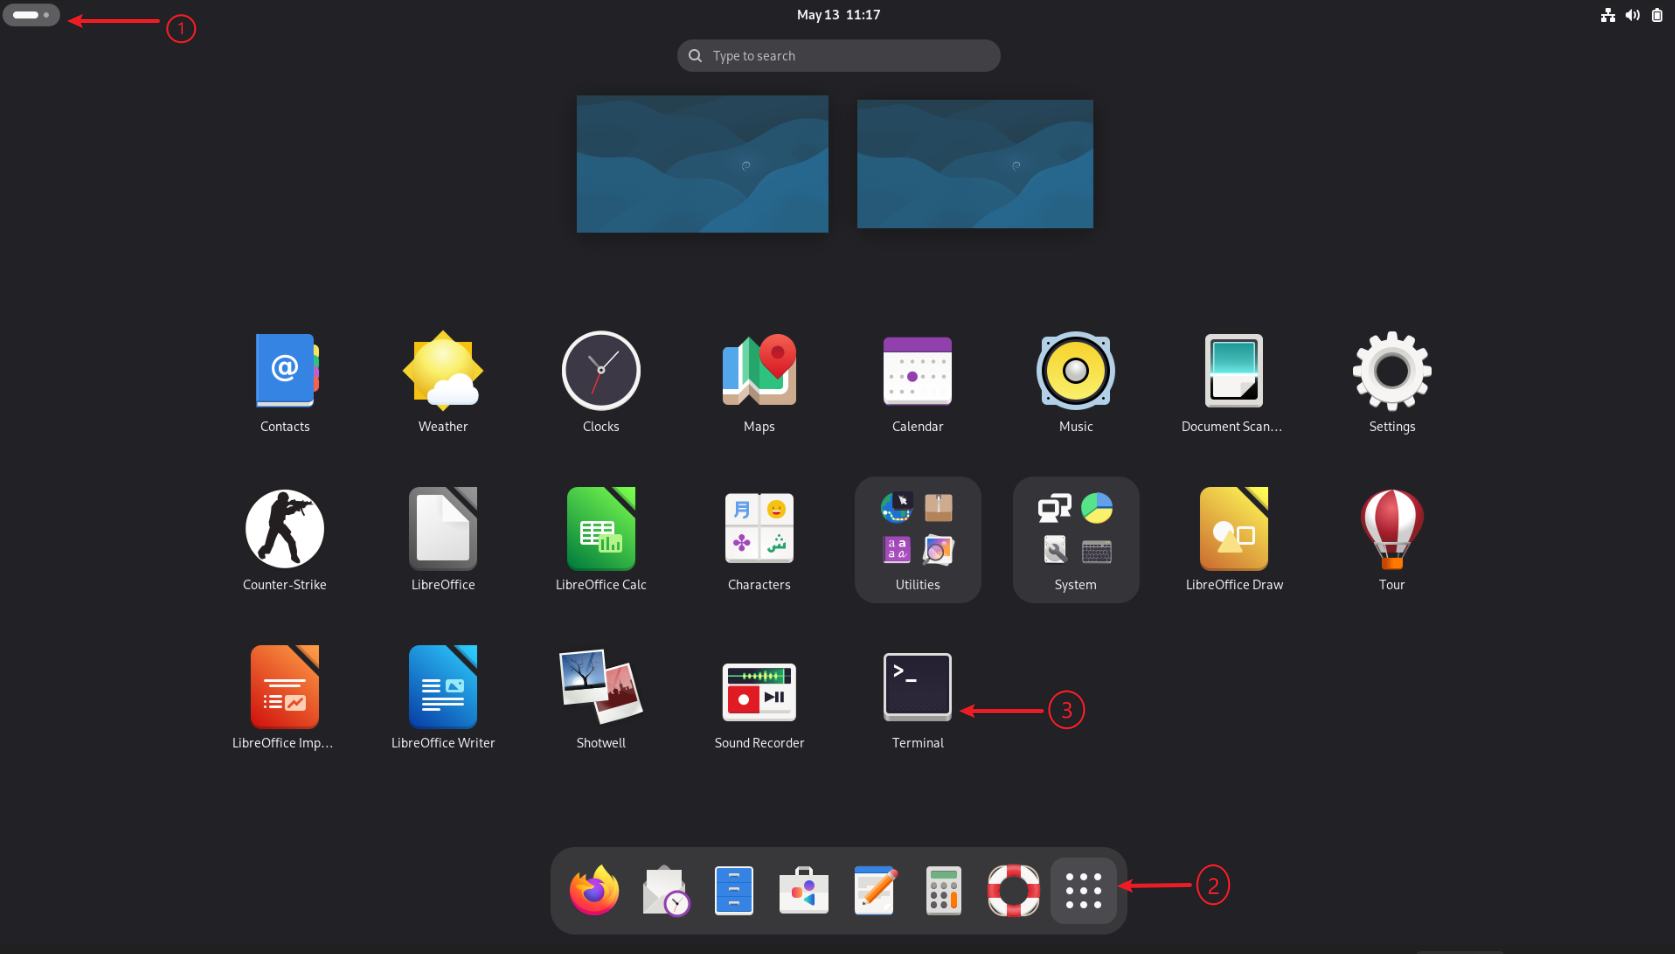
sudo apt update && sudo apt upgrade -y
‼️ If the system fails to start normally, please re-flash the system image
- Click here to download Debian13 image
- Click here to download and install USB driver.
- Use a power adapter that meets the requirements to power the smart single-board computer
- Connect the USB&DP interface of the smart single-board computer to the computer
- Click here to view the system installation tutorial
Basic configuration
Function verification
After startup, quickly verify whether the core accessories are working properly:
- Display verification: Confirm that the monitor can clearly display the desktop, and window dragging is smooth without freezing or screen distortion;
- Network verification: Open a browser and access any webpage to confirm that it loads normally, or execute ping 8.8.8.8 in the terminal to confirm that you can receive a response;
- USB peripheral verification: Enter characters with the keyboard and drag windows with the mouse to confirm that the keyboard and mouse respond normally.
Regional settings
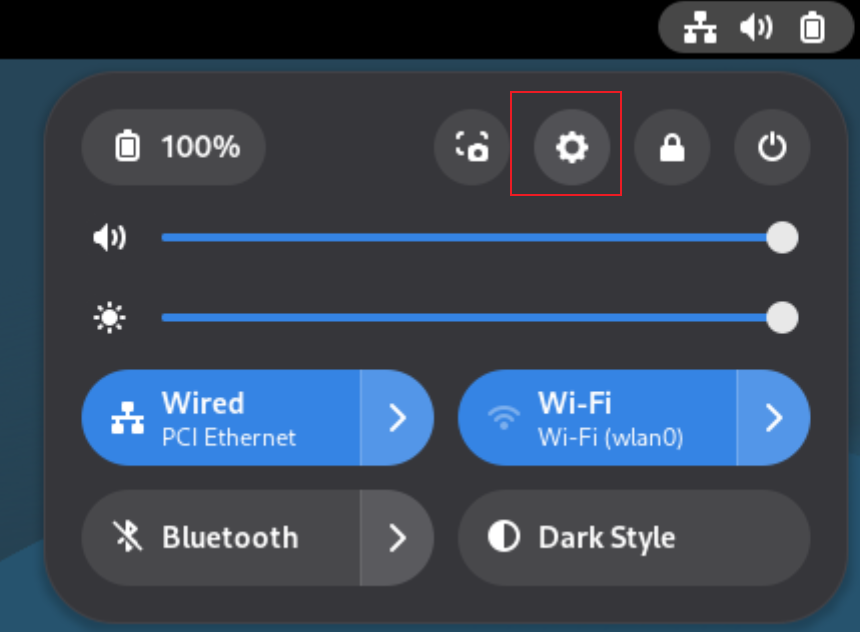
- System language: The system defaults to English. You can open system settings to configure it to other languages.

- Input method editor and keyboard layout: Use the system default configuration.
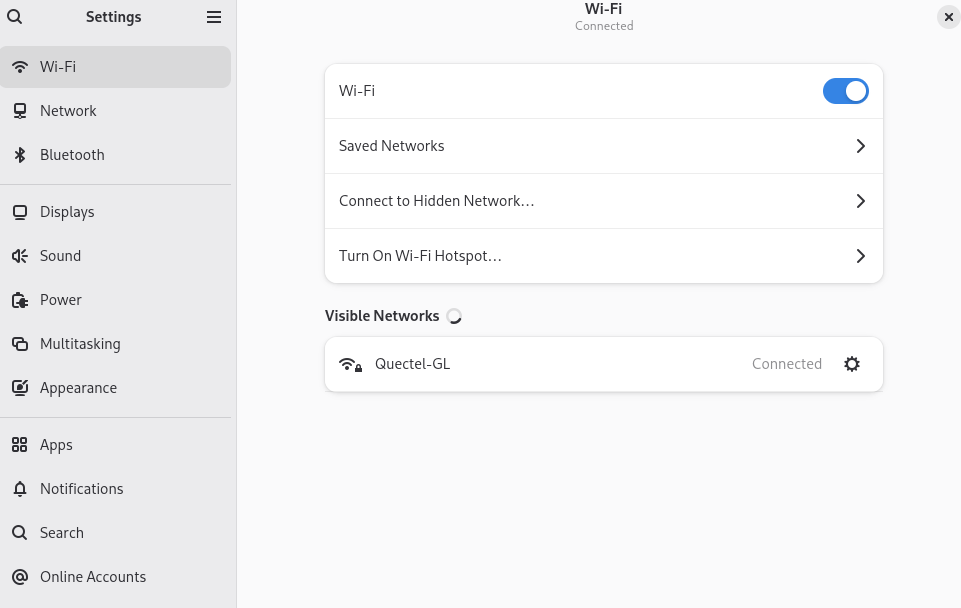
Network settings
Connect by entering the password based on the Wi-Fi name.
Serial port control panel
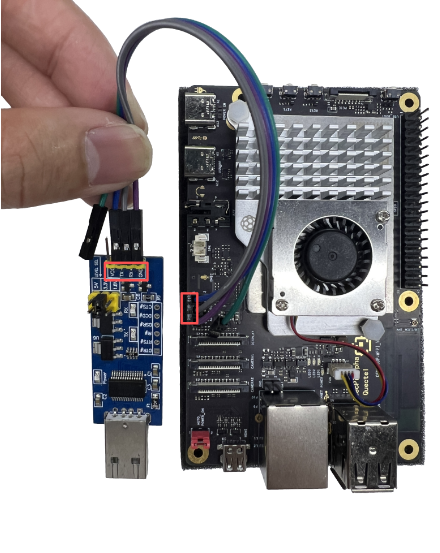
Hardware connection
⚠️When using a USB serial data cable to log in via serial port with a smart single-board computer, please ensure that the pin connections are correct. Incorrect pin connections may damage the hardware of the smart single-board computer.
Connection method
- Connect the GND pin of the Quectel Pi H1 smart single-board computer to the GND pin of the USB serial data cable.
- Connect the DBG_TXD pin of the Quectel Pi H1 smart single-board computer to the RXD pin of the USB serial data cable.
- Connect the DBG_RXD pin of the Quectel Pi H1 smart single-board computer to the TXD pin of the USB serial data cable.
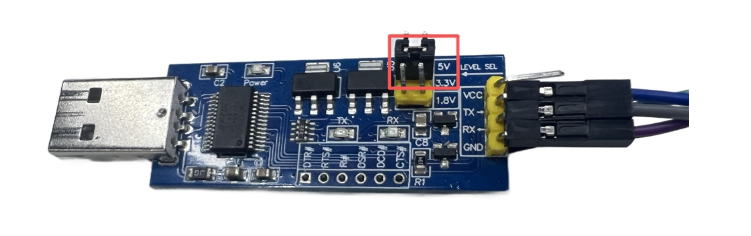
Use a jumper cap to select the 3.3 V power supply on the USB to TTL serial port board.
Serial port login
Prerequisite: The CH340 driver must be installed on the system first; otherwise, the serial port will not be recognized.
It is recommended to use PuTTY software for serial port connection.
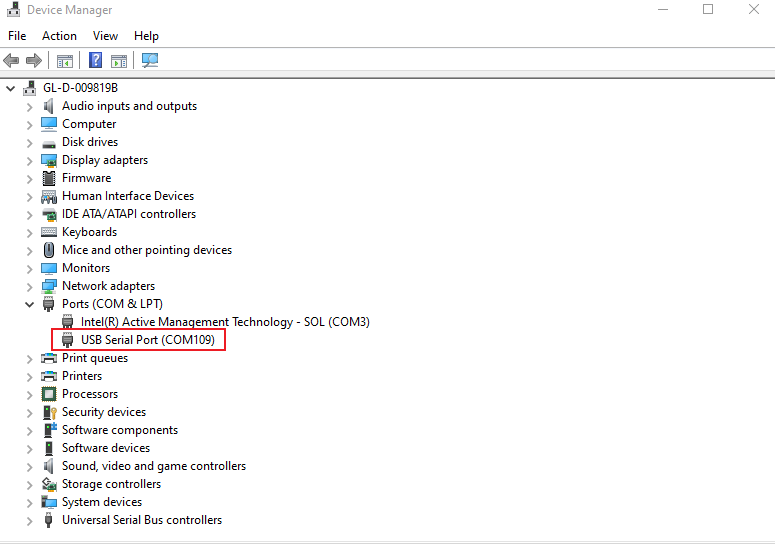
- Open Device Manager to view the serial port.
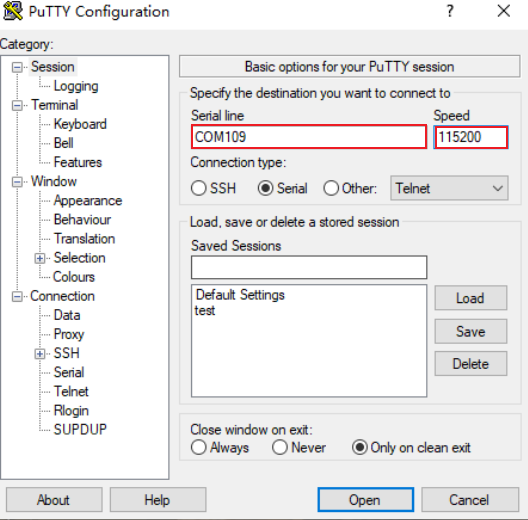
- Double-click to open PuTTY, configure it to the USB serial port and set the baud rate to 115200, then click Open.
- Enter the system username and password in the terminal to log in (the password will not be displayed in the terminal; press Enter after entering the password to log in).
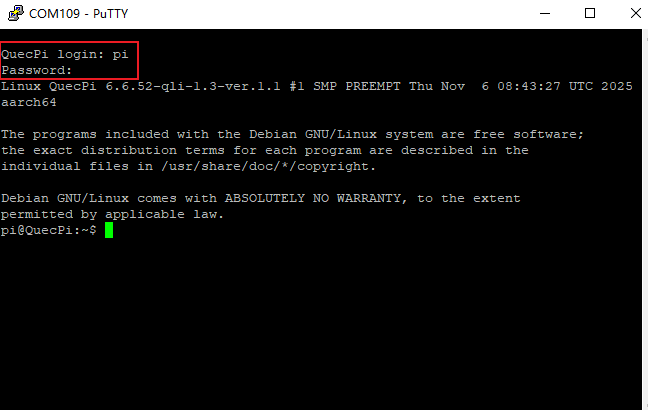
- After successful login, you can view logs and run commands for debugging via the serial port.
Purpose
The serial console is primarily used to view system logs, run commands for debugging, and as a backup method for system access when the graphical interface is unavailable through the serial port. It is an important tool for embedded Linux system development and maintenance, particularly suitable for underlying debugging and troubleshooting.
HelloWorld
Set up development environment
After logging in the Debian system of Quectel Pi H1, open a terminal window, enter the following command and press Enter to install the necessary development environment:
sudo apt update && sudo apt install vim gawk gcc g++ build-essential chrpath socat wget diffstat file unzip tar locales zstd debianutils iputils-ping cpio python3 python3-pip net-tools git make cmake
Compile and run helloworld
Create a helloworld.c file in the /Desktop directory.
Copy the following code snippet and paste it into the helloworld.c file:
#include <stdio.h>
int main(void)
{
    printf("hello world\r\n");
    return 0;
}
- Execute the following commands to compile the code:
$ cd /Desktop
$ gcc helloworld.c -o helloworld
- Execute the following command to run the helloworld program:
$ ./helloworld
- The program running result is printed as:
$ ./helloworld
$ hello world
Cross-compilation
Cross-compilation is the process of generating an executable program on one platform (such as an x86 PC) that can run on another platform with a different architecture (such as an ARM embedded device).
Preparation
- A 32/64-bit host computer for compiling the code.
- A Quectel Pi H1 smart single-board computer for running the executable program.
Here takes a 64-bit computer as an example. Perform the following steps on the host computer:
Install the ARM64 toolchain
sudo apt update
sudo apt install gcc-aarch64-linux-gnu g++-aarch64-linux-gnu
Verify the installation
$ aarch64-linux-gnu-gcc --version

Create a code file
$ touch hello.c
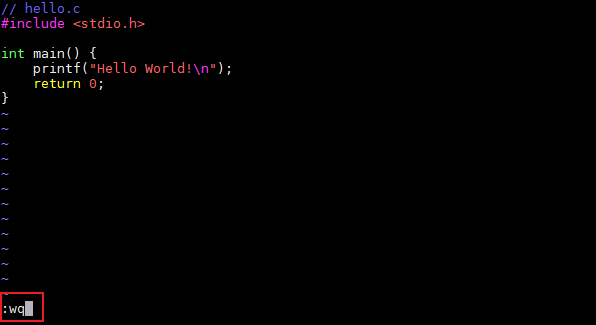
$ sudo vim hello.c
Press ESC + i, input the following code, press ESC + "shift + : ", then enter "wq + Enter" in the command prompt to save and exit.
#include <stdio.h>
int main() {
    printf("Hello World!\n");
    return 0;
}
Compiling the code file
$ aarch64-linux-gnu-gcc -o generated_compiled_filename original_filename
Example: aarch64-linux-gnu-gcc -o hello_arm64 hello.c
Checking the file structure
$ file filename
Successful compilation is shown below:

Upload compiled files
Download the compiled files from the host computer to your local path, then upload them to the Quectel Pi H1 smart single-board computer via the SCP command in the Windows console.
#Note: Do not use Chinese characters in the path where the compiled files are stored on the host computer.

Run compiled files
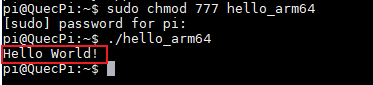
Set permissions for the compiled files and execute them on the Quectel Pi H1 smart single-board computer terminal.
sudo chmod 777 filename
Purpose
The HelloWorld program is mainly used to verify whether the development environment has been successfully set up. By writing, compiling, and running a simple C language program, it tests the basic functions of the system, including whether the compiler and runtime environment are working properly. It is a fundamental practice for beginners in embedded development.