
MIPI Camera - imx219
Hardware interface
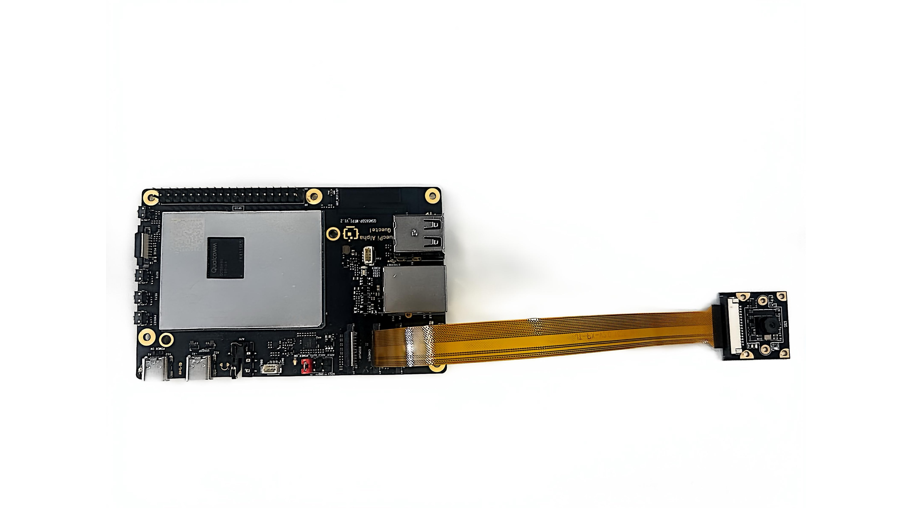
The Quectel Pi H1 single board computer supports two cameras MIPI CSI interfaces, as shown in the following figure

Quick Start
- Connect the camera according to the following diagram, pull up the black locking part of the connector when connecting, insert the FPC cable into any one CSI card slot, pay attention to the gold finger of the cable facing the metal contact surface inside the board, press the locking buckle, and confirm that the FPC cable is stable and not loose.
- Refer to Display Configuration to connect the display screen
Function usage
Preconditions
This step needs to be performed before the camera function is activated
Preview
- Run the following command in the device terminal
sudo -E gst-launch-1.0 -e qtiqmmfsrc name=camsrc ! 'video/x-raw,format=NV12,width=1280,height=720,framerate=30/1' ! autovideosink
This command starts the camera with 720p 30 FPS configuration and sends the image to the display screen for preview. If the gst pipeline status changes to "PLAYING", it means the camera is running
If two CSI card slots are simultaneously inserted with two cameras, use camera=0/1 to distinguish. camera=0 represents the first CSI card slot, and camera=1 represents the second CSI card slot. For example, to open the camera in the second CSI card slot, enter the following command:
sudo -E gst-launch-1.0 -e qtiqmmfsrc name=camsrc camera=1 ! 'video/x-raw,format=NV12,width=1280,height=720,framerate=30/1' ! autovideosink
- If you want to stop the camera stream, please press
CTRL+C

Preview + Video Recording
- Run the following command in the device terminal:
sudo -E gst-launch-1.0 -e \
    qtiqmmfsrc name=camsrc video_1::type=preview ! \
    'video/x-raw,format=NV12,width=1280,height=720,framerate=30/1,interlace-mode=progressive,colorimetry=bt601' ! \
    videocrop top=16 bottom=0 ! \
    tee name=t ! \
    queue ! waylandsink \
    t. ! \
    queue ! v4l2h264enc capture-io-mode=5 output-io-mode=5 \
    extra-controls="controls,video_bitrate=6000000,video_bitrate_mode=0;" ! \
    queue ! h264parse ! mp4mux ! filesink location=/opt/11.mp4
This command starts the camera with 720p 30 FPS configuration and saves it as a video file after h264 video encoding. If the gst pipeline status changes to "PLAYING", it means the camera is running
MP4 files are saved in the /opt/ directory
If you want to stop the camera recording, please press
CTRL+CTo play a video file, please enter the following command:; You can also double-click on the gnome desktop to open the video playback directly
sudo -E gst-launch-1.0 -e filesrc location=/opt/11.mp4 ! qtdemux ! queue ! h264parse ! v4l2h264dec capture-io-mode=5 output-io-mode=5 ! autovideosink
Preview + Photo
- Run the following command in the device terminal:
sudo -E gst-launch-1.0 -e \
    qtiqmmfsrc name=camsrc ! \
    'video/x-raw,format=NV12,width=1280,height=720,framerate=30/1' ! \
    tee name=t ! \
    queue ! videoconvert ! xvimagesink \
    t. ! \
    queue ! videoconvert ! jpegenc ! \
    multifilesink location=shot-%05d.jpg max-files=1
This command starts the camera with a 720p 30 FPS configuration and saves it as an image file after encoding the JPEG video. If the gst pipeline status changes to "PLAYING", it means the camera is running
If you want to shoot n continuously, you can modify the parameter max files=n
Press
Ctrl+Cto take a photo and exitThe generated file is shown in the following figure:

- To view photos, please enter the following command; You can also double-click on the gnome desktop to open the photo for viewing
sudo -E gst-launch-1.0 filesrc location=/opt/shot-00085.jpg ! jpegdec ! imagefreeze ! autovideosink