
USB OTG
USB On‑The‑Go (USB OTG) is a supplementary standard to USB 2.0 that enables supported OTG devices (such as smartphones and tablets) to switch between USB device mode and host mode. Under normal conditions, OTG‑capable devices still behave as USB peripherals when connected to a PC (host).
When a device enters host mode, it can directly connect to USB peripherals (such as USB flash drives, keyboards, and mice) for data access or control, without requiring a PC.
Typical usage scenarios:
- A USB printer can read files directly from a USB flash drive without a PC.
- A tablet can connect external devices (keyboard, mouse, USB storage) through OTG to extend functionality.
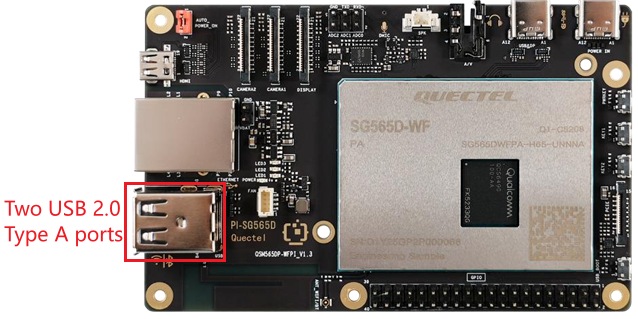
Hardware interface
Function usage
Set USB operating mode
Use the qusb command to configure the USB operating mode. qusb supports the following parameters:
| Parameters | Description |
|---|---|
init |
Initialize USB configuration (mount configfs, create device nodes, load default PID) |
bind |
Bind the USB device to the configuration (activate the current configuration) |
unbind |
Unbind the USB device (stop the current configuration) |
setpid <PID> |
Switch to the USB composition mode of the specified PID (e.g., setpid 901D enables DIAG+ADB) |
setpid -p <PID> |
Set the PID as the default mode (persist to /etc/usb/usb_pid, effective after reboot) |
showpid |
Display all supported PIDs and their corresponding function combinations |
persist <PID> |
Persist the PID only (do not switch immediately) |
USB network interface configuration
View all USB-supported functions
root@qcm6490-idp:/# qusb showpid
A4A1: NCM
4EE7: ADB
900E: DIAG
901C: DIAG,UAC2
901D: DIAG,ADB
9015: MASS_STORAGE,ADB
9024: RNDIS,ADB
902A: RNDIS,MASS_STORAGE
902B: RNDIS,ADB,MASS_STORAGE
902C: RNDIS,DIAG
902D: RNDIS,DIAG,ADB
902F: RNDIS,DIAG,MASS_STORAGE
908C: NCM,ADB
90CA: DIAG,UAC2,ADB
90CB: DIAG,UVC,ADB
90CC: DIAG,UAC2,UVC,ADB
90DF: DIAG,UVC
90E0: DIAG,UAC2,UVC
9135: DIAG,QDSS,ADB
9136: DIAG,QDSS
F000: MASS_STORAGE
F00E: RNDIS
Configuration steps
Switch USB mode (Enable NCM+ADB).
qusb setpid 908CConnect the board's Type-C port to the PC's USB port (PC must be running Linux).
Execute
ifconfig -aon the device shell to verify the recognized usb0 interface.Configure device IP address for the board's usb0 interface:
ip addr add dev usb0 192.168.0.5/24Configure PC-side IP address (Example PC interface name is
enp0s20f0u13):ip addr add dev enp0s20f0u13 192.168.0.6/24Replace
enp0s20f0u13with the actual interface name detected on your PC.Test the network: On the PC shell, run
ping 192.168.0.5. If the device responds, USB OTG networking is working normally.