
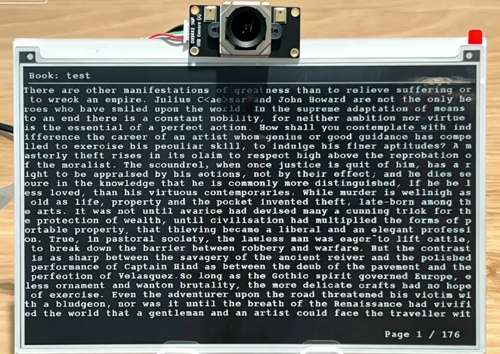
E-Ink Reader
This project is an intelligent electronic paper display reader based on the Quectel Pi H1 Smart Single-Board Computer. The system combines the low-power display characteristics of electronic paper with camera-based eye-tracking technology to achieve natural page-turning without manual operation. It detects user eye movement changes for page navigation, supplemented by physical buttons for auxiliary input to enhance system reliability.
In terms of display, the system adopts a partial refresh and partition rendering strategy, supports automatic typesetting and continuous reading of Chinese and English texts, and also has page memory and quick wake-up functions, making it suitable for long-term reading and embedded smart terminal application scenarios.
Development Resource Summary
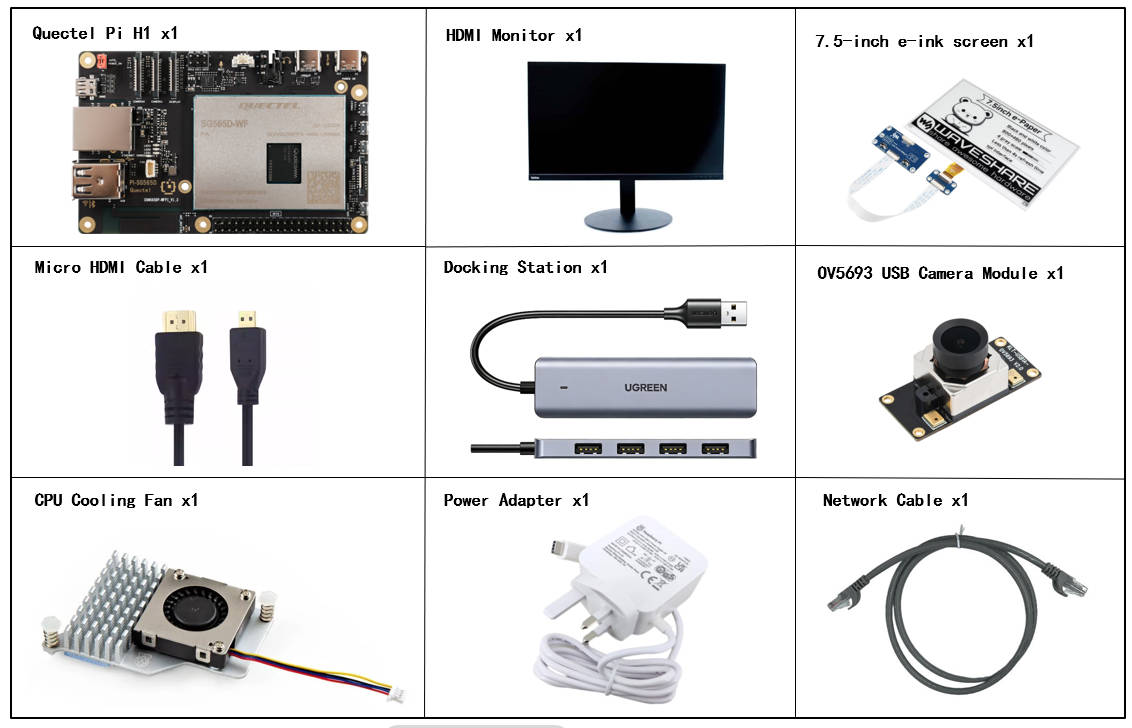
Development Component List
The development accessories are for reference only, and may vary depending on the development environment. For example, if you are developing via SSH remote connection, you may not need to use a USB docking station, and the display screen can also be replaced as needed.
| Component Name | Quantity | Specifications |
|---|---|---|
| Quectel Pi H1 Smart Single-Board Computer | 1 | - |
| USB-C Power Adapter | 1 | 27W USB Type-C Interface Charger 1.2m Cable Length China Standard Power PD Power Suitable for Raspberry Pi 5 |
| Micro HDMI Cable | 1 | Specification: Micro HDMI 2.0; Length: 1m; Connector: HDMI-A (male)-HDMI-D (male) |
| Ethernet Cable | 1 | Length: 1m; Speed: Gigabit |
| CPU Cooling Fan | 1 | Raspberry Pi 5 Official Active Cooler with Thermal Pad |
| 7.5-inch E-Paper Display | 1 | 7.5inch E-Ink display HAT for Raspberry Pi |
| USB Hub | 1 | UGREEN USB3.0 Hub |
| USB Camera Module | 1 | OV5693 5MP USB Camera Module |
| Monitor | 1 | 24-inch HDMI Display |
Component Physical Reference
Quick Start
Development Preparation
The Quectel Pi H1 Smart Single-Board Computer comes pre-installed with Debian 13 system image, eliminating the need for additional image burning.
Hardware Connections
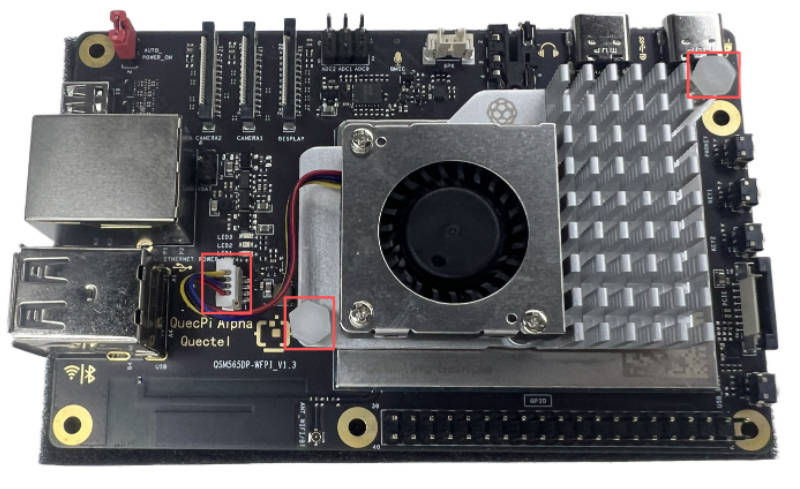
Cooling Fan Installation
First insert the cooling fan's cable into the FAN slot on the single-board computer, then secure both ends of the heat sink to the reserved holes on the single-board computer as shown below:
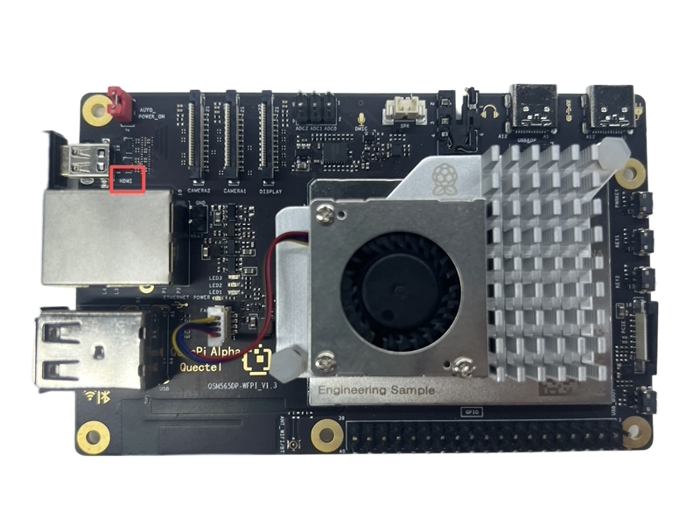
Display Connection
Connect one end of the Micro HDMI cable to the single-board computer's Micro HDMI interface and the other end to the monitor's HDMI interface.
Input Device Connection
Connect the USB keyboard and mouse to the USB interfaces of the expansion dock, then connect the expansion dock to the USB interface of the single-board computer. For wireless input devices, insert the receiver into the USB port of the expansion dock.

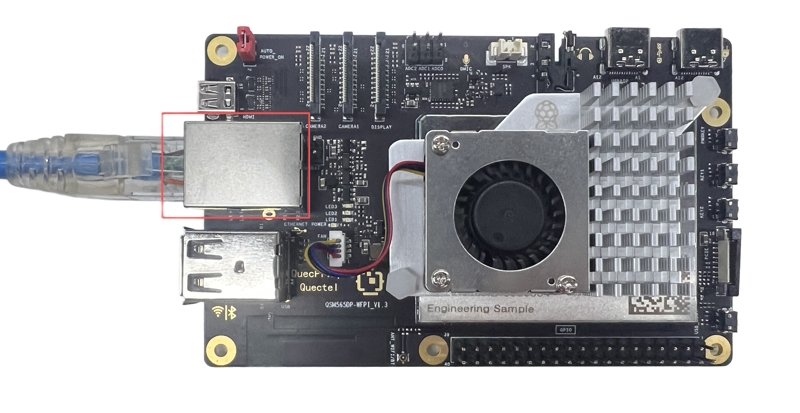
Network Connection
Connect one end of the network cable to the gigabit port of the single-board computer and the other end to the router port (ensure the router is connected to the internet).
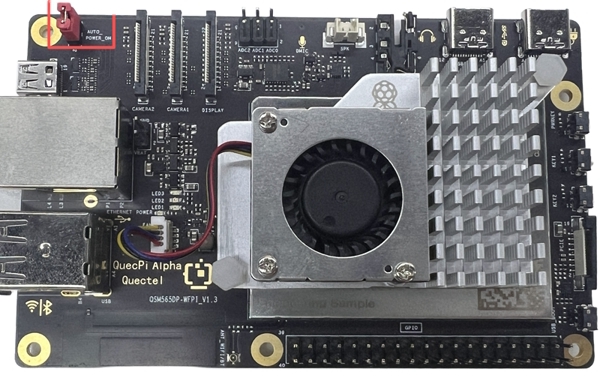
Jumper Cap Connection
Ensure that the pins marked with AUTO_POWER_ON silk screen in the upper left corner of the single-board computer are shorted with a jumper cap.
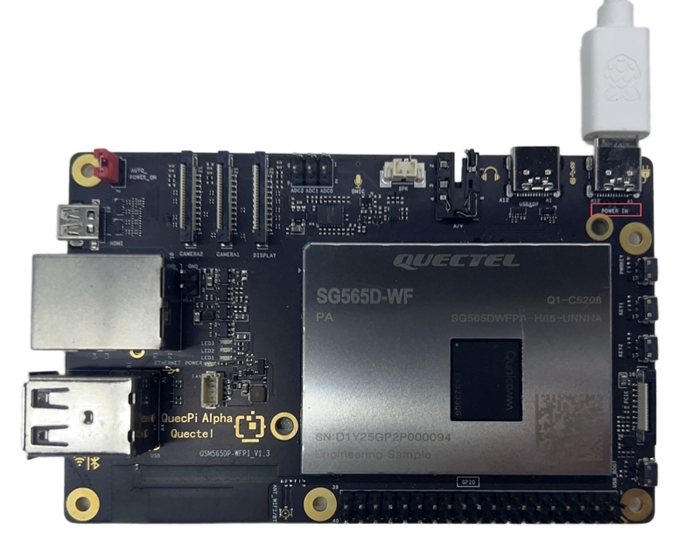
Power Connection
Connect the USB-A end of the USB-A power cable to the power adapter and the USB-C end to the power port of the single-board computer (usually labeled POWER IN).
E-Paper Display Connection
Use PIN ribbon cable connection, refer to the pin correspondence table below:
| EPD Pin | BCM2835 Code | Board Physical Pin Number |
|---|---|---|
| VCC | 3.3V | 3.3V |
| GND | GND | GND |
| DIN | MOSI | 19 |
| CLK | SCLK | 23 |
| CS | CE0 | 24 |
| DC | 25 | 22 |
| RST | 17 | 11 |
| BUSY | 24 | 18 |
| PWR | 18 | 12 |
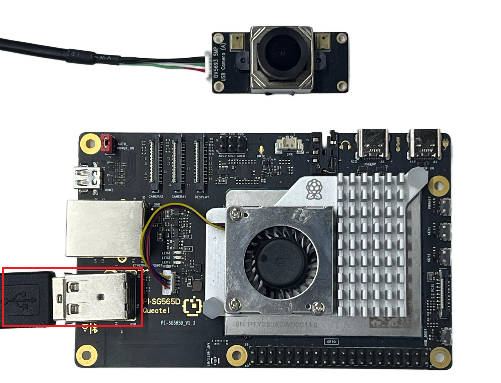
Camera Connection
Simply connect the OV5693 camera module to the USB interface of the single-board computer or expansion dock.
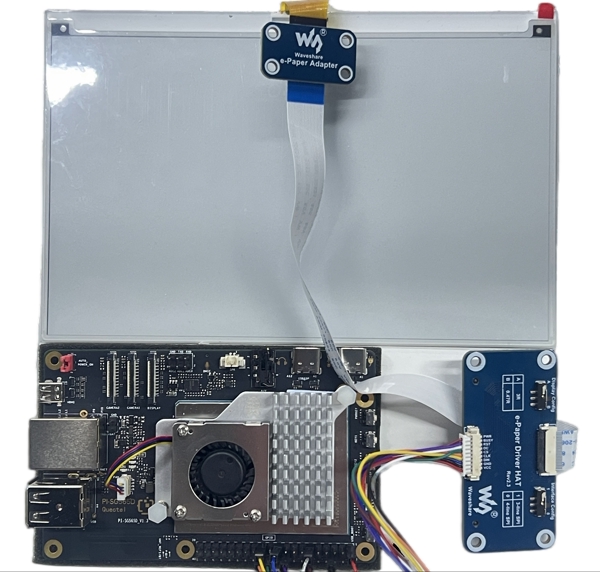
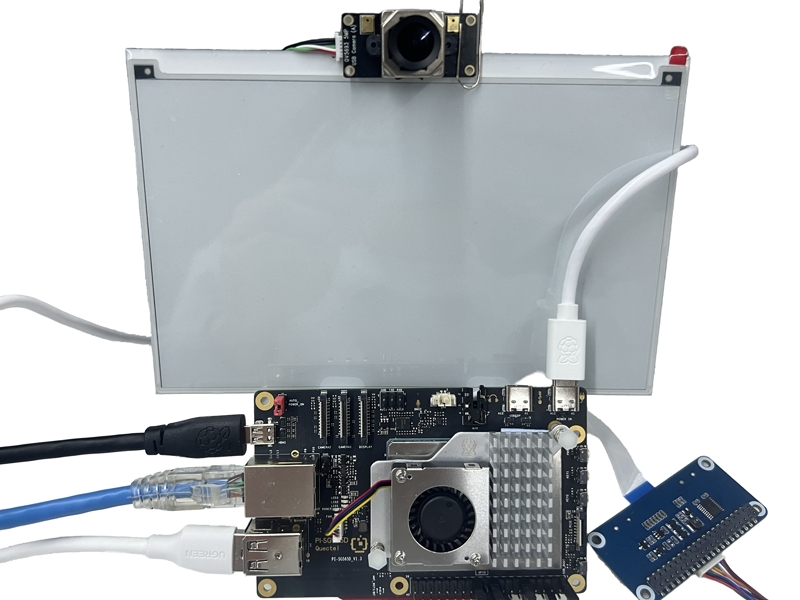
Completed Connection Reference
Project Implementation
Install LG Library
sudo apt update && sudo apt install python3-setuptools wget
wget https://github.com/joan2937/lg/archive/master.zip
unzip master.zip
cd lg-master
make
sudo make install
Obtain Project Source Code
- Create a new e-ink-reader folder in the terminal of the single-board computer to store project source code.
mkdir ~/e-ink-reader
cd e-ink-reader
- Use the git command to clone the project code.
#Install git
sudo apt install -y git
#Configure Git and then clone the project code according to online tutorials.
git clone https://github.com/Quectel-Pi/demo-inkscreen-reader.git
- Run the command in the terminal to modify folder permissions.
sudo chmod -R 755 folder_path
Example: sudo chmod -R 755 ~/e-ink-reader
Configure Python Environment
Currently, the default Python version is 3.13, while the development environment required by the MediaPipe model we use is Python 3.9-3.12. We need to re-specify the Python path. Since Python 3.10 is already installed in the system, we only need to modify the default Python path.
# Backup the current Python path link
sudo cp /usr/bin/python3 /usr/bin/python3.backup
# Delete the current Python path link
sudo rm /usr/bin/python3
# Create a new path link pointing to Python 3.10
sudo ln -s /usr/bin/python3.10 /usr/bin/python3
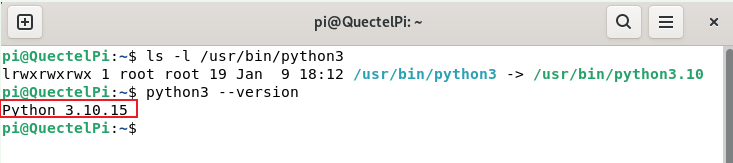
# Verify the changes
ls -l /usr/bin/python3
python3 --version
Activate Python Virtual Environment
Execute the following command to create and activate a Python virtual environment.
python3.10 -m venv folder_name
Example:
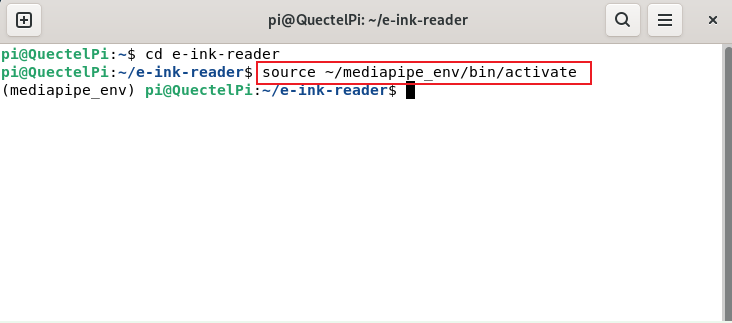
python3.10 -m venv ~/mediapipe_env
source ~/mediapipe_env/bin/activate
Install Python Dependencies
- Install project dependencies in the e-ink-reader/demo-inkscreen-reader directory:
pip install --upgrade pip
pip install -r requirements.txt
- Install the evdev library separately:
sudo ln -s /usr/bin/aarch64-linux-gnu-gcc /usr/bin/aarch64-qcom-linux-gcc
CPPFLAGS="-I/usr/include/python3.13 -I/usr/include/python3.10" CFLAGS="-I/usr/include/python3.13 -I/usr/include/python3.10" pip3 install --no-binary evdev evdev==1.9.2
Compile E-Paper Driver Program
Compile the e-paper reader program in the e-ink-reader/demo-inkscreen-reader/components/e-Paper/Quectel-Pi-H1/c directory. If an epd file appears in this directory, the compilation is successful.
cd ~/e-ink-reader/demo-inkscreen-reader/components/e-Paper/Quectel-Pi-H1/c
make CC=gcc EPD=epd7in5V2
Create udev Rule File
- First enter the following command to create and open the udev rule file:
sudo nano /etc/udev/rules.d/99-uinput.rules
- Add the following statement to the file, press "ctrl + o" + Enter to save the edited content, then press "ctrl + x" to exit editing:
KERNEL=="uinput", MODE="0660", GROUP="input"

Add Input Group
Add user to input group:
sudo usermod -aG input pi
Enable SPI Function
Enter the following command in the terminal to enable SPI function:
sudo qpi-config 40pin set
Verify Configuration
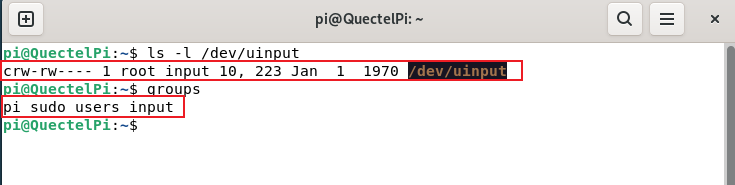
- After restarting the system, enter the following commands in the terminal to verify whether the user is in the input group and whether the udev rule configuration takes effect:
ls -l /dev/uinput
groups
- Verify if SPI function is enabled:
ls /dev/spi*

Configure Passwordless Program Execution
Enter the following command in the terminal to configure passwordless execution of the epd program:
echo "pi ALL=(ALL) NOPASSWD: /home/pi/e-ink-reader/demo-inkscreen-reader/components/e-Paper/Quectel-Pi-H1/c/epd" | sudo tee /etc/sudoers.d/e-ink-reader
Prepare Book Files
Put your .txt files in the e-ink-reader/demo-inkscreen-reader/books directory and ensure encoding is GB2312.
Windows user operation path: Notepad → Save As → Select encoding "ANSI" (which is GB2312).
Run Program
Open the system terminal and execute the build.sh script in the e-ink-reader/demo-inkscreen-reader path to run the project:
cd ~/e-ink-reader/demo-inkscreen-reader
./build.sh
Function List
Eye-tracking Page Turning Operations
- Next Page: Maintain reading posture and read at normal speed from the top of the screen downward. When your gaze reaches the bottom of the screen, simply move your eyes back to the top of the screen to trigger page turning.
- Previous Page: Page up must be turned using physical buttons.
Physical Button Page Turning Operations
- Short press KEY1: Next page
- Short press KEY2: Previous page
- Long press KEY1: Switch to next book
- Long press KEY2: Switch to previous book
Application Demonstration
Technical Support and Contributions
If you encounter any issues during use, please submit technical inquiries on the Quectel Official Forum. Our technical support team will respond promptly.
Project open-source repository: https://github.com/Quectel-Pi/demo-inkscreen-reader/
We welcome you to submit Issues to report problems or Pull Requests to contribute code improvements!