
Node-RED Based Edge GateAway
This project is a Node-RED Based Edge GateAway built on the Quectel Pi H1 Smart Single-Board Computer.
Using the Quectel Pi H1 as an edge-side computing and protocol aggregation node, it enables local LAN-based device onboarding, data acquisition and aggregation, rule orchestration, and visualized presentation, while persisting data to a local database. This forms a closed-loop architecture of “acquisition–processing–storage–visualization”, suitable for industrial sites and edge-computing scenarios with high requirements for real-time performance, reliability, and localized deployment.
Development Resources Summary
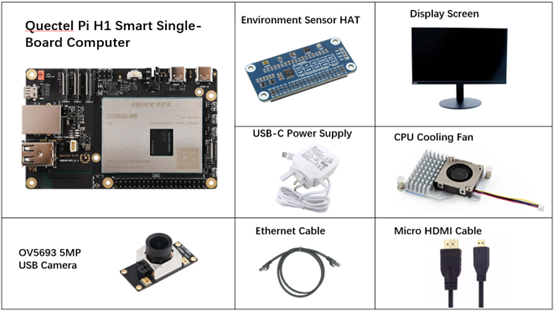
Development Accessories List
The development accessories are provided for reference only. Different development environments may vary. For example, if development is performed via an SSH remote connection, the USB expansion board is not required, and the display can also be replaced as needed.
| Accessory Name | Quantity | Specifications |
|---|---|---|
| Quectel Pi H1 Smart Single-Board Computer | 2 | Quectel Pi H1 Smart Single-Board Computer |
| Environment Sensor HAT | 1 | Environment Sensor HAT |
| OV5693 5MP USB Camera | 1 | OV5693 5MP USB Camera |
| USB-C Power Supply | 1 | 27W USB Type-C Interface Charger 1.2m Cable Length Standard Power PD Power Supply Suitable for Raspberry Pi 5 |
| CPU Cooling Fan | 1 | Raspberry Pi 5 Official Active Cooler with Heatsink and Thermal Pad |
| USB-C DP Cable / Micro HDMI Cable | 1 | Spec: DP 1.4; Length: 1m; USB-C (male) to USB-C (male) Spec: Micro HDMI 2.0 ; Length: 1m; HDMI-A (male) to HDMI-D (male) |
| Ethernet Cable | 1 | Length: 1m; Transmission Rate: Gigabit |
| Display Screen | 1 | 24-inch HDMI Monitor |
Physical Reference of Accessories
Get Started Quickly
Development Preparation
The Quectel Pi H1 Smart Single-Board Computer comes with the Debian 13 system image preinstalled at the factory. Therefore, there is no need to flash the image again; simply follow the steps below.
Hardware Connection
Gateway Side (H1-A)
1.Display Connection
Connect one end of the Micro HDMI cable to the Micro HDMI port of the Quectel Pi H1 Smart Single-Board Computer, and connect the other end to the display's HDMI port.
2.Input Device Connection
Connect the USB keyboard and mouse to the two USB-A ports on the Quectel Pi H1 Smart Single-Board Computer. If you are using wireless input devices, simply plug the receiver into a USB port.
3.Network Connection
Connect one end of the Ethernet cable to the Gigabit Ethernet port of the Quectel Pi H1 Smart Single-Board Computer, and connect the other end to a LAN port on the router.
Alternative option: Connect to the same local network via Wi-Fi.

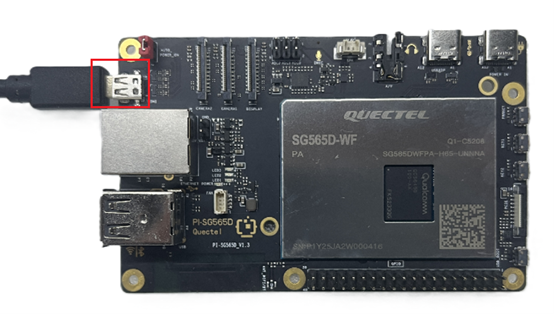
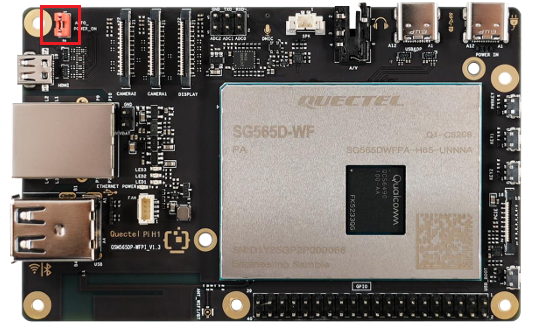
4.Jumper Cap Connection
On the header pins at the upper-left corner of the Quectel Pi H1 Smart Single-Board Computer labeled AUTO_POWER_ON, make sure the pins are shorted with a jumper cap.
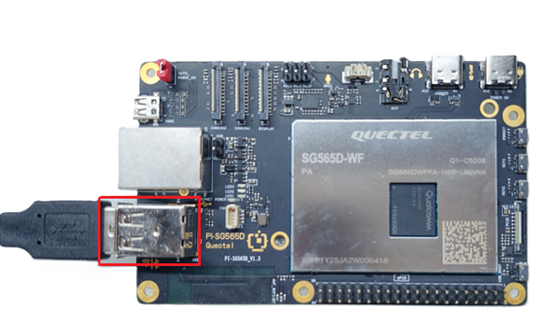
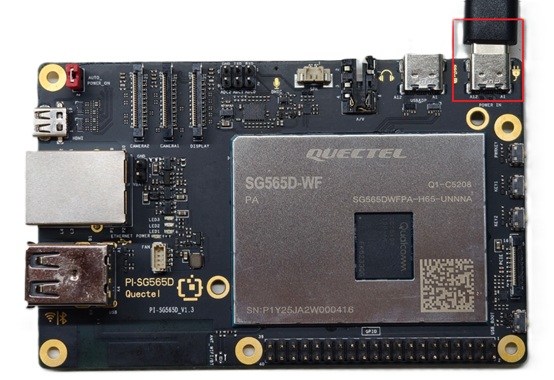
5.Power Connection
Connect the USB-A end of the power cable to the power adapter, and connect the USB-C end to the power input port of the Quectel Pi H1 Smart Single-Board Computer (labeled POWER IN).
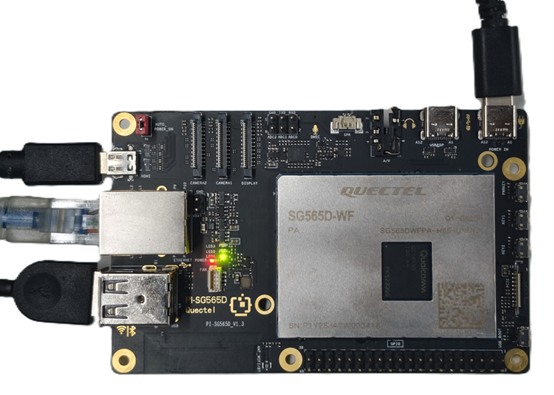
6.Reference for completed connections
Collection Side (H1-B)
1.Network Connection
Connect one end of the Ethernet cable to the Gigabit Ethernet port of the Quectel Pi H1 Smart Single-Board Computer, and connect the other end to a LAN port on the router.
Alternative option: Connect to the same local network via Wi-Fi.
2.Jumper Cap Connection
On the header pins at the upper-left corner of the Quectel Pi H1 Smart Single-Board Computer labeled AUTO_POWER_ON, make sure the pins are shorted with a jumper cap.
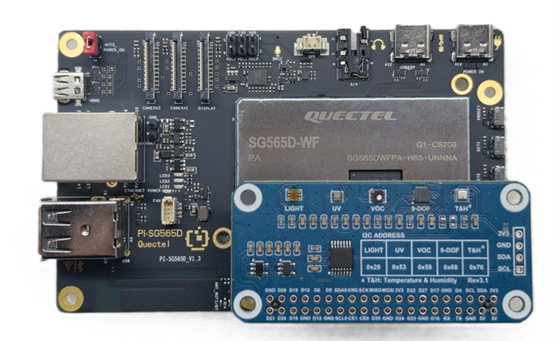
3.Environmental Sensor Expansion Board Connection
Connect the environmental sensor expansion board to the 40-pin header of the Quectel Pi H1 Smart Single-Board Computer.
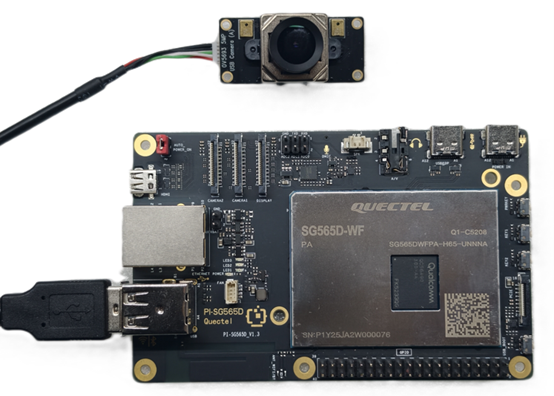
4.Camera Connection
Connect the USB camera to a USB-A port.
5.Power Connection
Connect the USB-A end of the power cable to the power adapter, and connect the USB-C end to the power input port of the Quectel Pi H1 Smart Single-Board Computer (labeled POWER IN).
6.Reference for completed connections

Project Implementation
This section is divided into “Gateway Side / Collection Side” for easier deployment.
Gateway Side (H1-A)
1.Update package sources
sudo apt update
2.Install Node-RED
sudo apt install build-essential git curl
bash <(curl -sL https://github.com/node-red/linux-installers/releases/latest/download/update-nodejs-and-nodered-deb)
Enable auto-start on boot:
sudo systemctl enable nodered.service
To disable the service, run:
sudo systemctl disable nodered.service
sudo systemctl restart nodered
3.Install Mosquitto and sqlite3
sudo apt install -y sqlite3 mosquitto mosquitto-clients
Enable auto-start on boot:
sudo systemctl enable --now mosquitto
Create and edit the Mosquitto configuration:
sudo nano /etc/mosquitto/conf.d/edge-listener.conf
Use the following configuration, then press Ctrl+O, Enter, Ctrl+X to save and exit:
listener 1883 0.0.0.0
allow_anonymous true
Restart the service
sudo systemctl restart mosquitto
4.Initialize the SQLite Database
The database path used by the Node-RED SQLite node is: /home/pi/edge_db/edge.db
First, create the directory and initialize the table schema:
mkdir -p ~/edge_db
sqlite3 ~/edge_db/edge.db << 'SQL'
CREATE TABLE IF NOT EXISTS telemetry (
  id INTEGER PRIMARY KEY AUTOINCREMENT,
  deviceId   TEXT    NOT NULL,
  ts         INTEGER,
  gatewayTs  INTEGER,
  temperature REAL,
  humidity    REAL,
  pressure    REAL
);

CREATE INDEX IF NOT EXISTS idx_telemetry_device_ts ON telemetry(deviceId, ts);
SQL
The fields written to the database by Node-RED are
(deviceId, ts, gatewayTs, temperature, humidity, pressure), anddeviceIdis obtained by parsing the topicedge/v1/<deviceId>/telemetry.
5.Accessing the Dashboard
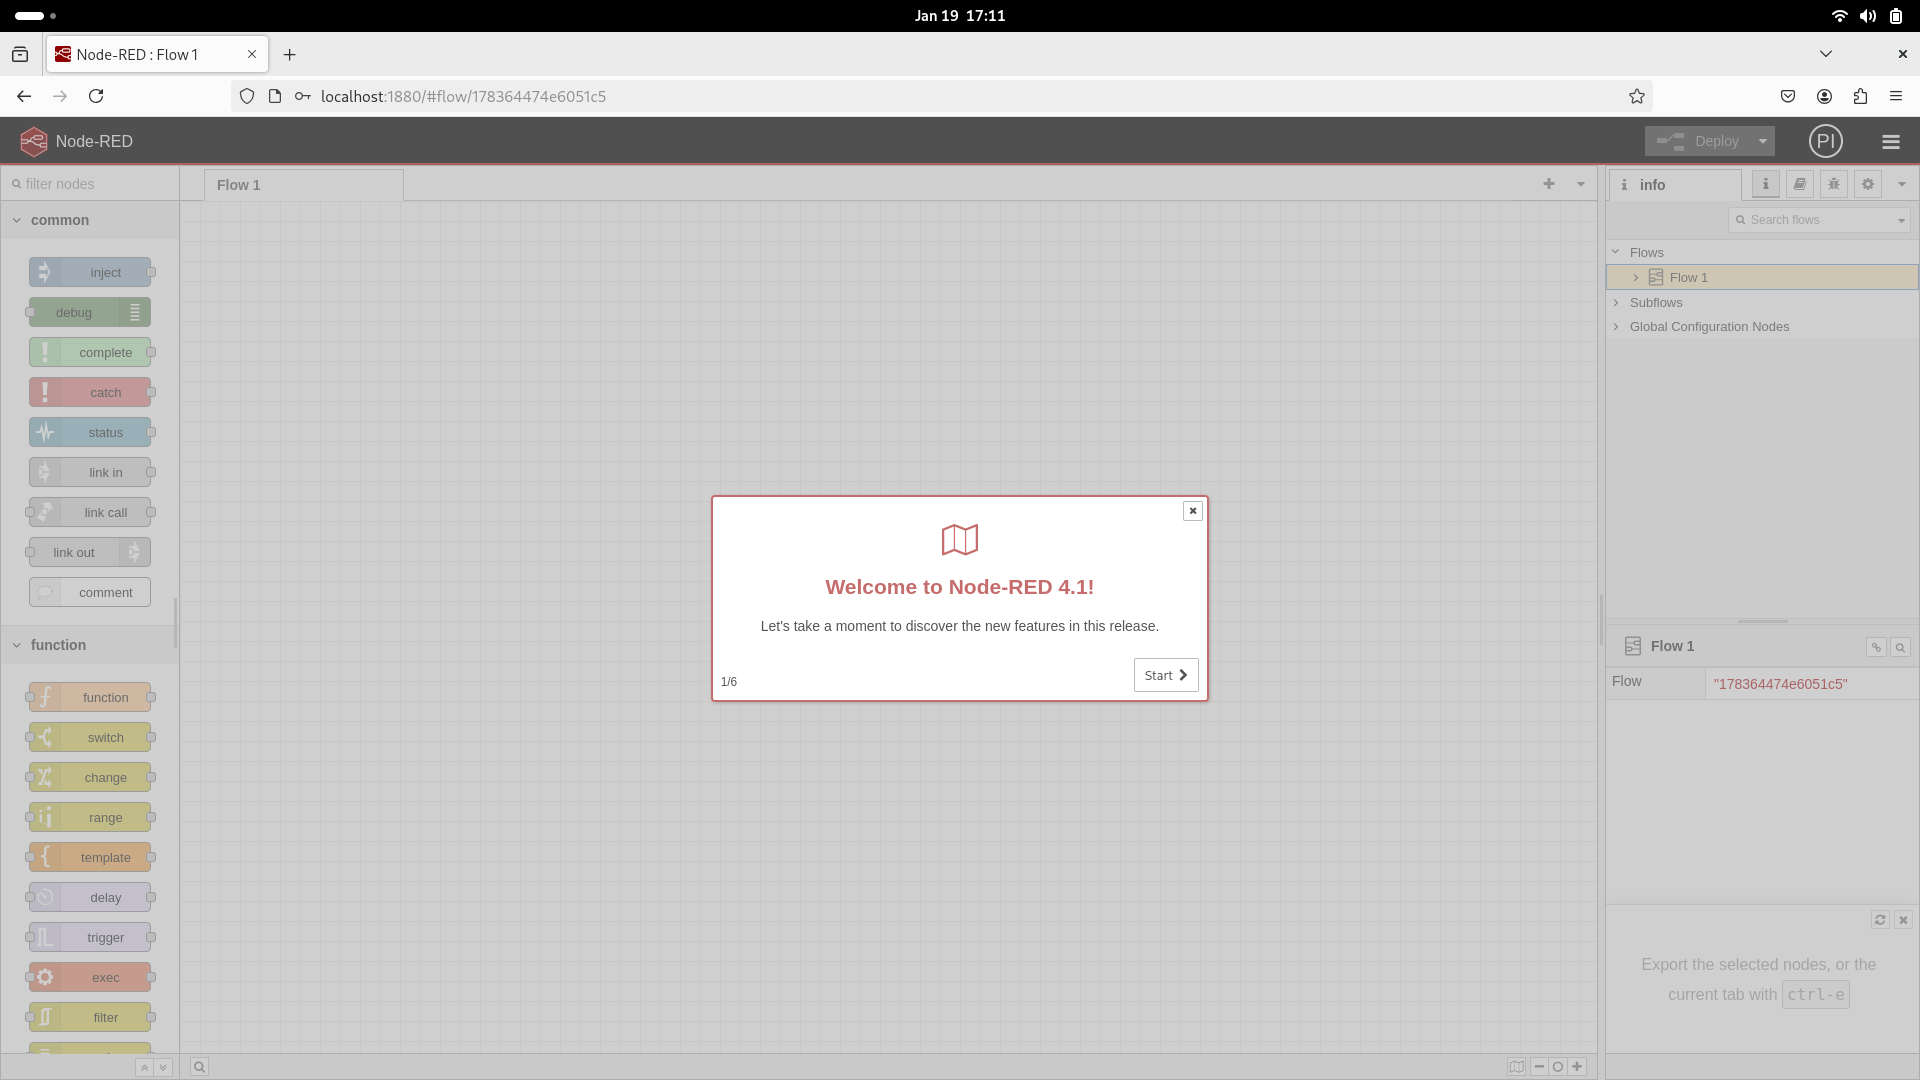
If you are using a browser on the Pi desktop, open: http://localhost:1880/.
If you are browsing from another machine, use the Pi’s hostname or IP address. You can find the IP address by running hostname -I on the Pi, then access: http://<hostname>:1880.
The web interface is shown in the figure below:
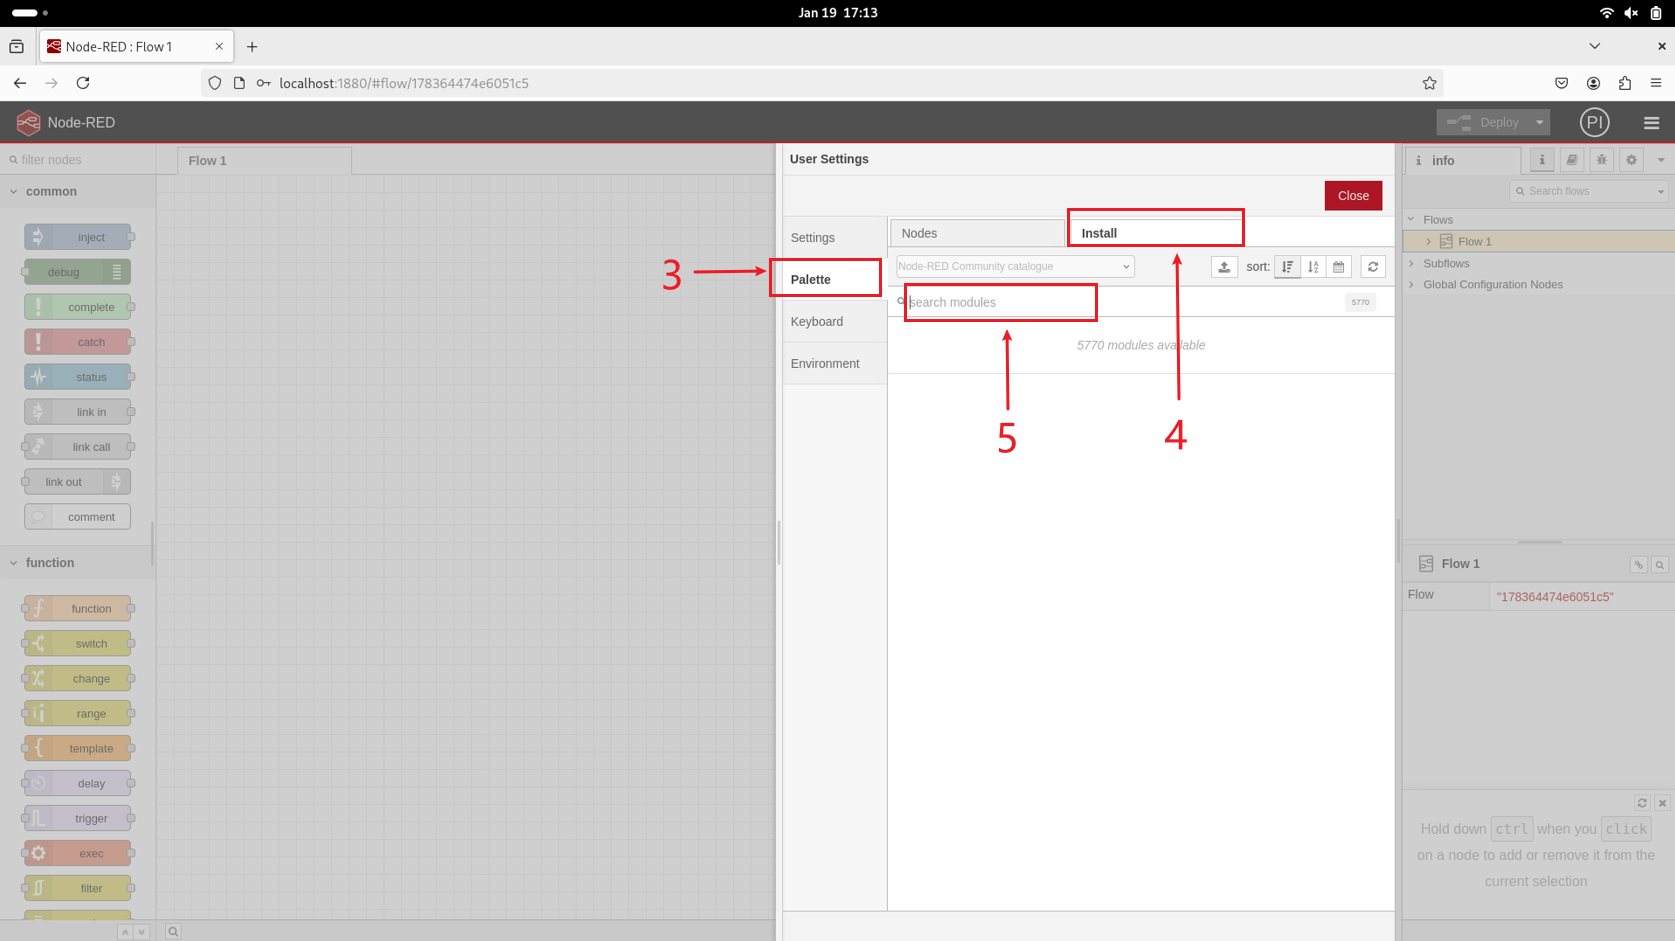
Install the required nodes:
After entering the editor, click the top-right menu, then go to Settings → Palette → Install to open the node installation page. Search for the nodes below and install them.
node-red-node-sqlite
node-red-dashboard

6.Import the Node-RED Flow
1.Place the flow.json file from flow.json under .node-red/lib/flows/.
cd ~/.node-red/lib/flows/
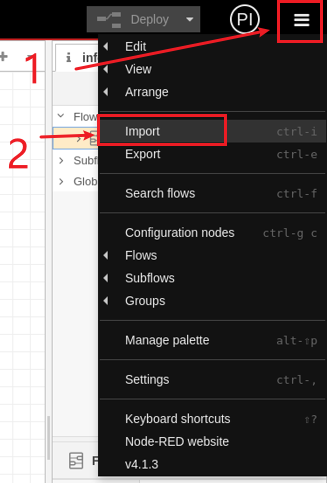
2.In the editor UI, click the top-right menu, then select Import → Local, choose flow.json, and click Import.
3.After importing the flow, click Deploy to apply the changes.

Collection Side (H1-B)
The collection side uses Python + paho-mqtt + smbus2, and calls mjpg-streamer to output MJPEG:
1.Install base components
sudo apt update
sudo apt install -y git python3-venv v4l-utils
2.Install mjpg-streamer (for MJPEG video streaming)
Install build dependencies:
sudo apt install -y git cmake build-essential libjpeg-dev
Clone the source code and build:
cd ~
git clone https://github.com/jacksonliam/mjpg-streamer.git
cd mjpg-streamer/mjpg-streamer-experimental
make
3.Obtain the code and create a Python virtual environment
Place the edge_h1_sensor folder from the code package under the user directory /home/pi:
cd ~/edge_h1_sensor
python3 -m venv venv
source venv/bin/activate
4.Upgrade pip and install OpenCV and paho-mqtt
pip install --upgrade pip opencv-python paho-mqtt
pip install -U smbus2
5.Configure the 40-pin interface configuration file
Enable I2C on the 40-pin header. In the terminal, run sudo qpi-config 40pin set, then restart the Quectel Pi H1 Smart Single-Board Computer for the configuration to take effect.
6.Start the program
Return to the project code directory, activate the Python virtual environment, and run the program:
cd ~/edge_h1_sensor
source venv/bin/activate
sudo -E ~/edge_h1_sensor/venv/bin/python h1_sensor_agent.py
Note: You need to modify the code and replace the gateway IP address with the actual IP address.
Application Demo
Node-RED UI
Node-RED editor URL: http://<hostname>:1880
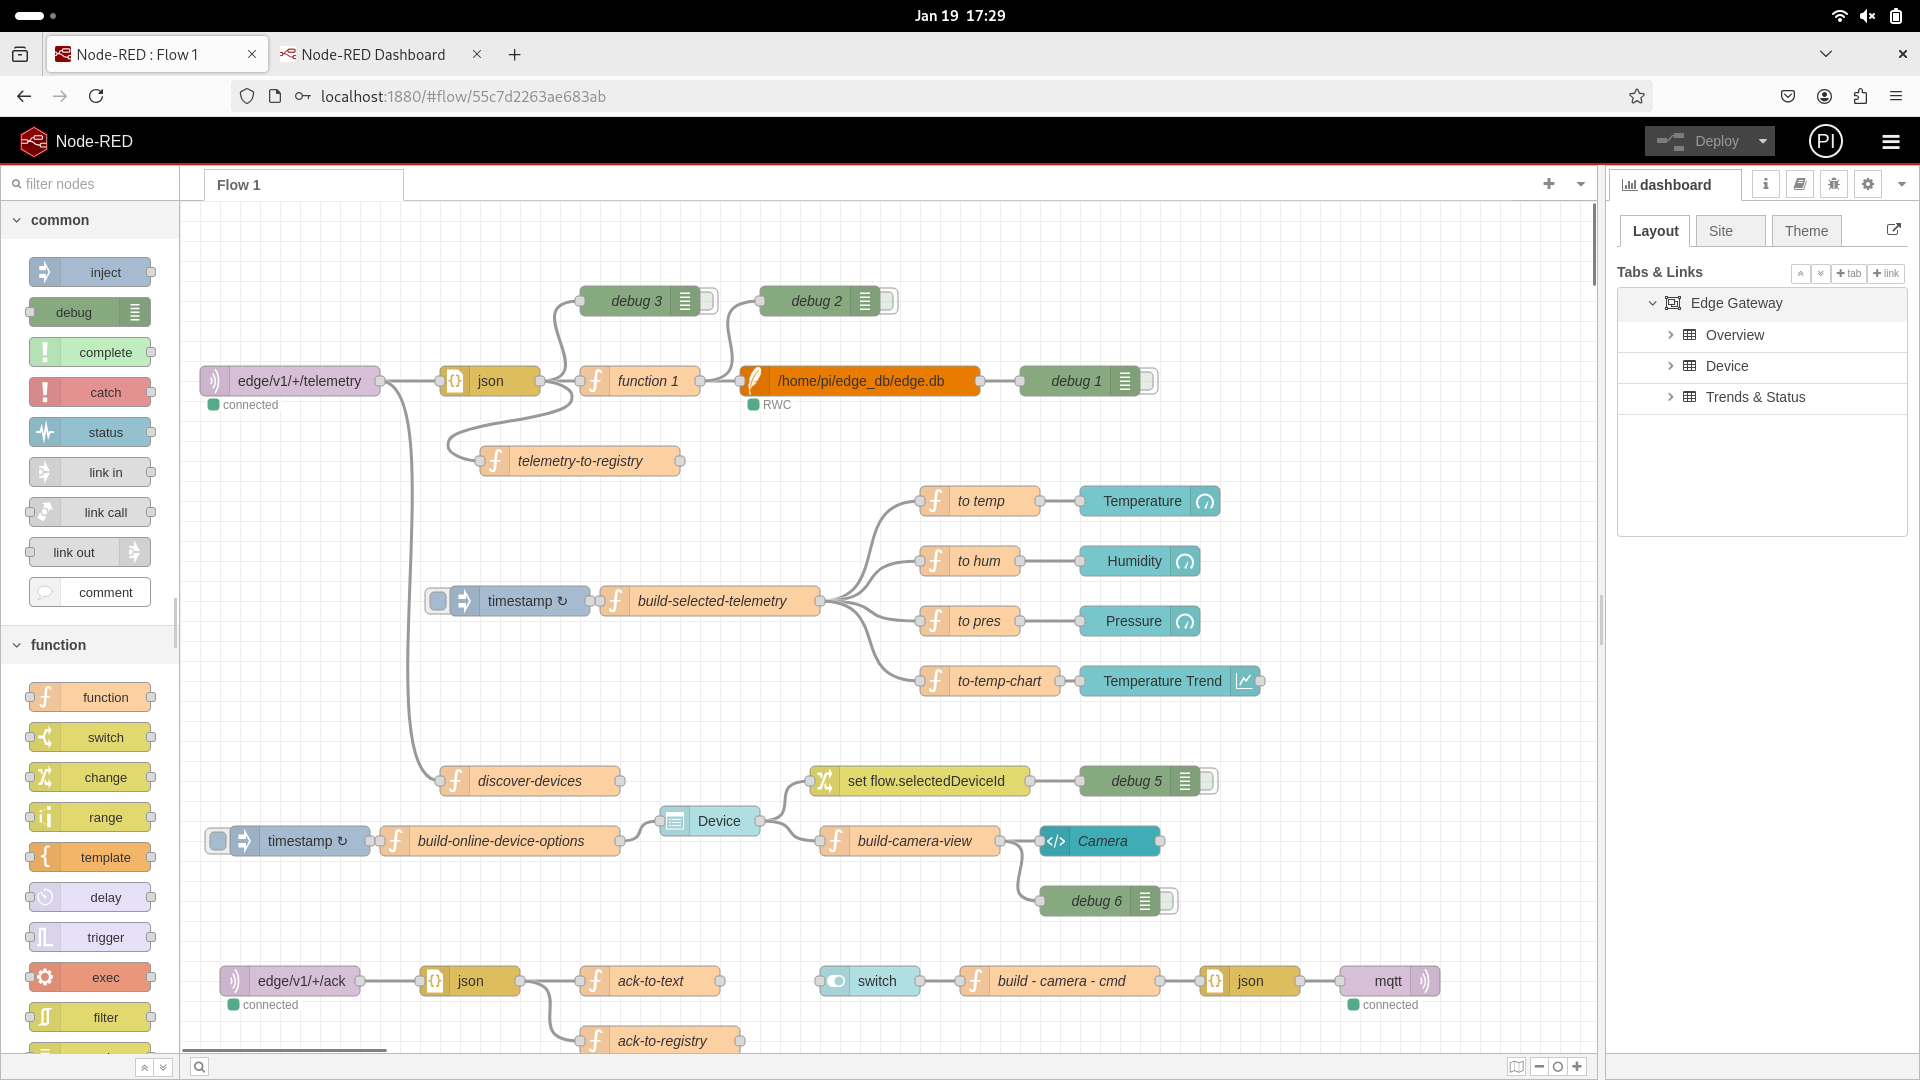
Node-RED UI URL: http://<hostname>:1880/ui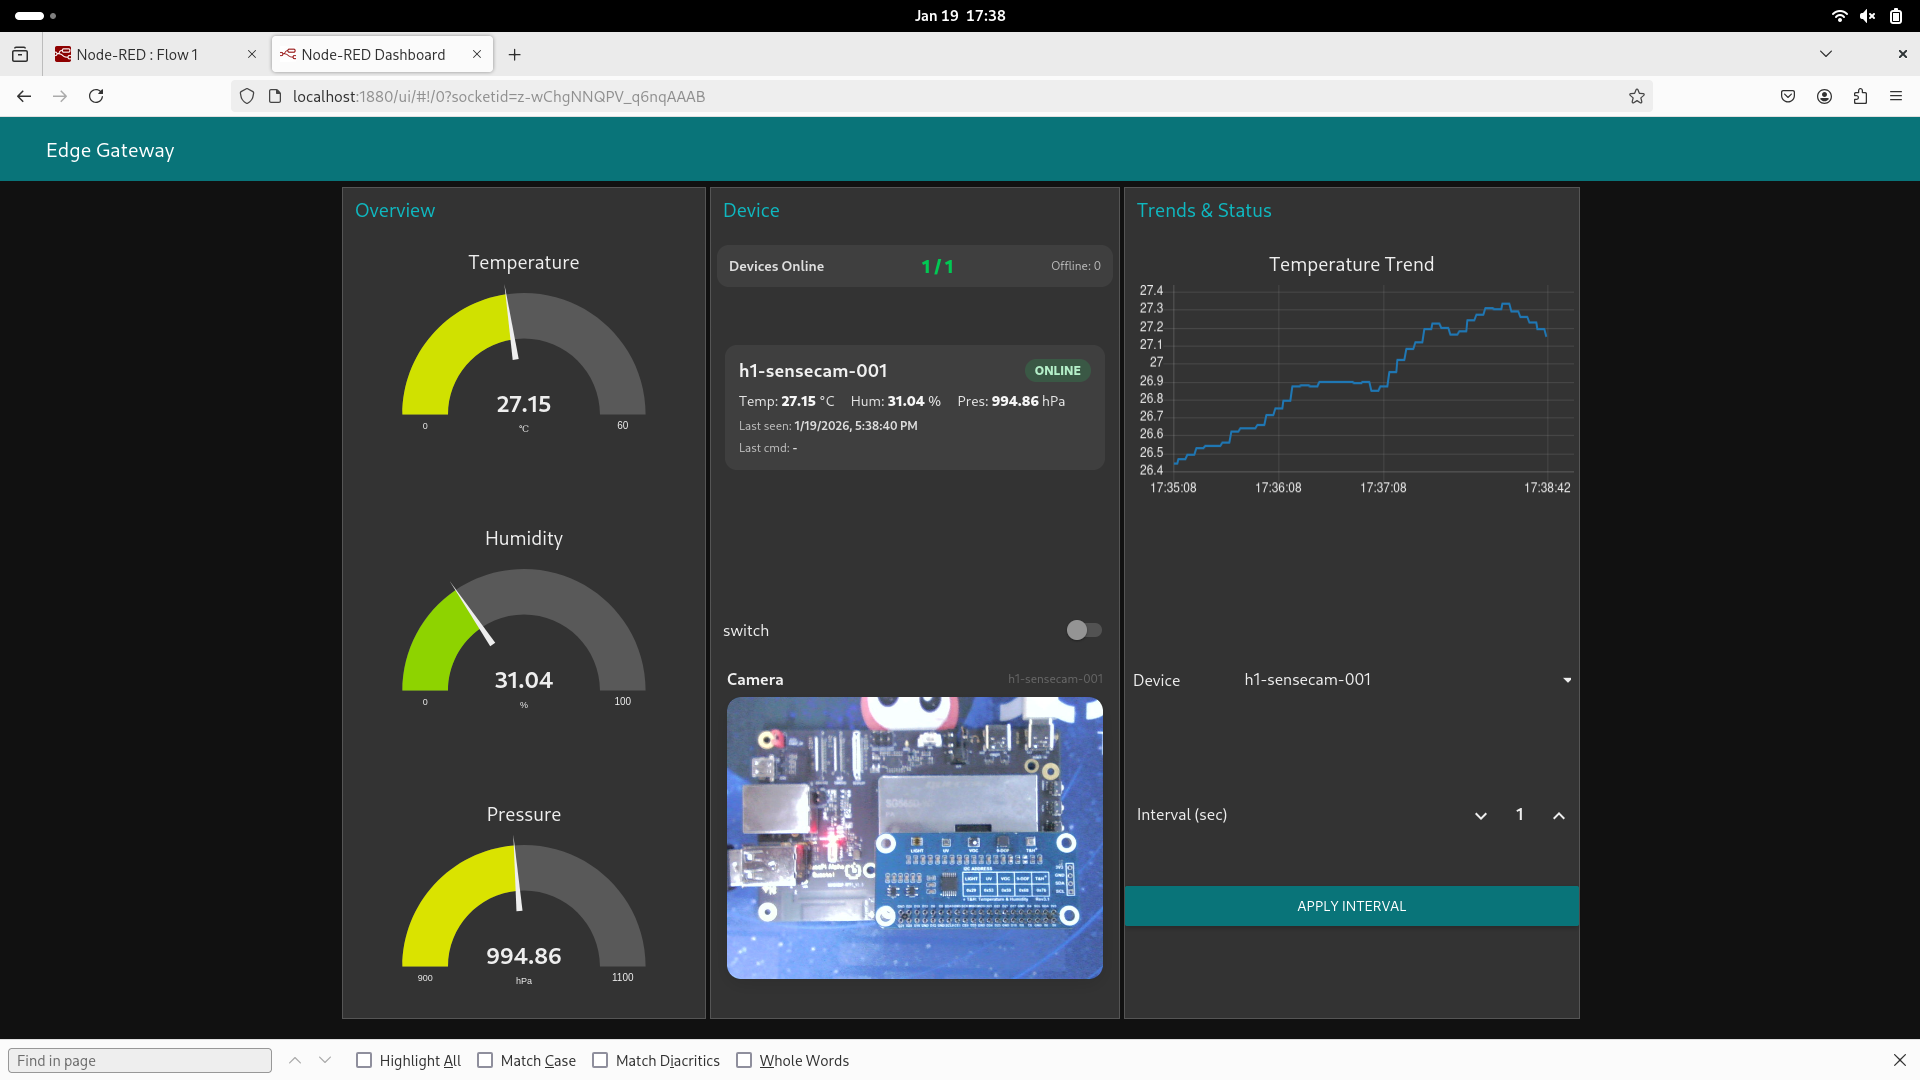
Example: Querying Database Data
On the gateway side, this project writes telemetry data to an SQLite database. The default path is:
- Database file:
/home/pi/edge_db/edge.db - Table:
telemetry - Fields:
deviceId, ts, gatewayTs, temperature, humidity, pressure
Enter the database
sqlite3 /home/pi/edge_db/edge.db
List tables and view the table schema
.tables
.schema telemetry
View the latest records
Replace h1-sensecam-001 with the actual device ID:
SELECT deviceId, ts, gatewayTs, temperature, humidity, pressure
FROM telemetry
WHERE deviceId = 'h1-sensecam-001'
ORDER BY ts DESC
LIMIT 20;
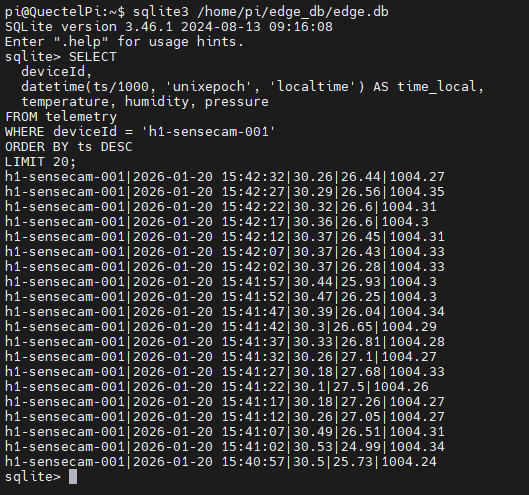
Convert timestamps to human-readable time
ts is in milliseconds.
SELECT
  deviceId,
  datetime(ts/1000, 'unixepoch', 'localtime') AS time_local,
  temperature, humidity, pressure
FROM telemetry
WHERE deviceId = 'h1-sensecam-001'
ORDER BY ts DESC
LIMIT 20;
Technical Support and Contributions
If you encounter any issues during use, please submit technical inquiries on the Quectel Official Forum. Our technical support team will respond promptly.