OpenClaw Deployment
OpenClaw is a lightweight, highly scalable open-source AI Agent scheduling platform designed for low-threshold agent implementation. It enables rapid construction of custom AI agents without complex development, and is perfectly compatible with hardware environments across all scenarios such as edge development boards, AI BOX, and cloud servers.
Key Features:
- Lightweight Deployment: No complex environment dependencies, simple deployment process, low resource consumption, and compatible with various low-config hardware environments;
- Highly Scalable Design: Supports plug-in based expansion, enabling quick access to multiple channels like Feishu to meet functional expansion needs for different scenarios;
- Full-Scenario Adaptation: Compatible with various hardware environments including edge development boards, AI BOX, and cloud servers, adapting to different deployment scenarios;
- Low-Threshold Usage: No professional development capabilities required. Complete agent construction and debugging through wizard-style configuration and simple command-line operations;
Installing OpenClaw
Update System Dependencies and Install Required Tools
Execute the following commands to update the system software sources and install basic tools such as curl, git to prepare for subsequent installation:
sudo apt update
sudo apt install -y curl git ca-certificates build-essential jq
Install Node.js 22
OpenClaw officially requires the Node.js runtime environment to be no lower than version 22. Execute the following commands to complete the installation:
curl -fsSL https://deb.nodesource.com/setup_22.x | sudo -E bash -
sudo apt install -y nodejs
After installation, verify that the version meets the requirements:
node -v   # Normal output should be v22.x.x or higher
npm -v    # Normal output should be 10.x.x or higher
Install OpenClaw
Install the latest version of OpenClaw globally via npm and verify the installation result:
sudo npm install -g openclaw@latest
openclaw --version
Installation usually takes 5–10 minutes, depending on the download speed of the network environment.
Initialize OpenClaw
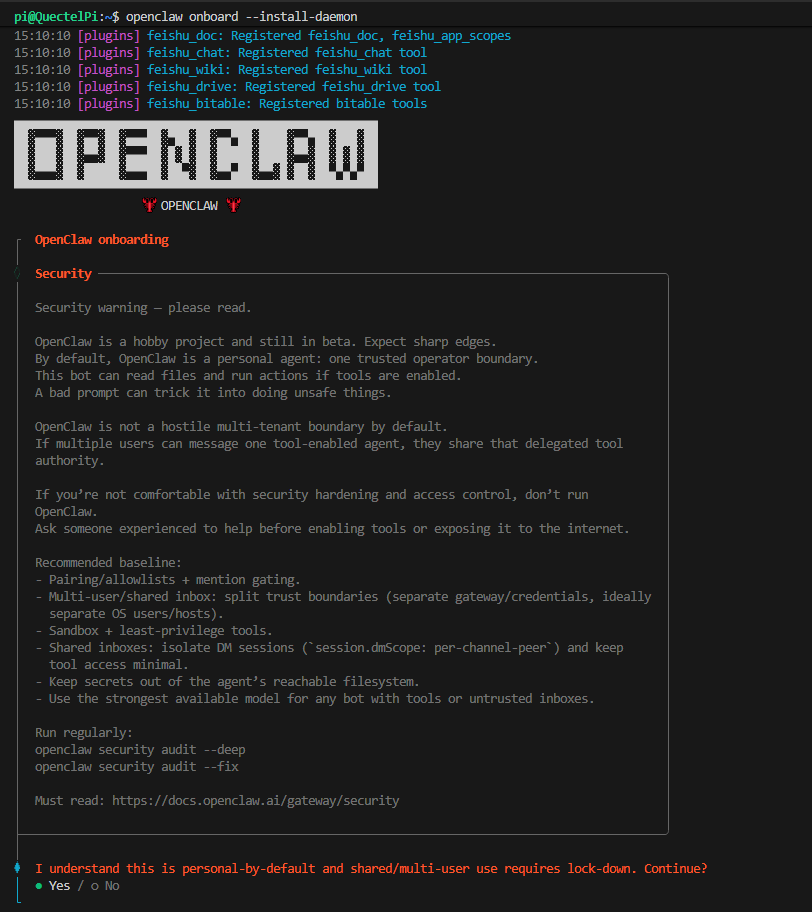
After the first installation, the configuration wizard process must be completed; otherwise, OpenClaw cannot run normally. Execute the following command to start the configuration wizard and install the gateway daemon:
openclaw onboard --install-daemon
The gateway daemon (launchd/systemd user service) ensures that OpenClaw runs in the background.
Configuration Wizard Screenshots (For Reference Only)
1.Enter the installation confirmation interface, select [Yes] and press Enter;
2.In the [Onboarding mode] option, select [QuickStart];

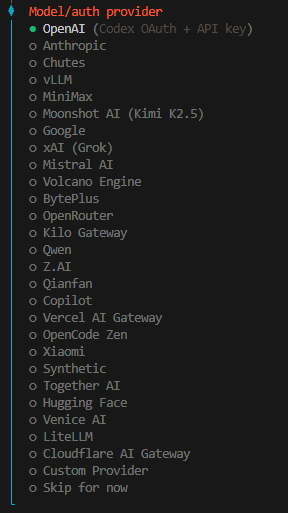
3.In the [Model/auth provider] option, select [Qwen] and press Enter;
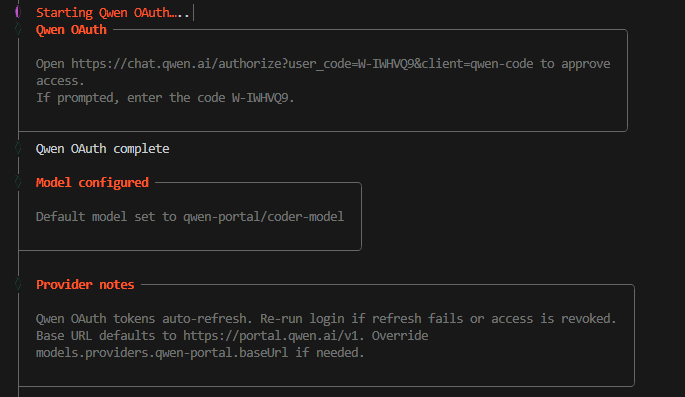
4.Open the specified website to log in to the qwen-code platform and complete identity authentication;
After configuration is complete, restart the gateway to make the configuration take effect:
openclaw gateway restart
Integrate with Feishu
Install Feishu Plugin
Feishu Plugin Repository:https://github.com/m1heng/clawdbot-feishu?tab=readme-ov-file#english
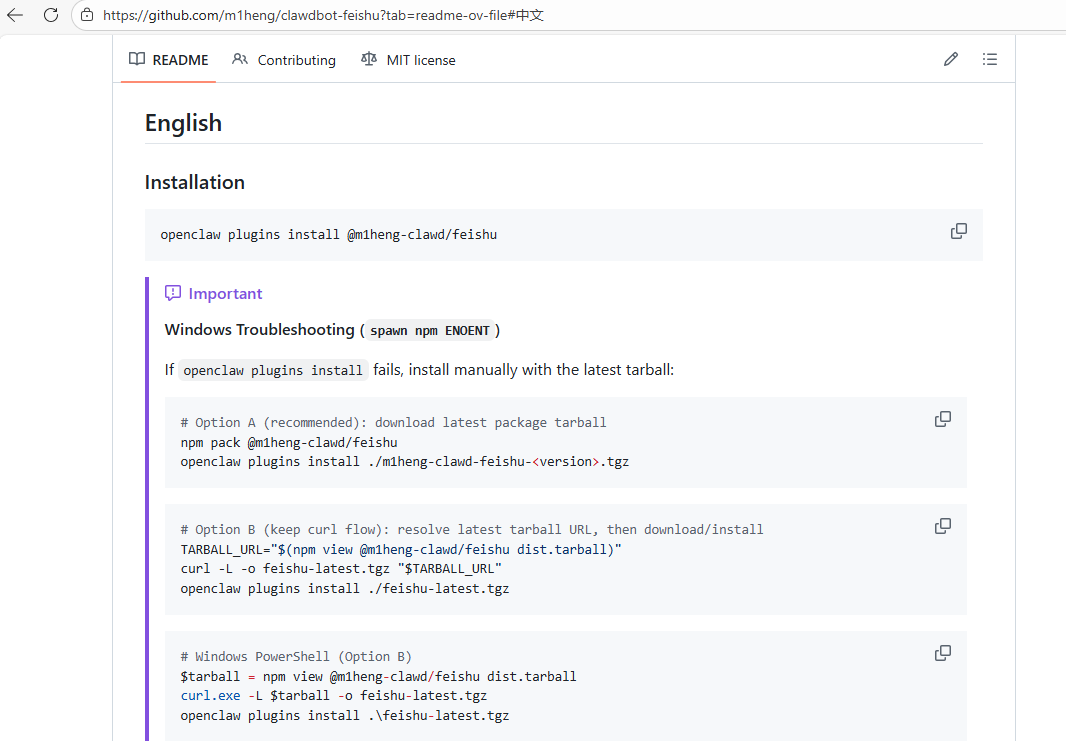
Execute the following command to install the Feishu plugin:
openclaw plugins install @m1heng-clawd/feishu
If the plugin is already installed, upgrade to the latest version with the following command:
openclaw plugins update feishu
Create a Feishu Application
- Log in to the Feishu Open Platform Developer Background:
Feishu (China):https://open.feishu.cn/app
Lark (International Version):https://open.larksuite.com/app
- Select to create an 「In-house Enterprise Application」;
- Complete basic application information, including application name, application description, etc.;
- Enter the 「Application Capabilities」 page from the left menu bar, click 「Add Application Capability」, and enable the 「Bot」 capability;
- Enter the 「Credentials and Basic Information」 page, record and securely save the application's AppID and App Secret (required for subsequent plugin configuration).
Configure the Plugin
Execute the following commands in the terminal command line, replace appId and appSecret in the commands with the actual parameters obtained in the above steps to complete the basic configuration of the Feishu plugin:
openclaw config set channels.feishu.enabled true --json
openclaw config set channels.feishu.appId "cli_xxxxx"
openclaw config set channels.feishu.appSecret "your_app_secret"
Configure Permissions
Enter the 「Permission Management」 page of the Feishu Open Platform application background, and configure the following permissions for the application (divided into required permissions and optional permissions):
Required Permissions
| Permission | Scope | Description |
|---|---|---|
im:message |
Messaging | Send and receive messages |
im:message.p2p_msg:readonly |
DM | Read direct messages to bot |
im:message.group_at_msg:readonly |
Group | Receive @mention messages in groups |
im:message:send_as_bot |
Send | Send messages as the bot |
im:resource |
Media | Upload and download images/files |
Optional Permissions
| Permission | Scope | Description |
|---|---|---|
contact:user.base:readonly |
User info | Get basic user info (required to resolve sender display names for speaker attribution) |
im:message.group_msg |
Group | Read all group messages (sensitive). Required when you want requireMention: false to work for non-@ group messages |
im:message:readonly |
Read | Get message history |
im:message:update |
Edit | Update/edit sent messages |
im:message:recall |
Recall | Recall sent messages |
im:message.reactions:read |
Reactions | View message reactions |
Configure Events and Callbacks
In the Feishu Open Platform application background, enter the 「Events and Callbacks」 page and complete the following configurations:
- Event Configuration Method
- Receive events using long connection — corresponding to
connectionMode: "websocket"(recommended, no public network address required) - Receive events using request address — corresponding to
connectionMode: "webhook"(requires a publicly accessible URL)
- Receive events using long connection — corresponding to
- Click 「Add Event Subscription」 and check the following necessary events:
| Event | Description |
|---|---|
im.message.receive_v1 |
Receive messages (required) |
im.message.message_read_v1 |
Message read receipts |
im.chat.member.bot.added_v1 |
Bot added to group |
im.chat.member.bot.deleted_v1 |
Bot removed from group |
Publish and Test
1.Enter the 「Version Management and Release」 page of the Feishu Open Platform application background;
2.Create a new version and submit it for release review;
3.After the release review is approved, the application can be searched in the Feishu client to complete basic testing.
User Permission Approval and Exception Handling
When a Feishu user chats with the bot for the first time, the system will trigger permission verification, and the corresponding Pairing code will be displayed in the chat interface. Execute the following command in the terminal of the device where OpenClaw is deployed to complete user permission approval, after which the user can chat with the bot normally:
openclaw pairing approve feishu "Pairing code"
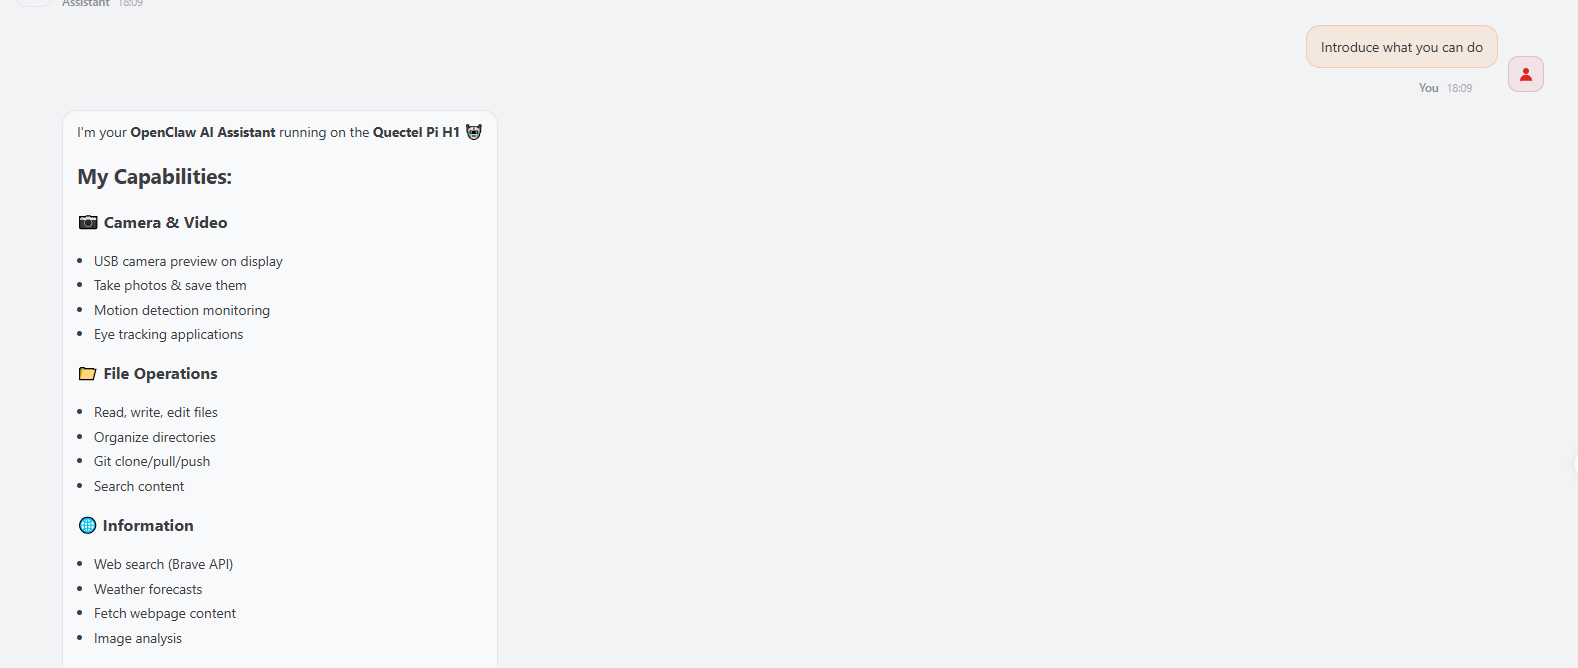
OpenClaw Function Demonstration
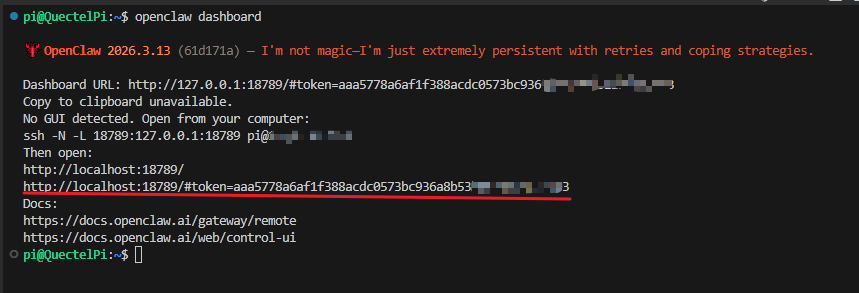
Execute the openclaw dashboard command in the terminal to view the access address of the OpenClaw Web management page.
Open-Source Project Deployment
1.After completing OpenClaw deployment, refer to the official open-source project deployment guide document to complete the deployment configuration of the corresponding Demo environment;
2.Run the Demo sample program to verify whether the basic functions of the Demo configured through OpenClaw are normal.

Effect Screenshots:
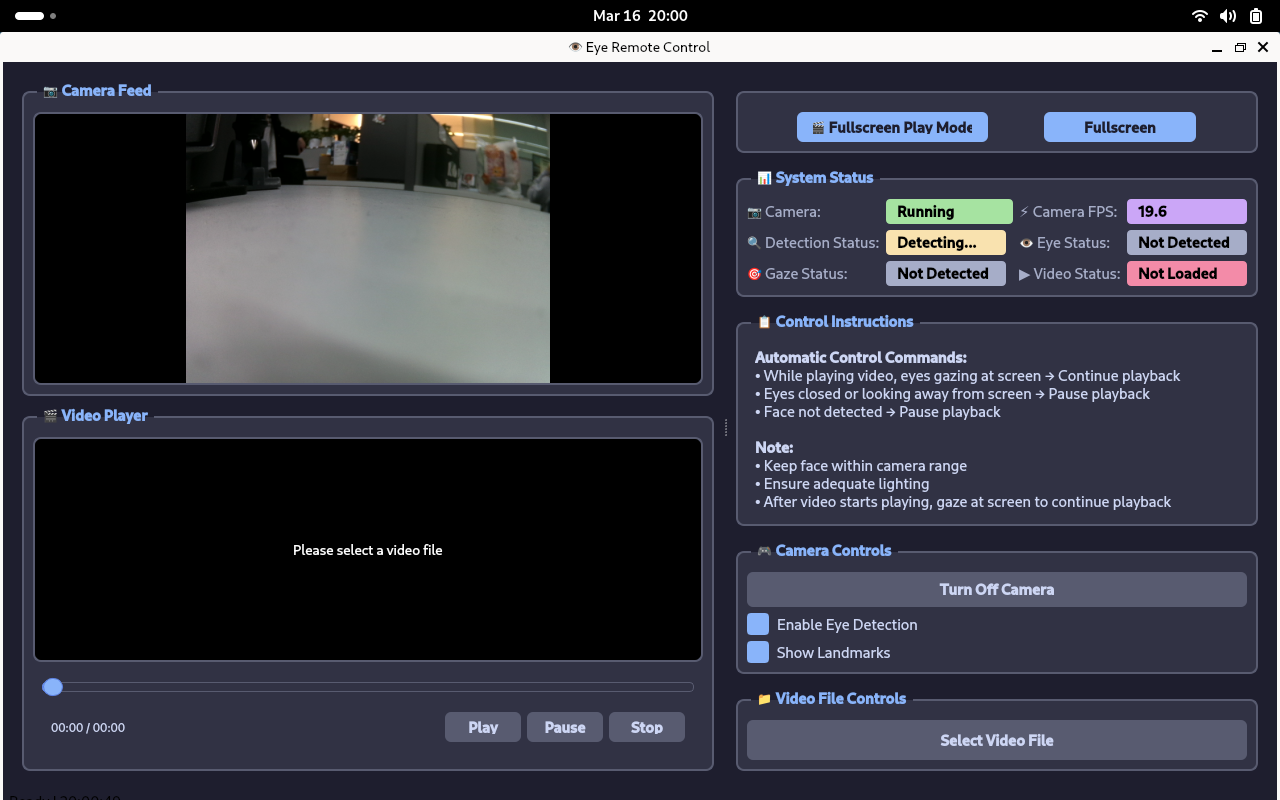
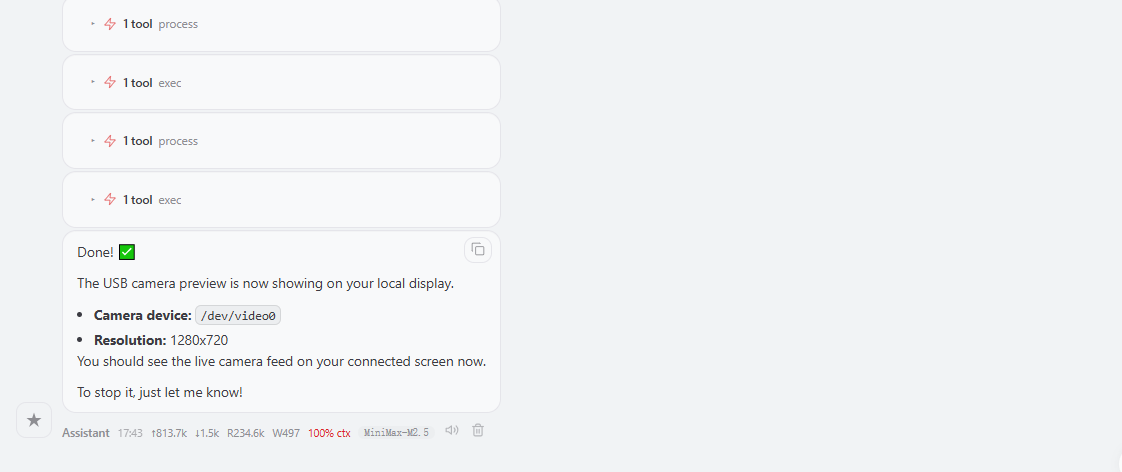
Control Peripherals
Send conversation instructions through the OpenClaw Web control page, and after a short wait, the real-time preview screen of the USB camera can be seen on the external display.