
OpenCV
This guide systematically introduces how to integrate and use OpenCV (Open Source Computer Vision Library) on the Android platform for computer vision application development. It aims to provide developers with a clear practical path to quickly and smoothly deploy and apply OpenCV's powerful visual functions in Android projects.
Introduction
Android OpenCV is a ported version for the Android platform, specifically designed to support computer vision (CV) and machine learning (ML) development on mobile devices. It supports multiple programming language interfaces including Java, C++, and Python. On the Android platform, OpenCV provides rich image processing and computer vision functions, enabling developers to easily implement complex tasks such as human face detection, object recognition, image tracking, and liveness detection.
Core features
Cross-platform: OpenCV supports Windows, Linux, macOS, iOS and Android.
Full functionality: Covers everything from basic image processing to advanced machine learning and deep learning algorithms.
High performance: The core is implemented in efficient C/C++. It provides a Java interface for Android via JNI (Java Native Interface) technology, ensuring high execution efficiency on mobile devices.
Main application areas include smart security, medical image processing, industrial quality inspection, auto driving, and mobile identity authentication and smart interaction.
Preparation
Before starting to integrate OpenCV, please ensure your development environment meets the following requirements.
System and environment requirements
Operating system: Windows, macOS or Linux.
Development tools: Android Studio (latest stable version recommended). Early OpenCV examples may be based on Eclipse, but current development mainly uses Android Studio.
Android SDK and NDK: Downloaded and configured in Android Studio. Some advanced features (such as native C++ development) require NDK.
Java development Kit (JDK): Usually built-in or automatically configured by Android Studio.
OpenCV library acquisition
You need to download the SDK package for Android from the official OpenCV website.
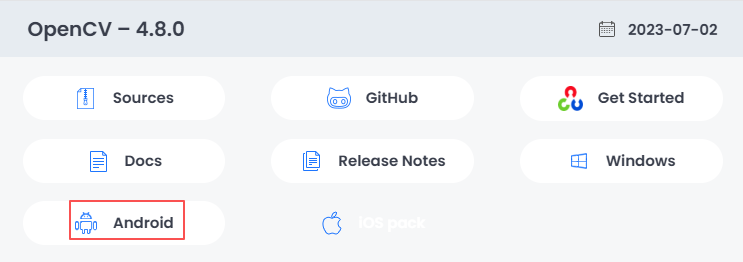
Visit OpenCV official release page.
Select the latest or a specific version of OpenCV, download the "Android" compressed package, save and extract it locally. Here we use 4.8.0 as an example:
SDK main directory structure description:
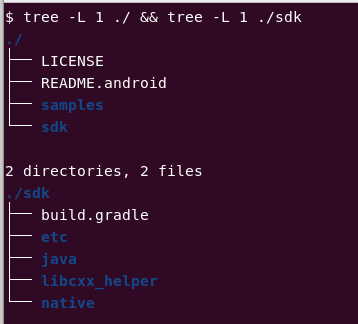
| Directory | Description |
|---|---|
| README.android | OpenCV Android documentation |
| samples/ | Sample application code, excellent learning resources |
| sdk/build.gradle | Core build configuration file for Android projects (based on Gradle build system) |
| sdk/etc/ | Resource directory for preset data and model files |
| sdk/java/ | Core Java library, containing Android Studio module files that will be imported as library modules into the project |
| sdk/libcxx_helper/ | C++ header files, used for JNI and native C++ development |
| sdk/native/ | Contain C++ header files for JNI and native C++ development Native libraries contain pre-compiled library files for different CPU architectures (such as armeabi-v7a, arm64-v8a, and x86) |
Installation steps
The following are two mainstream methods for integrating OpenCV in Android Studio projects.
Import local SDK module (traditional method)
This method directly integrates the OpenCV library source code and native libraries into your project.
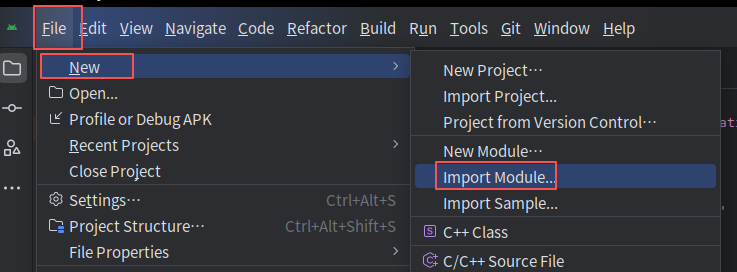
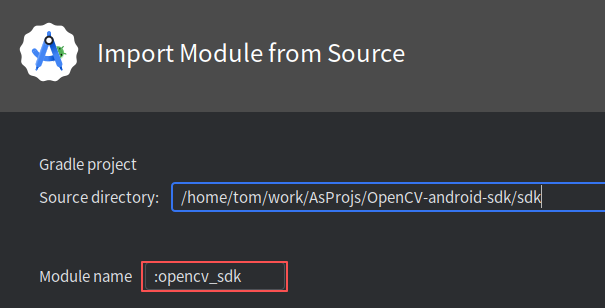
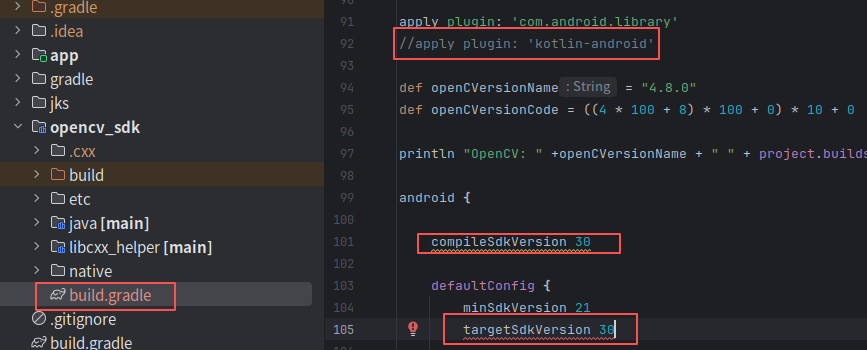
Import module: In Android Studio, select File -> New -> Import Module..., browse and select the sdk directory in the decompressed OpenCV SDK, here specify Module Name as opencv_sdk.
Modify the build.gradle file of opencv_sdk:
- Modify the sdk version in the build.gradle file to match the sdk version in the app's build.gradle.
- Comment the 'kotlin-android' plugin.
- Recompile successfully.
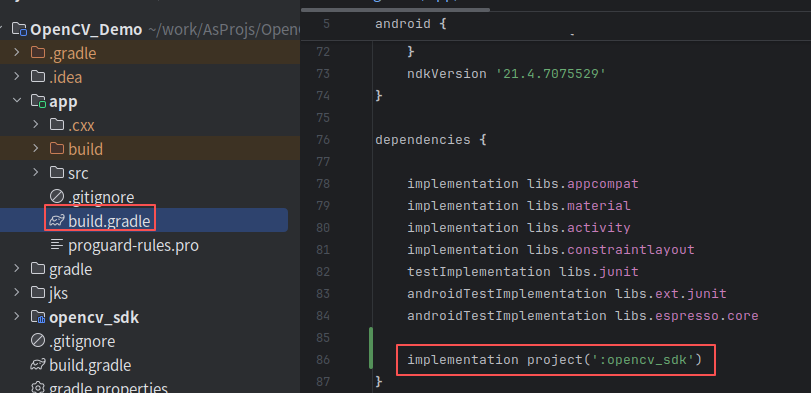
Add module dependency: Open the build.gradle file of your App module, and add the dependency on the OpenCV module in the dependencies block: implementation project(':opencv_sdk').
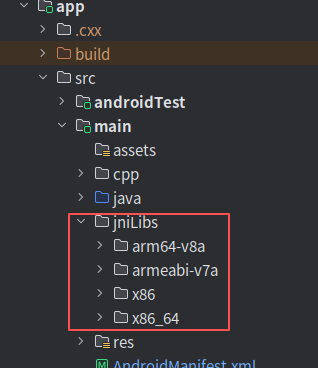
Copy native libraries: Create a jniLibs folder under the main directory of your App module (if it doesn't exist). Copy all subdirectories (such as arm64-v8a) from OpenCV-android-sdk/sdk/native/libs to the jniLibs directory.
Synchronize configuration: Ensure that version numbers of compileSdkVersion, minSdkVersion, etc. in the build.gradle file of the imported OpenCV module are consistent with your App module.
Via Maven dependency (recommended, convenient)
Starting from OpenCV 4.5.1, official Maven repository support is available, which is the most convenient integration method.
Add dependency: In the dependencies block of your app module's build.gradle file, add:
// Replace 4.x.x with the latest version number or a specified version number
implementation 'org.opencv:opencv-android:4.x.x'
Synchronize project: Gradle will automatically download the corresponding OpenCV Java library and native libraries from the Maven repository.
Function usage
The following contents introduce the usage method with the example of real-time conversion of camera stream to grayscale images.
Permission addition
Add permissions in the AndroidManifest.xml file of the app module:
 <uses-permission android:name="android.permission.CAMERA" />
    <uses-feature
        android:name="android.hardware.camera"
        android:required="true" />
    <uses-feature
        android:name="android.hardware.camera.autofocus"
        android:required="false" />
    <uses-permission android:name="android.permission.WRITE_EXTERNAL_STORAGE" />
Create a new DemoActivity and implement the real-time camera stream grayscale conversion function:
activity_demo.xml:
<?xml version="1.0" encoding="utf-8"?>
<androidx.constraintlayout.widget.ConstraintLayout xmlns:android="http://schemas.android.com/apk/res/android"
    xmlns:app="http://schemas.android.com/apk/res-auto"
    xmlns:tools="http://schemas.android.com/tools"
    android:id="@+id/main"
    android:layout_width="match_parent"
    android:layout_height="match_parent"
    tools:context=".DemoActivity">

    <org.opencv.android.JavaCameraView
        android:id="@+id/javaCameraView"
        android:layout_width="match_parent"
        android:layout_height="match_parent"
        app:camera_id="back"
        app:show_fps="true" />

</androidx.constraintlayout.widget.ConstraintLayout>
DemoActivity.java:
public class DemoActivity extends CameraActivity implements CameraBridgeViewBase.CvCameraViewListener2 {

    private static final String TAG = "opencvDemo";
    private JavaCameraView javaCameraView;

    @Override
    protected void onCreate(Bundle savedInstanceState) {
        super.onCreate(savedInstanceState);
        setContentView(R.layout.activity_demo);
        ViewCompat.setOnApplyWindowInsetsListener(findViewById(R.id.main), (v, insets) -> {
            Insets systemBars = insets.getInsets(WindowInsetsCompat.Type.systemBars());
            v.setPadding(systemBars.left, systemBars.top, systemBars.right, systemBars.bottom);
            return insets;
        });

        javaCameraView = findViewById(R.id.javaCameraView);
        javaCameraView.setVisibility(SurfaceView.VISIBLE);
        javaCameraView.setCvCameraViewListener(this);
    }

    @Override
    public void onPause() {
        super.onPause();
        if (javaCameraView != null) {
            javaCameraView.disableView();
        }
    }

    @Override
    public void onResume() {
        super.onResume();
        if (!OpenCVLoader.initDebug()) {
            OpenCVLoader.initAsync(OpenCVLoader.OPENCV_VERSION, this, baseLoaderCallback);
        } else {
            baseLoaderCallback.onManagerConnected(LoaderCallbackInterface.SUCCESS);
        }
    }

    private final BaseLoaderCallback baseLoaderCallback = new BaseLoaderCallback(this) {
        @Override
        public void onManagerConnected(int status) {
            switch (status) {
                case LoaderCallbackInterface.SUCCESS: {
                    javaCameraView.enableView();
                }
                break;
                default:
                    super.onManagerConnected(status);
                    break;
            }
        }
    };

    @Override
    protected List<? extends CameraBridgeViewBase> getCameraViewList() {
        List<CameraBridgeViewBase> list = new ArrayList<>();
        list.add(javaCameraView);
        return list;
    }

    @Override
    public void onCameraViewStarted(int width, int height) {
    }

    @Override
    public void onCameraViewStopped() {
    }

    @Override
    public Mat onCameraFrame(CameraBridgeViewBase.CvCameraViewFrame inputFrame) {
        return inputFrame.gray();
    }
}
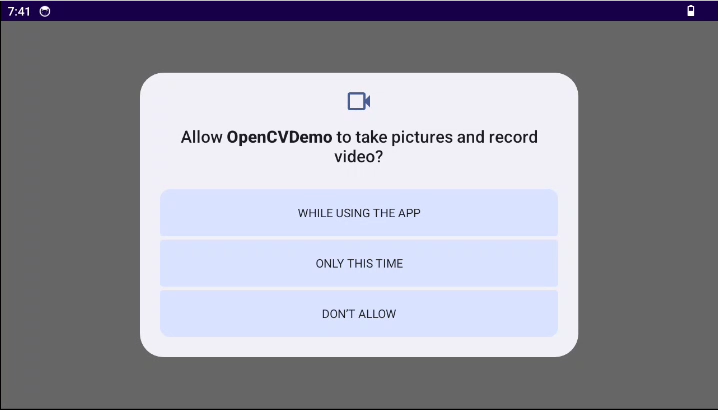
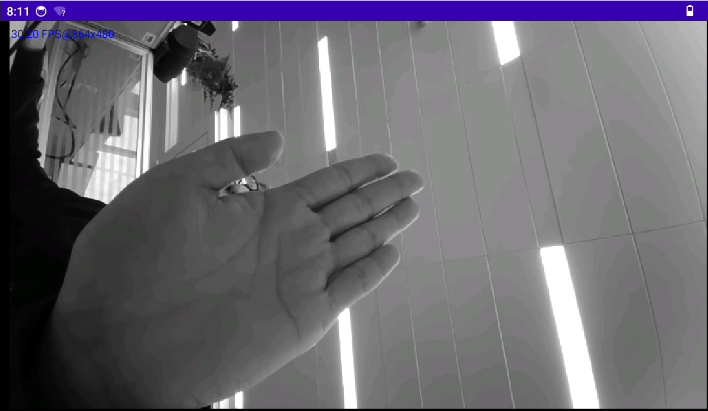
In MainActivity, it will automatically jump to DemoActivity after the permission is granted:
Common issues
| Issue | Possible cause |
|---|---|
| Error: Your build is currently configured to use incompatible Java 21.0.7 and Gradle 5.6.4. Cannot sync the project | In File > Settings > Build, Execution, Deployment > Build Tools > Gradle, modify Gradle JDK to Java11. |
| Initialization failed (onManagerConnected returns error) | 1. Check if the jniLibs directory structure is correct. 2. Specify abiFilters in the ndk block of build.gradle. 3. Ensure the test device has installed the required version of OpenCV Manager, or switch to static initialization. |
| Cannot find libopencv_java.so | Confirm that the .so files have been correctly copied to the subdirectories under app/src/main/jniLibs/. |
| Black screen or crash of camera preview | 1. Dynamically request and check permissions. 2. Ensure the camera is properly released in onPause(). 3. Set appropriate camera preview size in the surfaceChanged callback. |
| Link errors when using imread and other functions | Certain GUI functions that only exist on desktop platforms are not supported on mobile. Avoid using imshow on Android. To read images, use Bitmap and Utils.bitmapToMat conversion; for display, use Android's ImageView. |
| Excessive application size | Native libraries for all CPU architectures are integrated. Use ndk.abiFilters in build.gradle to only package library files for target device architectures (such as arm64-v8a). |
| Slow running speed | 1. Move image processing logic to background threads (such as AsyncTask or thread pools). For complex operations, consider using OpenCV's C++ native code implementation for optimal performance. 2. Combine on-board NPU and GPU capabilities for acceleration (if available). |
Advanced suggestions
Start with examples: The samples directory included in the OpenCV Android SDK is an excellent learning resource, covering various scenarios from basic camera operations to human face detection and color tracking.
Mixed use of Java and C++: For core algorithms with high performance requirements, C++ code can be called through JNI. OpenCV provides complete native/JNI support.
Pay attention to the DNN module: OpenCV's DNN module allows efficient execution of deep learning models (such as YOLO, MobileNet SSD) on mobile devices, which is key to implementing modern computer vision applications (such as object recognition, liveness detection).