

 English
FC41D Firmware Download&Upgrade Guide
Introduction
This document introduces how to download the module firmware, perform OTA upgrade and related function verification on Quectel FC41D module.
NOTE
For details about the AT commands mentioned in this document, see *document[1]*.
Environment Preparation
Hardware Environment
FC41D module × 1, FC41D-TE-B × 1
External antenna × 1: The FC41D-TE-B includes a built-in PCB antenna. If the current network environment is simple or the communication distance is short, an external antenna is not required.
Micro-USB Cable × 2: Used for connecting the FC41D-TE-B to the PC to view debugging information and download the module firmware.
AP router: Used for OTA upgrade and function verification.
Windows system PC × 1
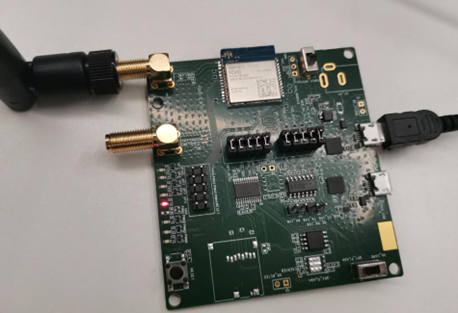
The connection is as follows:
Connect the main UART of FC41D-TE-B: Connect the main UART to the PC through the micro-USB cable, that is: PC USB port ---> Micro-USB cable ---> FC41D-TE-B. After the connection is successful, the module firmware download and AT command communication can be performed through the main UART. For the module firmware download, the baud rate of the main UART is set to 921600 bps. For the AT command communication, the baud rate of the main UART is set to 115200 bps.
Connect the debug UART of FC41D-TE-B: Connect the debug UART to the PC through the micro-USB cable, that is: PC USB port ---> Micro-USB cable ---> FC41D-TE-B. After the connection is successful, the debugging information can be viewed through the debug UART. The debug UART baud rate of R03A04 and later versions is set to 921600 bps, and the baud rate of versions before R03A04 is set to 115200 bps.
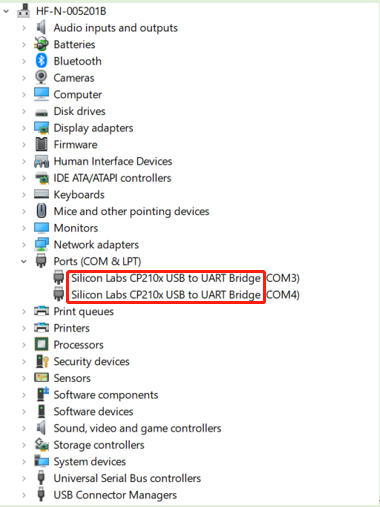
Once the FC41D-TE-B is successfully connected to the PC, open "Device Manager" → "Ports (COM & LPT)" on the PC to view the port information, as shown in the following figure:
If the serial port driver is not installed on the PC and the port information is not displayed in "Device Manager", you have two options:
Install Driver Genius, which will be automatically installed upon downloading, or
Contact Quectel Technical Support to obtain a driver compressed package.
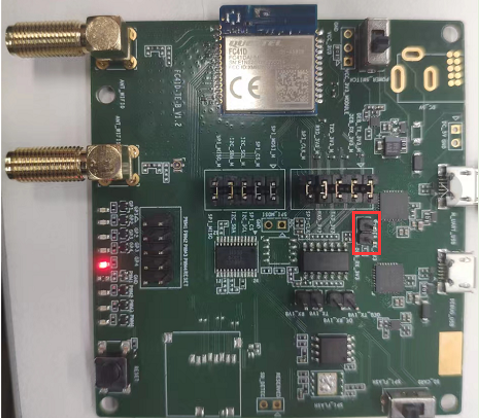
Before connecting to the FC41D-TE-B, remove the jumper cap from the FC41D-TE-B (as shown below) to prevent FC41D-TE-B into ATE mode.
Software Environment
The latest module firmware package with a suffix in .rbl, such as FC41DAAR03M03_OTA.rbl.
QCOM for OTA upgrade and function verification.
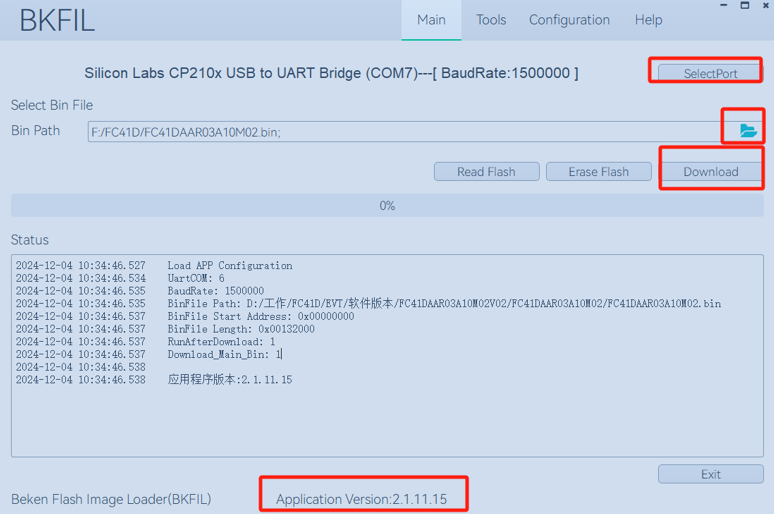
BKFIL (version 2.1.11.15 or higher) for the firmware download.
MyWebServer is a PC tool, which can be used directly without installation.
NOTE
- For how to use QCOM, see *document[2]*.
- You can contact Quectel Technical Support to obtain the latest module firmware package, MyWebServer tool package and BKFIL.
Firmware Download
This chapter mainly introduces how to download firmware of the module through the BKFIL tool (version 2.1.11.15 or higher). Specific steps are as follows:
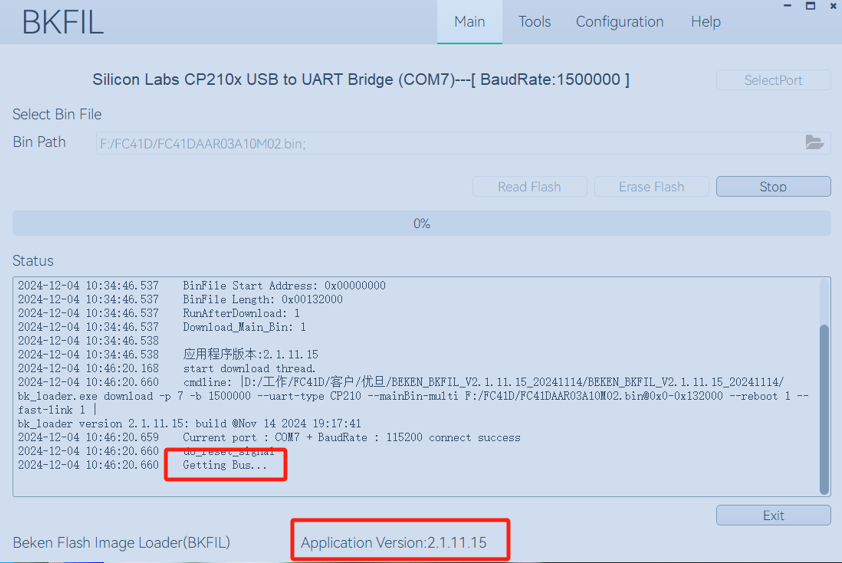
Open the BKFIL tool, click "SelectPort" to select the corresponding port from the drop-down list; then click the file icon, select the module firmware package file to be downloaded; then click "Download".
After "Getting Bus..." is displayed on the tool interface, press the RESET button on the FC41D-TE-B within 15 seconds. At this time, the tool interface displays the progress bar. When the progress bar displays "100%" and the character "DONE" appears below, it indicates that the module firmware is downloaded successfully.
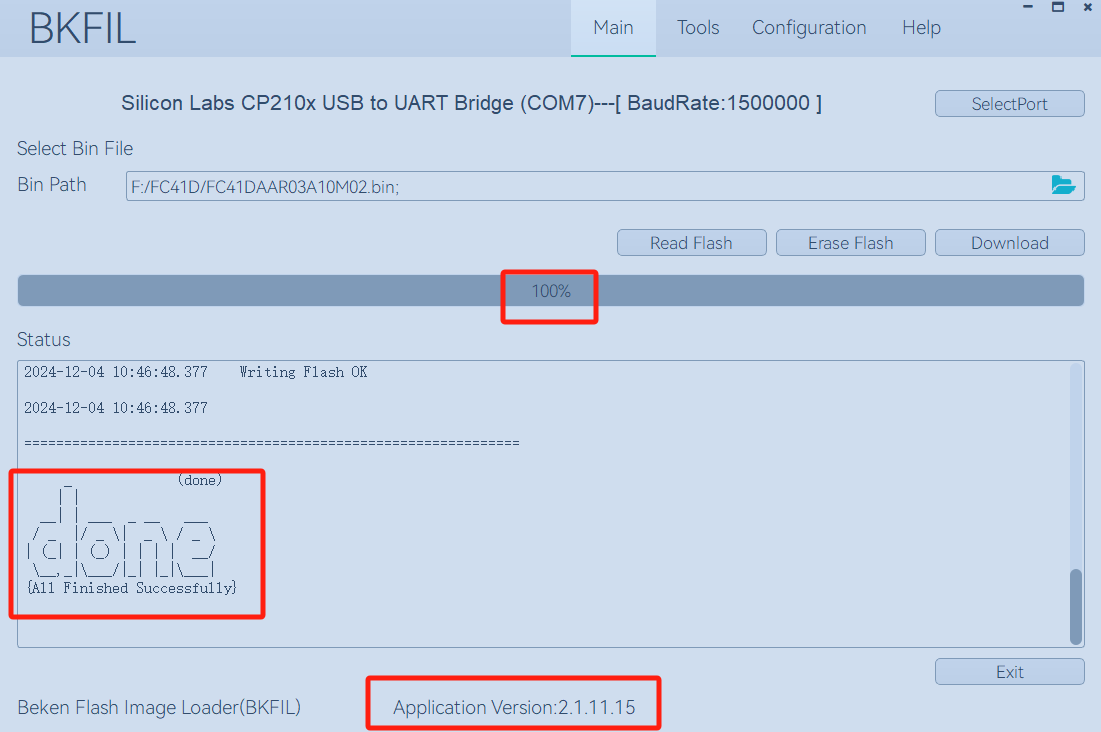
Once the module firmware is downloaded, press the RESET button on the FC41D-TE-B to reboot the module.
OTA Upgrade
This chapter takes the module working in STA mode as an example to introduce how to perform firmware OTA upgrade through the MyWebServer tool. Specific steps are as follows:
Connect the PC to the AP router, and follow the steps in *Chapter 5.1* to connect the module to the AP router, so that the module, AP router and PC are on the same LAN.
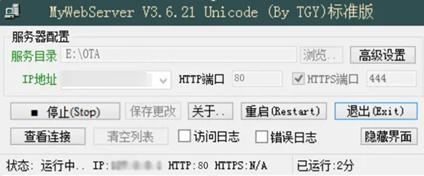
Use MyWebServer to set up the HTTP server. Open MyWebServer and click "浏览(Browse)..." Button) next to "服务目录(Service Directory)" to select the directory containing the firmware package to be downloaded as the Web service directory. Select the IP address of the PC from the drop-down list of IP Address. Enter "80" in the input box next to "HTTP Port" ( The module uses port 80 for OTA upgrade); Then click "启动(Start)" button (the button changes to "停止(Stop)" after you click on it) to set up the HTTP server.
Execute AT+QVERSION through QCOM to view the current module firmware version.

Execute AT+QWLANOTA=<URL> (<URL> is the address where the module firmware package is stored on the server) to start the OTA upgrade. Once the upgrade is completed, ready will be displayed in the tool window. You can execute AT+QVERSION again to view the upgraded module firmware version.


If the module firmware versions are different before and after the upgrade, the OTA upgrade of the module firmware is successful.
Function Verification
This chapter mainly introduces how to use the QCOM tool to enable the module's STA mode and network-related functions.
Enable STA Mode
This chapter explains how to enable the module's STA mode by using the example of the module connecting to the router AP hotspot named "quectel_test" with the password "12345678".
Execute AT+QECHO=1 through QCOM to enable echo function.
Execute AT+QSTADHCP=1 to enable DHCP service in STA mode.
Execute AT+QSTAAPINFO=<SSID>[,<pwd>] to set module to connect to the router AP hotspot to enable STA mode. For example, execute AT+QSTAAPINFO=quectel_test,12345678 to set module to connect the router AP hotspot named "quectel_test" with the password "12345678".
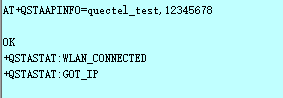
Execute AT+QSTAST to query the STA mode state. As shown in the figure below, STATION_UP indicates that STA mode is enabled.

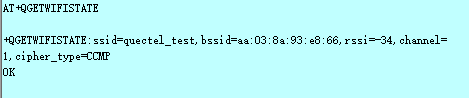
Execute AT+QGETWIFISTATE to query the connected hotspot.
Log in to the AP router background management interface and check whether there is a connected STA device (i.e. the module used for testing). If the module is connected, it means that the STA mode has been successfully enabled.
Verify Network-related Functions
This chapter takes the module working in STA mode as an example to introduce operational examples on how to implement the HTTP(S) function and MQTT function. Before using the HTTP(S) and MQTT functions, you need to ensure that the module is connected to the AP router.
HTTP(S) Function
This chapter introduces how to implement the HTTP(S) function for reference.
HTTP(S) GET
//Example: Send a HTTP(S) GET request.
//Step 1: Configure URL
AT+QHTTPCFG="url","http://www.example.com" //The URL is for reference only.
OK
//Step 2: Send GET request
AT+QHTTPGET=120 //Open web.
OK

+QHTTPGET: 0,200
//Step 3: Read the response data
AT+QHTTPREAD=60 // Read the response data.
CONNECT
<html>
<head>
    <script>
        location.replace(location.href.replace("https://","http://"));
    </script>
</head>
<body>
  <noscript><meta http-equiv="refresh" content="0;url=http://www.example.com/">
......................
OK

+QHTTPREAD: 0
HTTP(S) POST
//Example: Send a HTTP(S) POST request.
//Step 1: Configure URL
AT+QHTTPCFG="url","http://192.0.2.2:8252/study_log/" //The URL is for reference only.
OK
//Step 2: Send POST request
AT+QHTTPPOST=1024,120,120,"file","test.txt","text/plain" //Upload Form-data file in POST mode.

CONNECT
//Input body. When the length of inputted data reaches <body_length>, the module exits data mode.
OK

+QHTTPPOST: 0,200,1538
//Step 3: Read the response data
AT+QHTTPREAD=60 //Read the response data.
CONNECT
<html>
<head>
......................
OK

+QHTTPREAD: 0
HTTP(S) PUT
//Example: Send a HTTP(S) PUT request.
//Step 1: Configure URL
AT+QHTTPCFG="url","http://192.0.2.2:8252/uploads/test.txt" //URL is for reference only.
OK
//Step 2: Send PUT request
AT+QHTTPPUT=1024,120,120 //Upload file in PUT mode.
CONNECT
//Input body. When the length of inputted data reaches <body_length>, the module exits data mode.
OK

+QHTTPPUT: 0,200,1538
//Step 3: Read the response data
AT+QHTTPREAD=60 //Read the response data.
CONNECT
<html>
<head>
......................
OK

+QHTTPREAD: 0
//Customized header example
//Customize the parameter header: Range: bytes=x-x, to run the function of HTTP breakpoint download
AT+QHTTPCFG="header","Range","bytes=0-511"
OK
AT+QHTTPCFG="url","http://192.0.2.2:6023/1M.txt" //URL is for reference only.
OK
AT+QHTTPGET=60
OK

+QHTTPGET: 0,200,512
AT+QHTTPREAD=60 //Read the response data.
CONNECT
//Data
OK

+QHTTPREAD: 0
MQTT Function
This chapter outlines the operations related to MQTT function using the module accessing Alibaba Cloud as an example. The URL address "iot-06z00cn5d76w7p2.mqtt.iothub.aliyuncs.com" in the example below is provided for illustrative purpose only. Please replace it with a valid URL that corresponds to your server. For details about establishing an MQTT connection between FC41D module and Alibaba Cloud, please contact Quectel Technical Support.
Obtain MQTT Connection Parameters
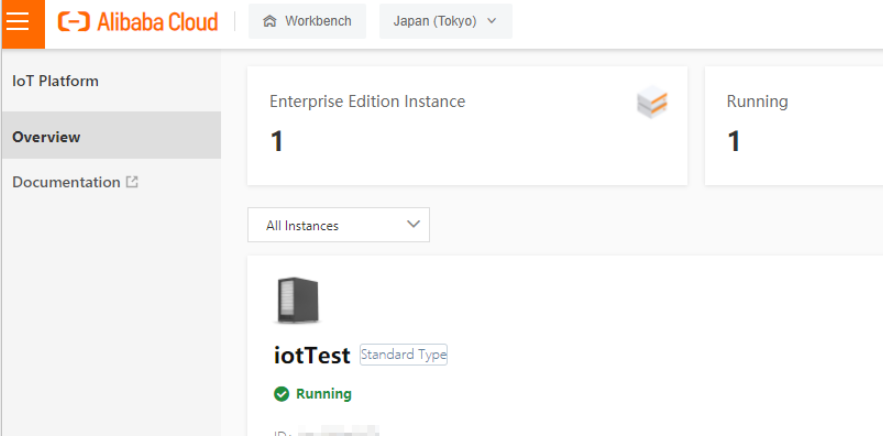
Once the module accesses Alibaba Cloud, go to the "Overview" page on Alibaba Cloud and click on the instance name to go to the "Instance Details" page.
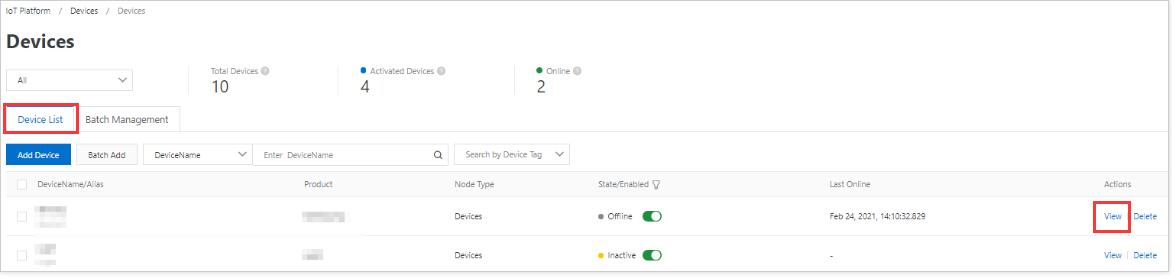
In the left-side navigation pane, choose "Devices" > "Devices" and the "Devices" page will appear. Select "Device List" tab and find the module in the device list, then click the corresponding "View" button to enter "Device Details" page.
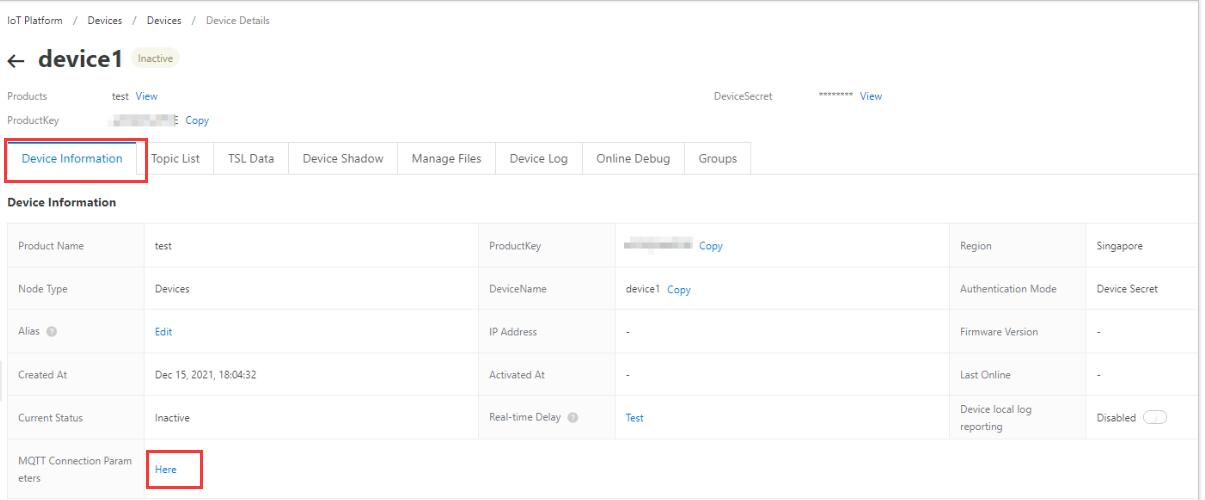
Click the "Here" button next to "MQTT Connection Parameters" in the "Device Information" column on "Device Details" page to obtain information such as mqttHostUrl and port.
Establish MQTT Connection
AT+QMTCFG="version",1,4 //Set MQTT protocol version to V4.
OK
AT+QMTCFG="session",1,1 //Set MQTT protocol session type to 1. After the client disconnects, all subscribed topics will be removed.

OK
AT+QMTOPEN=1,"iot-06z00cn5d76w7p2.mqtt.iothub.aliyuncs.com",1883 //Open a session between MQTT client and server. iot-06z00cn5d76w7p2.mqtt.iothub.aliyuncs.com is the address of Alibaba Cloud and 1883 is the port of Alibaba Cloud.

OK

+QMTOPEN: 1,0 //MQTT session was opened successfully.
AT+QMTCONN=1,"123456|securemode=2,signmethod=hmacsha1,timestamp=1637040585820|","test&gkuv4sOiiTd","98E402743A92F2BF4840065F484D71C23A27674A" //Connect a client to MQTT server.

OK

+QMTCONN: 1,0,0 //The server accepted the connection. MQTT is connected.
Subscribe to Topic
AT+QMTSUB=1,1,"/gkuv4sOiiTd/test_quectel/user/update",1
OK

+QMTSUB: 1,1,0,0 //The topic is subscribed successfully.
Publish Topic
AT+QMTPUB=1,1,1,0,"/gkuv4sOiiTd/test_quectel/user/update",6,"123333"
OK

+QMTSUB: 1,1,0,0 //The topic is published successfully.
Appendix References
Related Documents
Related Documents:
| Document Name |
|---|
| 1. Quectel_FC41D&FCM100D&FCM140D&FCM740D&FLMx40D_AT_Commands_Manual |
| 2. Quectel_QCOM_User_Guide |
Terms and Abbreviations
Terms and Abbreviations:
| Abbreviation | Description |
|---|---|
| AP | Access Point |
| API | Application Programming Interface |
| ATE | Auto Test Equipment |
| DHCP | Dynamic Host Configuration Protocol |
| HTTP | Hypertext Transfer Protocol |
| HTTPS | Hypertext Transfer Protocol Secure |
| IP | Internet Protocol |
| MQTT | Message Queuing Telemetry Transport |
| OTA | Over-the-Air Technology |
| PC | Personal Computer |
| PCB | Printed Circuit Board |
| SDK | Software Development Kit |
| SPI | Serial Peripheral Interface |
| UART | Universal Asynchronous Receiver/Transmitter |
| URL | Uniform Resource Locator |
| USB | Universal Serial Bus |