

 English
HCM111Z QuecOpen® Quick Start Guide
Introduction
Quectel HCM111Z module supports QuecOpen® solution. This document is applicable to QuecOpen® solution based on SDK build environment. It is a quick start guide for HCM111Z module, outlining the SDK directory structure, compilation environment setup, application development, compilation process, firmware downloading, key codes and memory partition definition.
SDK Directory Structure
In the QuecOpen SDK released by Quectel, the SDK directories of different software versions may be slightly different, but there is no difference in functions. An example of the QuecOpen SDK directory on Windows operating systems is shown in the following table.
| Directory Name | Description |
|---|---|
| components | Stores fundamental functionality code |
| quectel_demo | Stores application demos for various functional tests |
| tools | Stores relevant software tools |
Compilation Environment Setup
Installing MinGW-W64 GCC-8.1.0
Steps for downloading and installing MinGW-W64 GCC-8.1.0 are as follows:
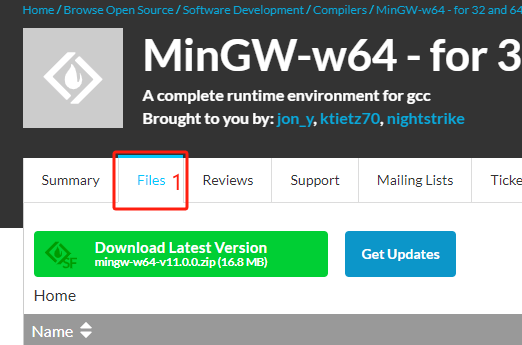
Visit https://sourceforge.net/projects/mingw-w64/ and click Files.
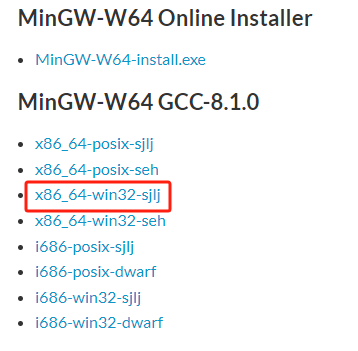
Scroll down the interface and click x86_64-win32-sjlj. The download will automatically start in 5 seconds.
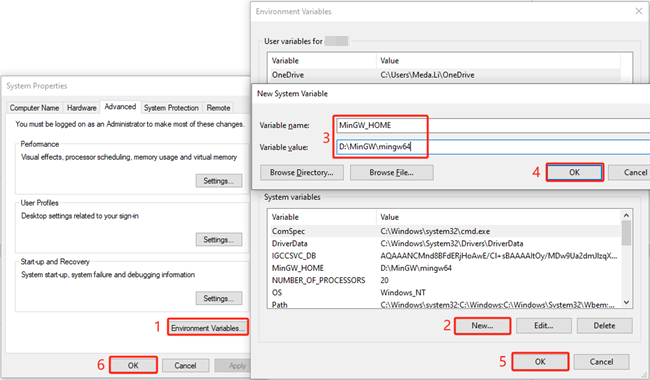
Unzip the downloaded package x86_64-8.1.0-release-win32-sjlj-rt_v6-rev0.7z, right-click This PC → Properties → Advanced system settings, and then follow the figure below to add environment variables.
a) Add the environment variable MinGW_HOME and set the variable value to local path D:\MinGW\mingw64:
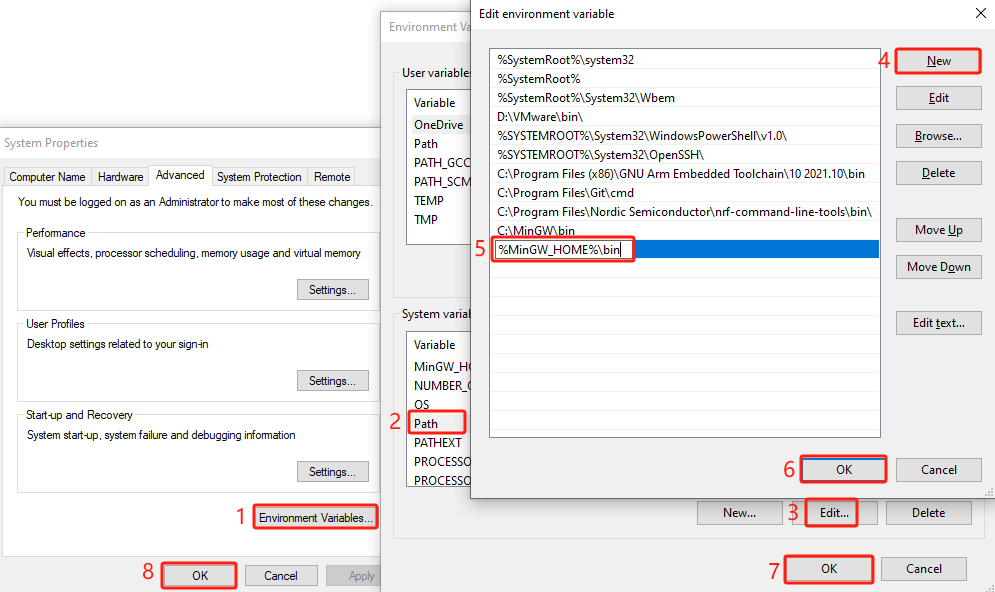
b) Add the environment variable %MinGW_HOME%\bin:
Installing gcc-arm-none-eabi-10.3-2021.10
The specific steps to download and install gcc-arm-none-eabi-10.3-2021.10 are as follows:
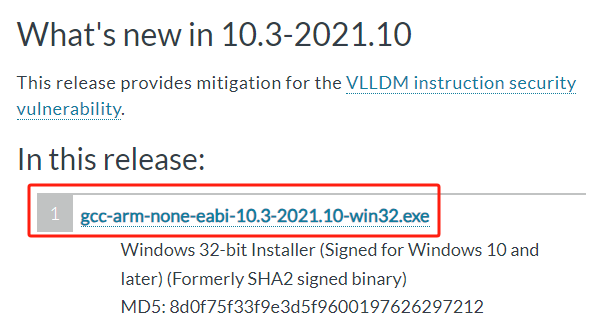
Visit https://developer.arm.com/downloads/-/gnu-rm and click gcc-arm-none-eabi-10.3-2021.10-win32.exe to download and follow the prompts to complete the installation.
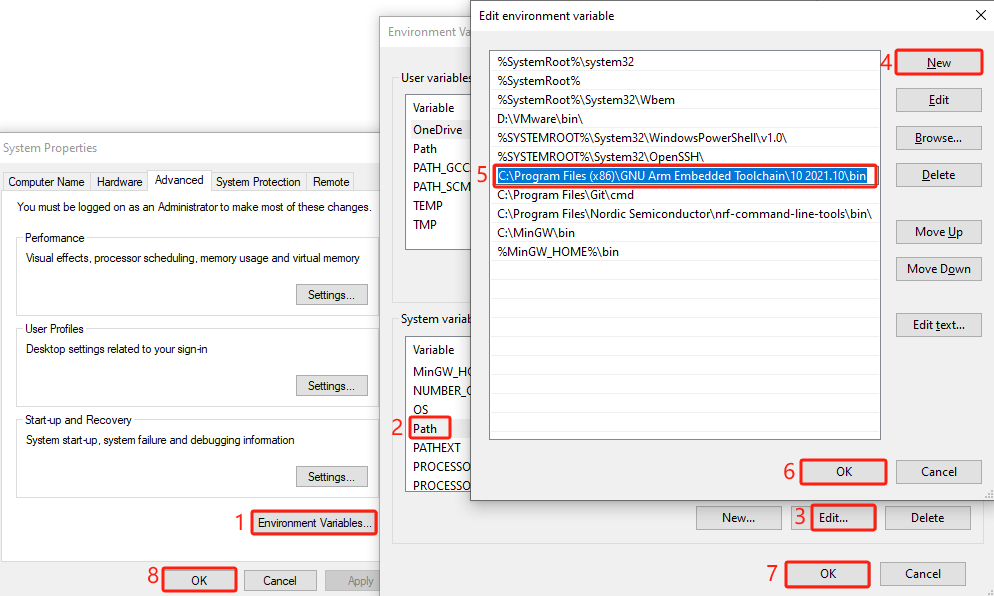
Right-click This PC → Properties → Advanced system settings, and then follow the figure below to add the environment variable C:\Program Files (x86)\GNU Arm Embedded Toolchain\10 2021.10\bin.
Application Development
Creating Application Directory
Create the required user folders (for storing source files and header files) in the QuecOpen SDK. For example, create user_code folder.

Create new inc and src folders in the user_code folder to store header files and source files.

Application Demo Description
QuecOpen SDK provides reference application demos for application development in the quectel_demo SDK directory.
Adding User Application
Creating Application Code
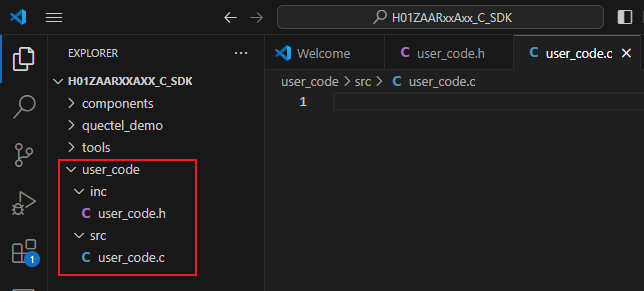
Create and write user_code.c and user_code.h files, and store them in the user_code/src and user_code/inc directories respectively.
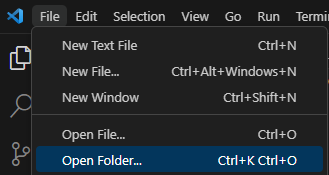
Open QuecOpen SDK with VS Code (File → Open Folder... → H01ZAARXXAXX_C_SDK).
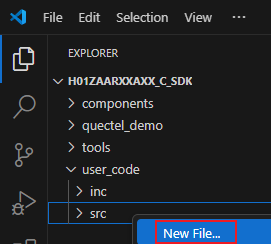
Right-click inc, then click New File to create user_code.h file.
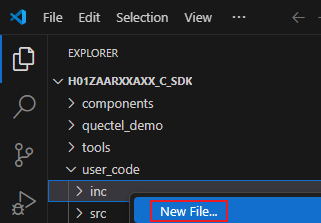
Right-click src, then click New File to create user_code.c file.
The page after creating the files is shown in the following figure.
Adding Compilation File
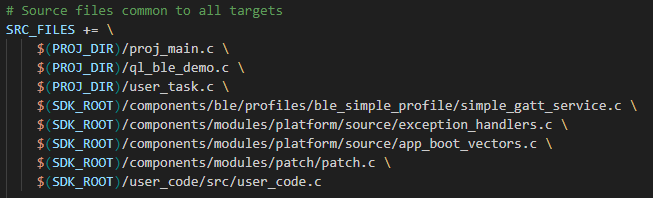
Open the makefile in the quectel_demo\ql_ble_peripheral_demo\gcc directory, and add source files according to the format shown in the following figure.
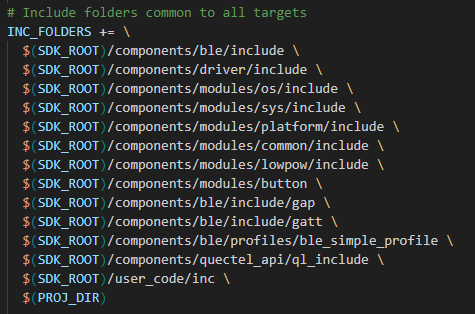
Add directories of header files according to the format shown in the following figure.
Application Compilation
Compilation Methods
There are two methods to compile the application, and you can choose between Command Line Window Compilation Method and VS Code Compilation Method based on your actual needs.
Command Line Window Compilation Method
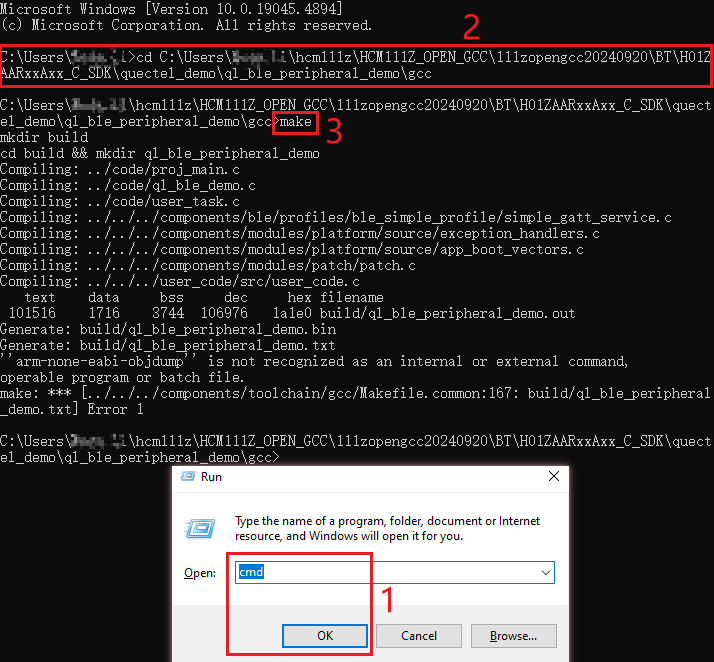
The steps for compiling using the command line window are as follows:
Press the WIN+R key to open the "Run" dialog box and type cmd, click OK to open cmd.exe;
Type cd
to go to the directory containing the makefile (H01ZAARXXAXX_C_SDK\quectel_demo\ql_ble_peripheral_demo\gcc); Type make and press the Enter key to start compiling.
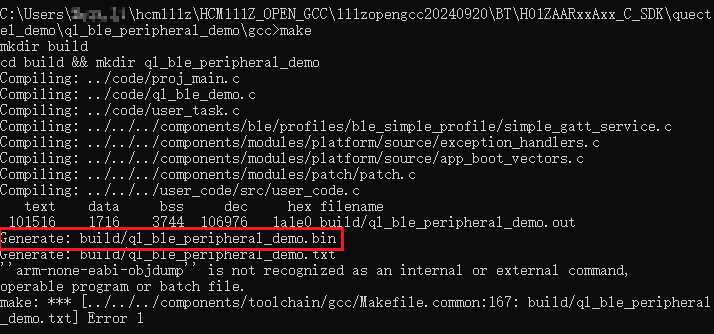
If a bin file is successfully generated, it indicates that the compilation was successful, as shown in the following figure.
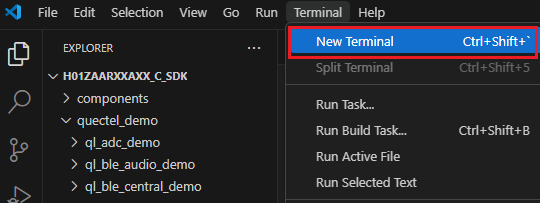
VS Code Compilation Method
The steps for compiling using VS Code are as follows:
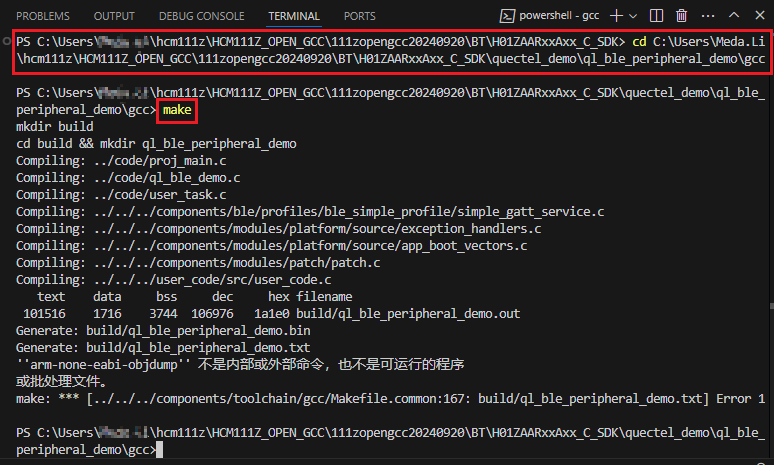
- Click New Terminal in the "Terminal" window;
- Type cd
to go to the directory where the makefile is located (H01ZAARXXAXX_C_SDK\quectel_demo\ql_ble_peripheral_demo\gcc); - Type make and press the Enter key to start compiling.
Compilation Result
The bin file will be generated in the quectel_demo\ql_ble_peripheral_demo\gcc\build directory after the compilation completed, as shown in the following figure.

Firmware Downloading
Before firmware downloading, the module needs to be connected to the PC via HCM111Z-TE-B, and then obtain the FreqChip_Download tool and Fr8010 OTA application in the SDK package H01ZAARxxAxx_C_SDK\tools directory. See Quectel_HCM111Z_TE-B_User_Guide for details on the use of HCM111Z-TE-B.
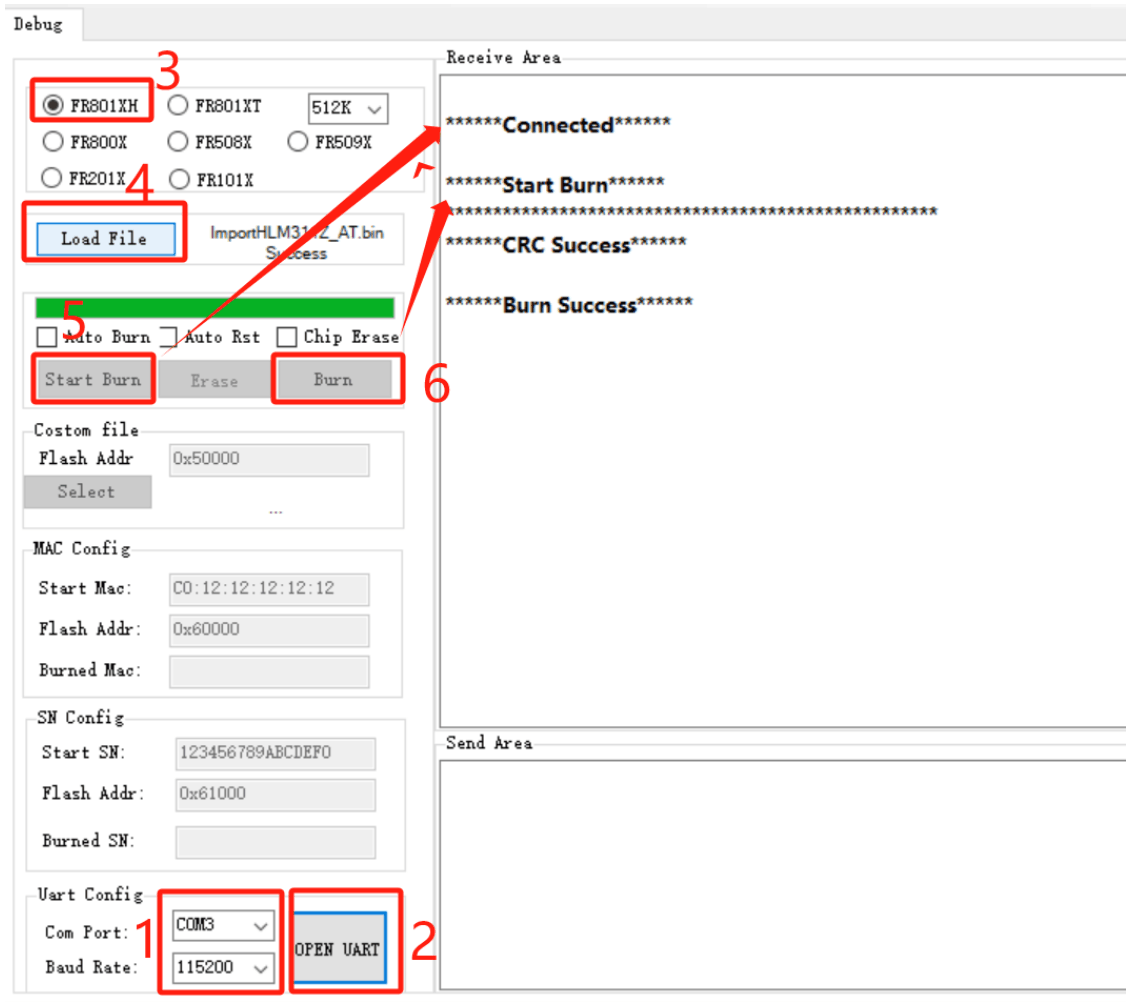
The module firmware can be downloaded through the FreqChip_Download tool, which can be run on a PC. The specific steps are as follows:
Select the target serial port, and set the baud rate to 115200.
Click OPEN UART button to open the target UART.
Select the chip model FR801XH.
Click Load File to select the bin file generated after compilation.
Click Start Burn and reset the module. If "Connected" is displayed in the right window as shown in the following figure, the tool is connected to the module successfully.
Click Burn. "Start Burn" is displayed in the right window to indicate the start of firmware downloading. Once the firmware is downloaded into the module successfully, "Burn Success" appears in the right window.
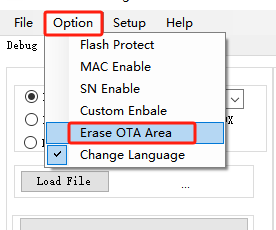
The firmware is downloaded into Application A partition through FreqChip_Download tool on a PC. You can also choose to perform the OTA upgrade using the Fr8010 OTA application on a mobile phone. If the two upgrade methods are used in combination, it is necessary to click Erase OTA Area from the "Option" menu in the FreqChip_Download tool to prevent invalid firmware downloading.
Key Codes Description
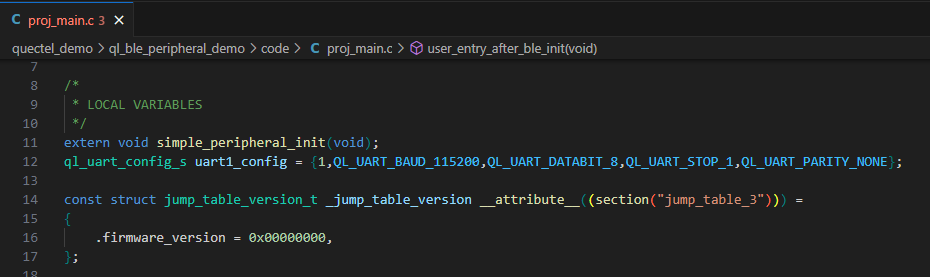
firmware_version
After the system starts up, the bootloader automatically decides to run either Application A partition or Application B partition based on the firmware_version value, giving priority to the partition with the higher firmware_version value.
When performing the OTA upgrade using the Fr8010 OTA application on a mobile phone, the Fr8010 OTA first obtains the firmware_version value of the currently running partition and increments this value by one before writing it to the other program partition (i.e., if the currently running program partition is Application A, it increments the firmware_version value by one and writes it to Application B) to ensure the success of the firmware update.
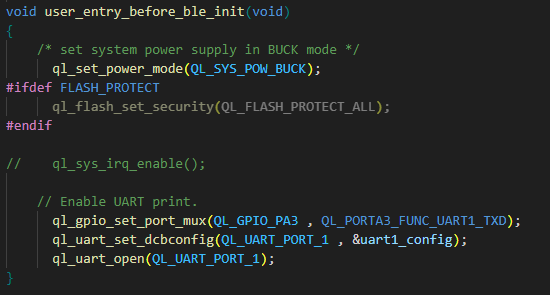
user_entry_before_ble_init
user_entry_before_ble_init() is the application entry function. You can initialize peripherals through this interface before initializing the Bluetooth protocol stack. However, you cannot perform Bluetooth-related operations with this function.
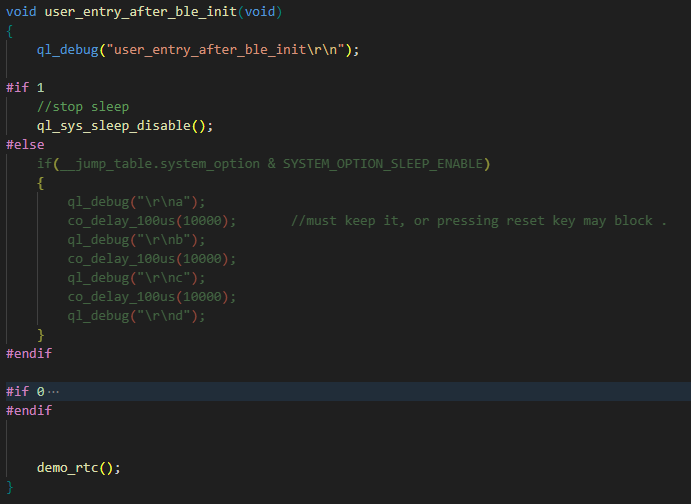
user_entry_after_ble_init
After initializing the Bluetooth protocol stack, you can call user_entry_after_ble_init() to initialize the peripherals or perform Bluetooth-related operations.
user_entry_before_sleep_imp
Before the module enters sleep mode, you can call user_entry_before_sleep_imp() to save application parameters and set wake-up pins. After the module enters sleep mode, non-PMU peripherals are deinitialized.

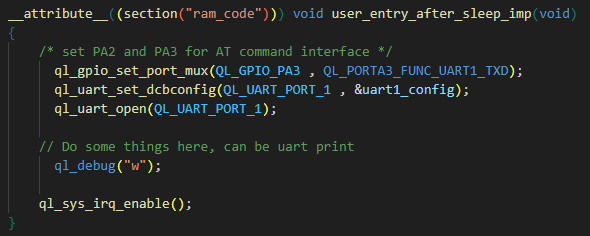
user_entry_after_sleep_imp
After the module wakes up from sleep mode, you can call user_entry_after_sleep_imp() to re-initialize the related peripherals.
Memory Partition Definition
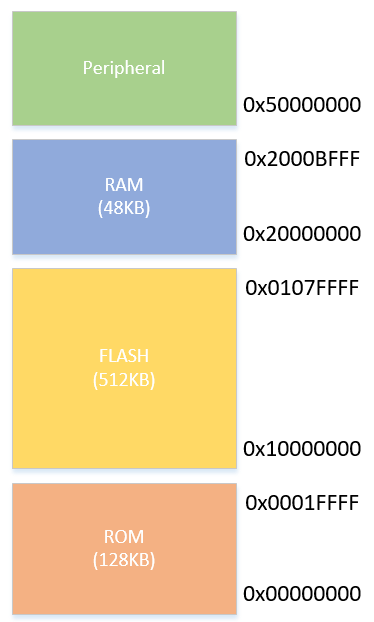
- ROM: Read only memory, which stores the boot code and part of the BLE controller protocol stack.
- RAM: Random access memory, which stores various variables, stacks, the remapped interrupt vector addresses and code that is sensitive to running speed (for example, interrupt response). This space supports low-power data retention feature.
- Peripheral: Peripheral address space stores peripheral register addresses and maps addresses for various peripherals, used for configuring peripherals.
- FLASH: The flash space, which stores user programs, upgrade backup areas, user data, and Quectel production test data.
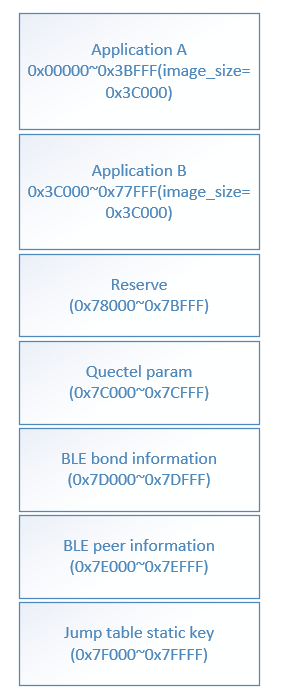
The size of user data and the upgrade backup area can be modified in the jump_table located in the code/proj_main.c file of the demo.

The default sizes of flash partitions are as follows. The sizes of the Application, OTA Backup and Reserve partitions can be adjusted as needed.
Appendix: Glossary
| Abbreviation | Description |
|---|---|
| API | Application Programming Interface |
| APP | Application |
| BLE | Bluetooth Low Energy |
| IoT | Internet of Things |
| OTA | Over-the-air programming |
| PC | Personal Computer |
| PMU | Power Management Unit |
| RAM | Random Access Memory |
| ROM | Read Only Memory |
| RTOS | Real-Time Operating System |
| SDK | Software Development Kit |